
Part 17 — How I Run My Entire Digital Life on a Raspberry Pi: Your Privacy-Preserving DNS Leaves Home Too — DoH, DoT, and a Pi-hole You Can Actually Take With You
Table of Contents
In Part 3, we built a privacy-respecting DNS fortress at home — Pi-hole blocking ads and trackers, DNSCrypt-Proxy encrypting every query leaving our network. It was beautiful. It was private. And the moment you stepped out the door, it was completely useless.
 Bring your private DNS with you — image generated via ChatGPT
Let’s be honest for a second. We spent a good chunk of Part 3 setting up the perfect local DNS resolver. Pi-hole sits on our LAN, DNSCrypt-Proxy encrypts everything upstream, and all our home devices live a blissfully ad-free, privacy-respecting life. Then you take your phone off Wi-Fi, step onto the street, open a webpage — and every single DNS query goes straight to your ISP’s resolver, unencrypted, logged, and potentially monetised. All that work, left behind on the kitchen table. You might set a private DNS on your phone to alleviate the issue, but then you reach back home again, and your phone does not send the queries anymore to your Pi.
It doesn’t have to be this way.
In this episode, we’ll take our Pi-hole setup and make it accessible from anywhere in the world — not via a plain old API call, but as an actual DNS resolver that your devices can use on the go. We’ll support two modern encrypted DNS protocols:
- DNS over HTTPS (DoH) — works on port 443, passes through every firewall on the planet, supported natively in browsers (specified in RFC 8484)
- DNS over TLS (DoT) — the native “Private DNS” option built into Android 9+ (specified in RFC 7858)
- DNS over QUIC (DoQ) — We’re not covering DNS over QUIC (DoQ, RFC 9250) in this post — adoption is still uneven and most clients don’t speak it yet — but it’s the protocol to watch.
And we’ll do it without Cloudflare tunnels, without giving away our traffic to a third party, and without opening raw port 53 to the public internet (which would be, to put it mildly, a terrible idea).
If you haven’t read Part 16 yet, I’d recommend a quick detour — we’ll be building on our nginx reverse proxy setup and the wildcard Let’s Encrypt certificate we set up there. If you’re already caught up, let’s get into it.
Why not just open port 53?
I know what you’re thinking. Pi-hole listens on port 53. Can’t we just port-forward 53 from the router to Pi-hole and call it done?
No. Please don’t do that. And I mean that in two separate ways.
First, the security argument. An open DNS resolver on the public internet is one of the most reliably abused things in existence. Within hours — sometimes minutes — your server will be used in DNS amplification DDoS attacks. Attackers send small spoofed queries to your resolver, which responds with large answers to the victim’s IP. Your bandwidth, someone else’s problem. Your IP will end up on blacklists. Your ISP might terminate your service. Port 53 stays closed. Full stop.
Second, and more importantly for us — the privacy argument. Cast your mind back to Part 3. The whole reason we set up DNSCrypt-Proxy alongside Pi-hole was to ensure that DNS queries leaving our home network are encrypted. We didn’t want our ISP to see what domains we’re resolving. We didn’t want anyone snooping on the wire between our home and the upstream resolver. That was the entire point.
Now think about what opening port 53 remotely would mean. Your phone, sitting on a coffee shop’s Wi-Fi, would send a plain, unencrypted DNS query across the open internet to your home server. The coffee shop’s router sees it. The hops in between see it. Anyone running a packet capture on that network sees it. We’d have encrypted the outbound leg (Pi-hole → upstream resolver) while leaving the inbound leg (your device → Pi-hole) completely naked. That’s not a privacy setup — that’s security theatre with extra steps.
What we need is encrypted DNS end-to-end — DoH and DoT — which tunnels DNS queries inside HTTPS or TLS all the way from your device to your server. This means:
- Queries are encrypted in transit from device to Pi-hole (no eavesdropping on any network)
- Port 443 is used for DoH (never blocked, looks like normal HTTPS traffic)
- We preserve the privacy guarantee we built in Part 3, now extended to mobile devices
- We get to keep Pi-hole’s filtering and logging for all our remote devices
The Architecture
Before writing a single config line, let’s understand what we’re building:
 The architecture — image generated via ChatGPT
The key insight here is that nginx owns TLS. It terminates all encrypted connections using the same wildcard certificate from Part 16 that we already use for all our other services. Then it passes plain, unencrypted DNS traffic to our internal containers — traffic that never leaves the host machine, so it’s perfectly safe.
Meet dnsdist — our new DNS traffic manager
You might be wondering: why do we need dnsdist at all? Can’t nginx just proxy DoH directly to Pi-hole?
Not quite. Pi-hole runs a built-in web server that handles its admin UI and REST API just fine, but it doesn’t expose a /dns-query DoH endpoint. Something needs to sit between nginx and Pi-hole to translate HTTP-based DNS queries into the plain DNS wire format that Pi-hole understands. That’s dnsdist’s job.
dnsdist is made by the same people behind PowerDNS. It’s a high-performance DNS load balancer and proxy, purpose-built for exactly this kind of work. It accepts DoH queries on an HTTP port, converts them to DNS wire format, forwards to Pi-hole, and sends the response back. Fast, reliable, and actively maintained.
A quick historical note: we originally planned to use cloudflared in proxy-dns mode for this job. Then cloudflared v2026.2.0 dropped that feature entirely. So dnsdist it is — and honestly, it’s the better tool for this anyway.
Step 1: The Docker stack
If you’ve been following along from Part 3, you already have a running dns stack in Portainer with two containers: dnscrypt-proxy on 172.30.1.4 and pihole on 172.30.1.3, all sitting on pi_docker_network. Good news — we’re not throwing any of that away. We’re just adding one more container to the party.
The full stack now has three services:
- dnscrypt-proxy — unchanged from Part 3, still encrypting all outbound DNS queries from Pi-hole to upstream resolvers
- pihole — same as Part 3 with a few new
FTLCONFenvironment variables to play nicely with our nginx reverse proxy - dnsdist — new arrival, sits in front of Pi-hole and speaks DoH and DoT to the outside world
All three share pi_docker_network, and dnsdist gets the next free IP: 172.30.1.5.
One thing worth noting about Pi-hole specifically: in Part 3, we also attached it to a priv_lan macvlan network so it would appear as a separate device on the LAN at 192.168.22.252. That stays — and it’s actually more important now than ever.
Here’s why. Once we put dnsdist in front of Pi-hole for remote DoH/DoT traffic, all those remote queries will arrive at Pi-hole from dnsdist’s IP (172.30.1.5). Pi-hole can’t see past that — the DNS wire protocol carries no HTTP-level context like client IPs. So remote users will all appear as one client in the query log — the DNS wire protocol carries no HTTP-level client context. We tackle this properly in Wait — about that ‘remote users all appear as one client’ thing further down, using EDNS Client Subnet to smuggle the real IP through.
But for your LAN devices — your phone on home Wi-Fi, your laptop, your smart TV — they still talk directly to Pi-hole’s macvlan IP 192.168.22.252 on port 53. Pi-hole sees their real LAN IPs, logs them individually, and you keep full per-device monitoring and group management for everything inside your home. The moment you step outside and switch to DoH/DoT, you become one of the remote clients. That’s the trade-off, and it’s an acceptable one.
So the priv_lan macvlan network stays in the compose, and Pi-hole keeps its 192.168.22.252 LAN presence.
Here’s the updated docker-compose.yml for the full dns stack:
services:

  # ── DNSCrypt-Proxy ──────────────────────────────────────────────────────────
  # Encrypts all outbound DNS queries from Pi-hole to upstream resolvers.
  # Carried over from Part 3 — nothing changes here.
  dnscrypt-proxy:
    container_name: dnscrypt-proxy
    hostname: dnscrypt-proxy
    restart: unless-stopped
    image: klutchell/dnscrypt-proxy
    dns: 9.9.9.9
    volumes:
      - /etc/localtime:/etc/localtime:ro
      - /etc/timezone:/etc/timezone:ro
      - /mnt/storage/docker/dns/dnscrypt-proxy/config:/config:rw
      - /mnt/storage/docker/dns/dnscrypt-proxy/log:/log:rw
    environment:
      TZ: "Asia/Singapore"
    networks:
      pi_docker_network:
        ipv4_address: 172.30.1.4

  # ── Pi-hole ────────────────────────────────────────────────────────────────
  # Network-wide ad blocker and DNS filter.
  # DNS1 points to dnscrypt-proxy so all upstream queries are encrypted
  # (same as Part 3 — DNS1=172.30.1.4#5053).
  # New in this part: FTLCONF settings for reverse proxy compatibility,
  # and removal of the macvlan priv_lan network since nginx now handles
  # all external access — no need for Pi-hole to be directly on the LAN.
  pihole:
    image: pihole/pihole:latest
    container_name: pihole
    hostname: pihole
    restart: unless-stopped
    environment:
      TZ: "Asia/Singapore"
      WEBPASSWORD: "CHANGE_ME"              # ← strong password
      DNS1: "172.30.1.4#5053"              # dnscrypt-proxy — encrypted upstream
      DNS2: "no"                            # no fallback — all queries go encrypted
      DNSSEC: "true"
      DNSMASQ_LISTENING: "all"
      VIRTUAL_HOST: "pihole.yourdomain.com"
      FTLCONF_webserver_domain: "pihole.yourdomain.com"
      FTLCONF_webserver_port: "80"          # plain HTTP — nginx handles TLS
      HOSTNAME: "pihole"
    volumes:
      - /mnt/storage/docker/dns/pihole/config:/etc/pihole
      - /mnt/storage/docker/dns/pihole/dnsmasq:/etc/dnsmasq.d
    cap_add:
      - NET_ADMIN
      - SYS_NICE
    dns:
      - 9.9.9.9    # external resolver for container-level DNS (blocklist downloads etc.)
      - 1.1.1.1
    depends_on:
      - dnscrypt-proxy
    networks:
      pi_docker_network:
        ipv4_address: 172.30.1.3
      priv_lan:
        ipv4_address: 192.168.22.252  # LAN presence — keeps per-device monitoring for home clients

  # ── dnsdist ────────────────────────────────────────────────────────────────
  # DoH/DoT frontend — new in this part.
  # Accepts plain HTTP DoH on :8053 (nginx proxies HTTPS to it).
  # Accepts plain DNS on :5300 (nginx stream proxies DoT/TLS to it).
  # Forwards all queries to Pi-hole on 172.30.1.3:53.
  dnsdist:
    image: powerdns/dnsdist-19:latest
    container_name: dnsdist
    restart: unless-stopped
    volumes:
      - /mnt/storage/docker/dns/dnsdist/dnsdist.conf:/etc/dnsdist/dnsdist.conf:ro
    depends_on:
      - pihole
    networks:
      pi_docker_network:
        ipv4_address: 172.30.1.5

networks:
  pi_docker_network:
    external: true
  priv_lan:
    external:
      name: priv_lan
A few things worth pointing out:
- We’re using static IPs for both containers. This is important — nginx will reference these IPs directly in its config. If the IPs change between restarts, things break. Static IPs eliminate that problem entirely.
- Pi-hole’s
dns:entries point to external resolvers, not to itself. This is a subtle but important distinction. Pi-hole uses these for its own container-level DNS (like downloading blocklists). Having it point to itself creates a feedback loop that floods the query log with internal health checks. Ask me how I know. 😅 - We set
FTLCONF_webserver_port: "80"to keep Pi-hole serving plain HTTP internally. nginx handles all TLS externally — Pi-hole doesn’t need its own certificate. SYS_NICEsilences a warning about process priority that Pi-hole generates without it. It’s harmless without it, but noisy.
Step 2: Configure dnsdist
dnsdist uses a Lua-based config file. Create /docker/dnsdist/dnsdist.conf:
-- dnsdist.conf
-- DoH frontend for Pi-hole. TLS terminated by nginx upstream.

-- ── Upstream: Pi-hole ─────────────────────────────────────────────────────
newServer({
    address = "172.30.1.3:53",
    name    = "pihole",
    -- Mark as always up — Pi-hole monitors its own upstream independently.
    -- Without this, dnsdist periodically queries a.root-servers.net to
    -- health-check Pi-hole, which floods the Pi-hole query log.
    healthCheckMode = "up", -- always marked up, Pi-hole monitors upstream connectivity itself
    checkInterval = 0,  -- disabled, Pi-hole monitors upstream connectivity itself
    useClientSubnet = true,
})

-- ── DoH listener ──────────────────────────────────────────────────────────
-- Plain HTTP (no cert) — nginx terminates TLS upstream.
-- IMPORTANT: use h2o library, not the default nghttp2.
-- nghttp2 only supports HTTP/2, but nginx's open-source proxy_pass
-- only speaks HTTP/1.1 to upstreams (HTTP/2 upstream is nginx Plus/paid).
-- h2o supports both HTTP/1.1 and HTTP/2 — problem solved.
addDOHLocal("0.0.0.0:8053", nil, nil, "/dns-query", {
    reusePort = true,
    library = "h2o",
    exactPathMatching = true,
    trustForwardedForHeader = true,
})

-- ── ACL ───────────────────────────────────────────────────────────────────
-- nginx is the public gatekeeper — dnsdist is not directly exposed.
-- Open ACL to all IPs (nginx enforces per-client rate limiting upstream).
-- Note: "::/0" IPv6 wildcard causes a fatal error in this dnsdist build — IPv4 only.
setACL({"0.0.0.0/0"})

-- ── Query rules ───────────────────────────────────────────────────────────
-- Drop ANY queries (commonly abused in amplification attacks)
addAction(QTypeRule(DNSQType.ANY), DropAction())
-- Drop queries for internal/local TLDs (no business going upstream)
addAction(SuffixMatchNodeRule({"local", "internal", "lan", "home"}), DropAction())
-- Forward everything else to Pi-hole
addAction(AllRule(), PoolAction(""))

-- ── Plain DNS fallback port ────────────────────────────────────────────────
-- nginx stream block for DoT will forward TCP here
setLocal("0.0.0.0:5300")
A few things that might surprise you here:
The h2o library setting. This one caused me a proper headache. By default, dnsdist 1.9 uses nghttp2 as its DoH library, which only accepts HTTP/2 connections. But nginx’s open-source proxy_pass directive always connects to upstreams using HTTP/1.1 — HTTP/2 upstream support is an nginx Plus (paid) feature. The result: nginx proxies DoH requests to dnsdist, dnsdist silently drops them, and all you get is a HTTP 403. Setting library = "h2o" makes dnsdist accept both HTTP/1.1 and HTTP/2. Problem solved, no paid nginx required, thank me later!
The open ACL. We’re allowing all IPs. This might feel uncomfortable, but remember: dnsdist is not publicly exposed. The only thing that can reach port 8053 is nginx, from inside the docker network. Nginx is the actual gatekeeper — it enforces rate limiting per real client IP before anything reaches dnsdist — but still, dnsdist sees the proxied IP, so we need to whitelist the whole Internet.
healthCheckMode = "up". Without this, dnsdist periodically queries a.root-servers.net to verify Pi-hole is alive. These queries show up in Pi-hole’s query log, which is confusing and noisy. Since Pi-hole monitors its own upstream resolvers independently, we don’t need dnsdist doing it too.
Step 3: Nginx configuration
This is where it all comes together. We need two server blocks: one for the Pi-hole admin UI and API, and one for the DoH endpoint. Plus we’ll add a stream block for DoT.
Following the same pattern from Part 16, create /docker/nginx/config/nginx/conf.d/pihole.conf:
###############################
###        PI-HOLE          ###
###############################

server {
    listen 80;
    server_name pihole.yourdomain.com;
    return 301 https://$host$request_uri;
}

server {
    set $pihole http://172.30.1.3:80;

    listen 443 ssl;
    http2 on;
    server_name pihole.yourdomain.com;

    include /etc/nginx/ssl.conf;
    # No mTLS here — Pi-hole has its own session-based auth

    location / {
        # No rate limiting on the UI — Pi-hole loads 20-30 assets per
        # page navigation and makes many API calls internally.
        # Pi-hole's own session auth is the access control layer here.
        proxy_pass $pihole;
        include /etc/nginx/proxy.conf;

        access_log /var/log/nginx/access_pihole.log;
        error_log  /var/log/nginx/error_pihole.log;
    }

    location /api {
        proxy_pass $pihole;
        include /etc/nginx/proxy.conf;

        access_log /var/log/nginx/access_pihole_api.log;
        error_log  /var/log/nginx/error_pihole_api.log;
    }

    location = /robots.txt {
        alias /usr/share/nginx/html/robots.txt;
        allow all;
        log_not_found off;
        access_log off;
    }
}

###############################
###          DoH             ###
###############################

server {
    listen 80;
    server_name dns.yourdomain.com;
    return 301 https://$host$request_uri;
}

server {
    set $doh http://172.30.1.5:8053;

    listen 443 ssl;
    http2 on;
    server_name dns.yourdomain.com;

    include /etc/nginx/ssl.conf;
    # No mTLS — DoH must work from any device, no client cert

    location / {
        return 404;
    }

    location /dns-query {
        limit_req zone=doh_limit burst=50 nodelay;

        proxy_pass $doh;
        include /etc/nginx/proxy.conf;

        # DNS responses must not be cached at the proxy layer
        add_header Cache-Control "no-store";

        proxy_read_timeout    10s;
        proxy_connect_timeout 5s;

        access_log /var/log/nginx/access_doh.log;
        error_log  /var/log/nginx/error_doh.log;
    }

    location = /robots.txt {
        alias /usr/share/nginx/html/robots.txt;
        allow all;
        log_not_found off;
        access_log off;
    }
}
Add the DoH rate limiting zone to your nginx.conf http{} block alongside your existing mylimit zone:
# DoH — per real client IP, 120 queries/min
# DNS query bursts happen when opening a page with many resources
limit_req_zone $binary_remote_addr zone=doh_limit:10m rate=120r/m;
Note that we’re not rate limiting the Pi-hole UI or API. Pi-hole’s web interface makes 20–30 parallel requests every time you navigate between pages — loading scripts, stylesheets, fonts, and API data all at once. Apply mylimit to those and you’ll be fighting 503 errors constantly. Pi-hole’s own session authentication handles access control there.
Step 4: DoT via nginx stream
DNS over TLS needs port 853. Unlike DoH which is just HTTPS, DoT is a raw TCP connection with TLS on top — nginx handles this through its stream module rather than the http module.
If you followed Part 16, you’ll know nginx is compiled with --with-stream and --with-stream_ssl_module on the standard Debian/Alpine package. Perfect.
First, add the stream block to your nginx.conf (outside the http {} block):
stream {
    limit_conn_zone $remote_addr zone=dot_limit:10m;
    include /etc/nginx/stream.d/*.conf;
}
Then create /docker/nginx/config/nginx/stream.d/dot.conf:
upstream dot_backend {
    server 172.30.1.5:5300;
}

server {
    listen 853 ssl;

    ssl_certificate     /etc/nginx/letsencrypt/live/yourdomain.com/fullchain.pem;
    ssl_certificate_key /etc/nginx/letsencrypt/live/yourdomain.com/privkey.pem;
    ssl_protocols       TLSv1.2 TLSv1.3;
    ssl_ciphers         TLS_AES_256_GCM_SHA384:TLS_CHACHA20_POLY1305_SHA256:TLS_AES_128_GCM_SHA256:ECDHE-ECDSA-AES256-GCM-SHA384:ECDHE-RSA-AES256-GCM-SHA384;
    ssl_prefer_server_ciphers on;
    ssl_session_cache   shared:SSL_stream:10m;
    ssl_session_timeout 10m;

    # Max 5 concurrent DoT connections per client IP
    # A normal device keeps 1-2 persistent connections
    limit_conn dot_limit 5;

    proxy_pass dot_backend;
    proxy_timeout 10s;
    proxy_connect_timeout 5s;
}
Notice that the stream block uses limit_conn (concurrent connection limiting) rather than limit_req (request rate limiting). That’s because DoT uses persistent TCP connections — a device connects once and reuses that connection for many queries. Rate limiting by request doesn’t translate well to that pattern; connection limiting does.
Don’t forget to open port 853 in your firewall:
# ufw allow 853/tcp comment "DNS over TLS"And expose it in your nginx container’s docker-compose:
ports:
  - "80:80"
  - "443:443"
  - "853:853"   # ← add this
Step 5: Deploy and test
After updating your docker-compose.yaml via Portainer, update and redeploy the stack.
Let’s test each component in order:
Test 1: DNS resolution through Pi-hole (internal)
# dig @172.30.1.3 google.com +short
// Should return real IPs

# dig @172.30.1.3 doubleclick.net +short
// Should return 0.0.0.0 — blocked!
Test 2: DoH endpoint (internal, before nginx)
Must use —http1.1 flag since dnsdist defaults to HTTP/2 and the test is from the host, not through nginx
# curl -si --http1.1 \
  "http://172.30.1.5:8053/dns-query?dns=AAABAAABAAAAAAAAA3d3dwZnb29nbGUDY29tAAABAAE=" \
  -H "Accept: application/dns-message" | head -3
// Expect: HTTP/1.1 200 OK
Test 3: DoH through nginx (external)
# dig +https=/dns-query @dns.yourdomain.com google.com +short
// Expect: real IP addresses for google.com
Test 4: DoT through nginx (external)
# dig +tls @dns.yourdomain.com google.com +short
// Expect: real IP addresses
Test 5: TLS certificate check
# openssl s_client -connect dns.yourdomain.com:853 </dev/null 2>&1 \
  | grep -E "subject|issuer|Verify"
#// Expect: your domain, Let's Encrypt issuer, Verify return code: 0
Test 6: The full end-to-end (block and unblock via PiHole API)
Now, we will use the Pi-hole’s API through our remote access to block index.hu then remove it from the block list. Pi-hole does not have any API-key based access. So, we have to login first (via curl, get Bearer token, which we can append afterwards to our curl requests.
Get API token
# TOKEN=$(curl -s -X POST https://pihole.yourdomain.com/api/auth \
  -H "Content-Type: application/json" \
  -d '{"password":"YOUR_PIHOLE_ADMIN_PASS"}' | jq -r '.session.sid')
Query before blocking
# dig +https=/dns-query @dns.yourdomain.com index.hu +shortBlock it
# curl -s -X PUT https://pihole.yourdomain.com/api/domains/deny/exact/index.hu \
  -H "sid: $TOKEN" -H "Content-Type: application/json" \
  -d '{"comment":"test"}' | jq .
Query again — should return 0.0.0.0
# dig +https=/dns-query @dns.yourdomain.com index.hu +shortUnblock
# curl -s -X DELETE https://pihole.yourdomain.com/api/domains/deny/exact/index.hu \
  -H "sid: $TOKEN"
Query one more time — should resolve again
# dig +https=/dns-query @dns.yourdomain.com index.hu +shortLogout
# curl -s -X DELETE https://pihole.yourdomain.com/api/auth -H "sid: $TOKEN"You can also keep track of this blacklist/whitelist sequence on the dashboard to verify.
Step 6: Configure your devices
Brave (and most Chromium-based browsers)
Settings → Privacy and Security → Security → Use secure DNS → With Custom provider:
https://dns.yourdomain.com/dns-queryAndroid (Native Private DNS — DoT)
Natively, Android’s “PRIVATE DNS” supports DoT only. If you want DoH, you can download a DoH app and use that to access your DoH endpoint. Below, I show, however, how to use the built-in native DoT feature.
Go to Settings → Network & Internet → Private DNS → Private DNS provider hostname:
dns.yourdomain.comJust the hostname — no port, no path, no https://. Android handles port 853 automatically. Once saved, you’ll see “Private DNS active” in your network settings. Every DNS query on your phone now goes through your Pi-hole, wherever you are.
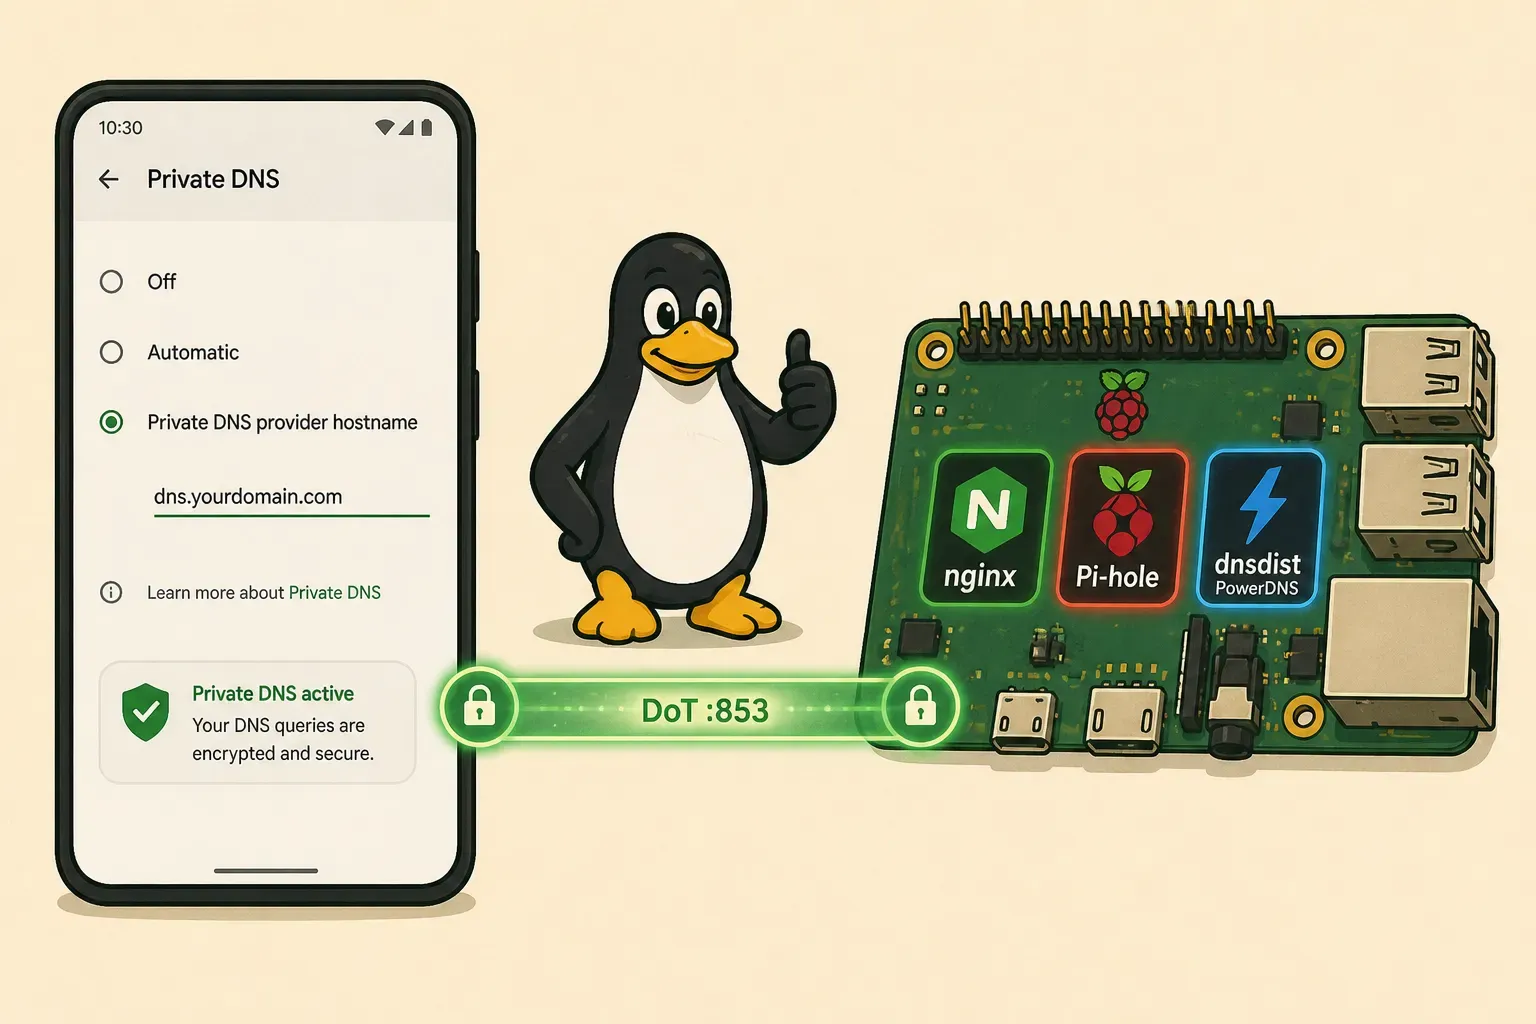 Your android phone connecting to your (remote) Pi-hole via DNS-over-TLS — image generated via ChatGPT
iOS (this section is provided by AI — I don’t have Apple device)
iOS requires a configuration profile (.mobileconfig file) to set a system-wide DoH resolver — you can’t do it through the UI. You can generate one from Apple Configurator 2 on a Mac, or use any of the free online .mobileconfig generators. Point the DoH URL at https://dns.yourdomain.com/dns-query and install it by opening it in Safari on your iPhone.
Linux
// Using dig (if your version supports it — check with dig -h | grep https)
# dig +https=/dns-query @dns.yourdomain.com google.com

// Using DoT
# dig +tls @dns.yourdomain.com google.com
For system-wide DNS on Linux, configure systemd-resolved with a drop-in file or use stubby as a local forwarder — plenty of guides available for your specific distro.
The things that surprised us along the way
No self-respecting engineering blog post skips the part where things go wrong. Here’s what we ran into, so you don’t have to.
cloudflared dropped proxy-dns in v2026.2.0.
I originally planned to use cloudflared as the DoH proxy, same image many tutorials recommend. Then it simply stopped working — the feature was removed. Classic tool dependency problem. dnsdist turned out to be the better choice anyway.
nghttp2 vs h2o
dnsdist 1.9 switched its default DoH library to nghttp2. nghttp2 only speaks HTTP/2. nginx open-source only proxies HTTP/1.1 to upstreams. Result: every DoH request silently returned 403. The fix is one line in dnsdist.conf: library = "h2o". The lesson: when something is returning 403 with no error in the nginx logs, dig deeper — it might not even be nginx generating it.
The ACL that blocked legitimate traffic
dnsdist has an ACL that checks the source IP of each query. We set it to 172.18.1.0/24 thinking nginx’s IP would match. It didn’t — because trustForwardedForHeader = true made dnsdist evaluate the forwarded client IP (the user’s real IP), not nginx’s. Real clients have IPs like 103.x.x.x, which naturally failed the ACL. Solution: since dnsdist isn’t publicly exposed anyway, open the ACL to 0.0.0.0/0 and let nginx be the gatekeeper.
Pi-hole rate limiting all DoH users as one
Once you put a DNS proxy in front of Pi-hole, all DoH traffic appears to come from dnsdist’s single IP address by default. Pi-hole can’t distinguish between users at the DNS protocol level — that context is lost the moment traffic goes from HTTP to DNS wire format. The fix: EDNS Client Subnet forwarding via dnsdist and use it in Pi-hole as a client IP — see below.
The Pi-hole UI making 503s
I initially applied nginx rate limiting to both the UI and the API. Pi-hole’s web interface is surprisingly chatty — every page navigation fires 20–30 parallel requests for assets, API data, and websocket connections. Rate limiting that aggressively causes your own dashboard to throw 503 errors at you while you’re just trying to check the query log. Remove rate limiting from the UI entirely. Pi-hole’s own session auth is sufficient protection there.
A note on privacy: you are now protected everywhere
Think about what we’ve actually built here. Back in Part 3, we encrypted the outbound leg — everything leaving our Pi-hole to the upstream resolver. Today, we encrypted the inbound leg — everything coming from your devices to Pi-hole. Put them together and the full picture looks like this:
Your device
    │ DoH (HTTPS) or DoT (TLS) — encrypted
    ▼
Pi-hole (your server)
    │ DNSCrypt-Proxy — encrypted
    ▼
Upstream resolver (9.9.9.9)
Every hop is encrypted. Every network you connect to — the coffee shop, the hotel, the airport, the corporate office — sees nothing but TLS traffic going to your server on port 443 or 853. Your ISP on the mobile side sees the same. No one in the middle can read your DNS queries, correlate your browsing habits, or inject responses.
And it’s your infrastructure doing it. No Cloudflare. No Google. No DNS provider that monetises your query data in exchange for a “free” service. Your Pi-hole, your rules, your logs.
Let’s be honest about what we are given now:
- Your ISP cannot see your DNS queries in transit ✅
- Ad networks cannot intercept or inject DNS ✅
- Your queries are filtered by Pi-hole — ads and trackers blocked, everywhere ✅
- DNSCrypt-Proxy encrypts and distribute the upstream leg from Pi-hole to 9.9.9.9, 1.1.1.1, 8.8.8.8, and any other provider you set✅
- You can see everything in Pi-hole’s query log — which, depending on your threat model, is a feature not a bug
Step on any Wi-Fi network in the world. Your DNS is encrypted, filtered, and going home. That’s a genuinely powerful thing for a Raspberry Pi sitting on your shelf to be doing. 😊
Wait — about that “remote users all appear as one client” thing
Remember earlier when I said remote users would all appear as a single client in Pi-hole’s query log, and we couldn’t do much about it? I lied. Well — I was right at the time, but it turns out we can fix it. And once you see how, you’ll wonder why we didn’t do it from the start.
Here’s the situation we’re in today. DoH/DoT clients connect to nginx with their real IP. Nginx terminates TLS and forwards the plain DNS query to dnsdist. dnsdist forwards it to Pi-hole. By the time Pi-hole sees the query, the L4 source address is dnsdist’s container IP — 172.30.1.5. Every remote query, every user, every device — same IP in the Pi-hole dashboard. Useless for monitoring, useless for per-client grouping, useless for spotting which device is making weird queries at 3am.
Two mechanisms, one outcome
DNS doesn’t carry HTTP-style “I’m forwarding for someone else” semantics. But it turns out there are two ways to smuggle the real client IP from dnsdist to Pi-hole:
Proxy Protocol v2 (HAProxy’s specification for forwarding L4 connection metadata) — a binary header prepended to the DNS payload that says “by the way, the real client is X.X.X.X”. Pi-hole’s listener strips the header and uses the contained IP. Clean, elegant, designed for exactly this kind of L4 proxying.
EDNS Client Subnet (ECS, RFC 7871) — an EDNS0 option inside the DNS message itself, carrying the originating client’s IP at the configured prefix length. Originally designed for upstream resolvers to make geo-aware decisions, but Pi-hole’s FTL has support for consuming it as the client identifier when the prefix is /32.
I tried Proxy Protocol first. dnsdist supports it cleanly via useProxyProtocol = true. Pi-hole’s FTL — well, that’s where I hit a wall. There’s no dns.proxyProtocol key in FTLCONF, no environment variable, nothing. The exact symptom was beautiful in its own way: every query showed up in the dashboard as Domain: opcode, Type: NONE, action Deny. FTL was reading the Proxy Protocol binary header bytes as if they were a DNS query and failing the parse. The whole stack went dark until I flipped useProxyProtocol back to false.
So: ECS it is.
Configuring dnsdist to emit /32 ECS
Three pieces matter on the dnsdist side. Two are global, one is per-server. Add to your dnsdist.conf (as per advised here):
-- ── Global ECS settings ─────────────────────────────────────────────────
-- Send full-host source address as ECS (no privacy masking on the LAN side —
-- the strip happens at Pi-hole egress, see further down)
setECSSourcePrefixV4(32)
setECSSourcePrefixV6(128)
-- Replace any inbound ECS rather than preserving it
setECSOverride(true)
And on the Pi-hole upstream server, make sure you still have useClientSubnet = true (you may already have it; the docs default it to false):
newServer({
    address = "172.30.1.3:53",
    name    = "pihole",
    healthCheckMode = "up",
    useClientSubnet = true,    -- ← attach ECS to every query
})
The setECSOverride(true) is the one that’s easy to miss. Without it, if a client happens to already attach an ECS option to its query (some recursive resolvers and apps do this), dnsdist preserves the existing prefix — which might be /24. Pi-hole specifically requires /32 for client identification; anything shorter is ignored. Override forces a clean /32 regardless of what arrived.
Configuring Pi-hole to consume ECS as client ID
Pi-hole’s side is one config key:
environment:
  FTLCONF_dns_EDNS0ECS: "true"
That tells FTL: “if a query arrives with an ECS option carrying a /32 address, use that as the client identifier instead of the L4 source IP.”
While you’re at it, temporarily enable EDNS0 debug logging so you can verify what’s actually arriving:
# docker exec pihole tail /var/log/pihole/FTL.log | grep -i ecsYou’re looking for the success line:
DEBUG_EDNS0: CLIENT SUBNET: 103.x.x.x/32 - OK (IPv4)That /32 - OK is the magic acknowledgment — Pi-hole accepted the ECS as a full host address and is logging the query against that IP. The Pi-hole dashboard Query Log should now show real remote client IPs in the Client column instead of 172.30.1.5.
 Client column shows now the real client’s IP
But wait — privacy regression?
If you’ve been paying attention to the privacy thesis of this entire series, the next thought should make you uncomfortable. We just configured dnsdist to attach the remote client’s full /32 IP to every DNS query. That ECS option rides along with the query as it travels through the stack:
 ECS now leaks — Privacy alert — image generated via chatGPT
If Pi-hole forwards the ECS option onward to DNSCrypt-Proxy, every internal client’s real IP leaks to the encrypted upstream. The encryption layer protects the query in transit, but the upstream resolver — Quad9, Cloudflare, whoever — now learns the originating client. The privacy guarantee we spent two episodes building gets undermined by the very mechanism we just added.
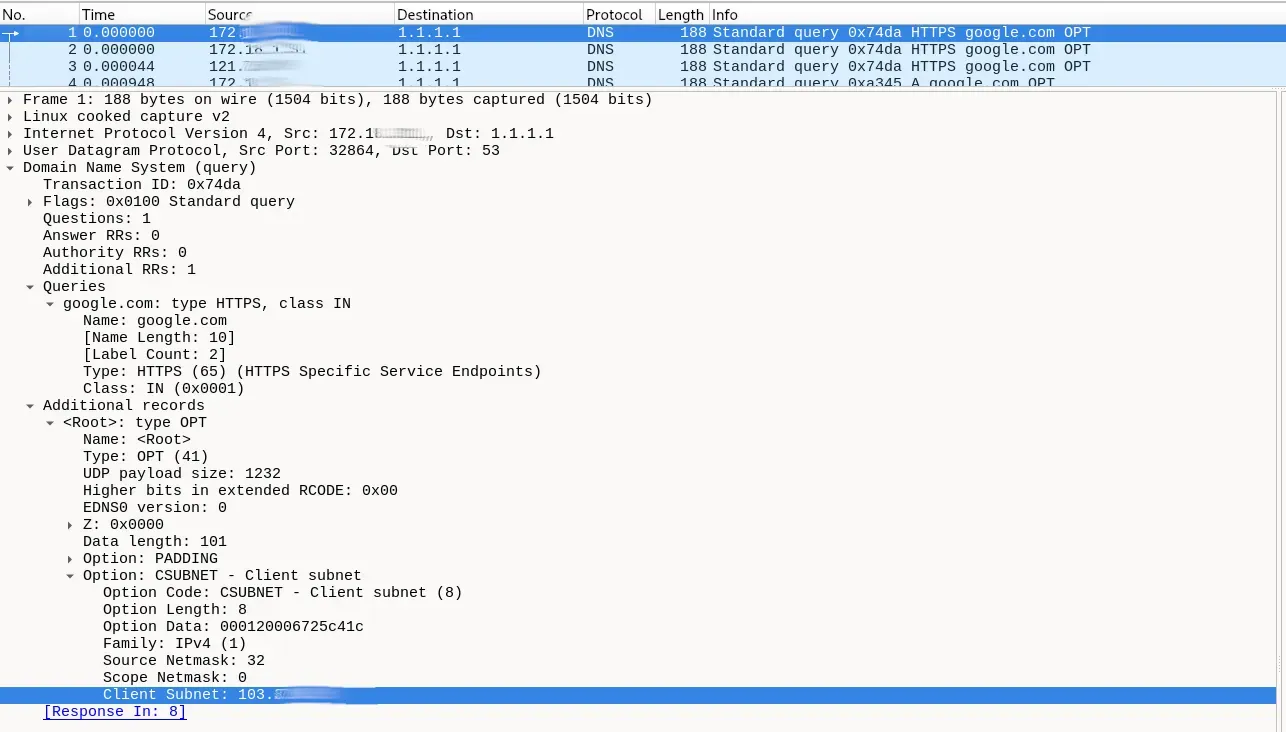 Caption: Outbound DNS query from Pi-hole to upstream. Highlighted: the ECS option carrying the original client’s /32 IP. This is the leak we need to plug. Note: For an easier check, i disabled DNSCrypt-proxy and set Pi-hole to send everything unencrypted to 1.1.1.1 — this is for a quick EDNS verification only!
So we need to make Pi-hole consume ECS on inbound and strip it on outbound. There’s no first-class FTLCONF key for this — EDNS0ECS is the only ECS-related setting in v6.6’s schema. But Pi-hole’s underlying dnsmasq engine has the directive we need; we just have to ask FTL to load custom dnsmasq.d files.
Two changes. First, tell FTL to read dnsmasq.d:
environment:
  FTLCONF_misc_etc_dnsmasq_d: "true"
Second, drop a config file in the bind-mounted dnsmasq directory:
$ sudo tee /mnt/storage/docker/dns/pihole/dnsmasq/99-strip-ecs.conf > /dev/null <<'EOF'
# Strip privacy-sensitive EDNS options before forwarding upstream.
# Pi-hole consumes ECS for client identification (dns.EDNS0ECS=true),
# then this stanza ensures /32 client IPs don't leak to upstream resolvers.
strip-subnet
strip-mac
EOF
strip-subnet removes ECS from forwarded queries. strip-mac removes the MAC address option that FTL adds for its own internal client tracking — there’s no reason for that to leave your network either.
 We direct Pi-hole to remove stip the EDNS client subnet info and avoid leakage — image generated via chatGPT
Restart our whole stack and observe.
Inbound — ECS still arrives and is consumed:
DEBUG_EDNS0: CLIENT SUBNET: 103.x.x.x/32 - OK (IPv4)Outbound — ECS no longer leaks:
 A new query after applying strip-subnet. The ECS option is gone from the outbound packet to upstream. Pi-hole still knows the client; the upstream resolver does not. Note: For an easier check, i disabled DNSCrypt-proxy and set Pi-hole to send everything unencrypted to 1.1.1.1 — this is for a quick EDNS verification only!
The query going upstream is now ECS-free. Pi-hole still logs the real client IP in its dashboard. Upstream resolvers still see “this query came from Pi-hole” without learning which internal device made it.
Why this matters
Without these changes, the per-device monitoring story for remote devices doesn’t exist. You have a beautifully encrypted DNS pipeline that’s effectively single-tenant from Pi-hole’s perspective — one giant blob of “stuff that came from dnsdist”. With these changes, you get the same per-client granularity Pi-hole was always able to give you on the LAN, extended now to every device anywhere in the world that uses your DoH/DoT endpoint. Group rules work. Per-client query patterns work. Anomaly spotting works.
And the privacy seal stays intact. The remote client’s IP only travels as far as Pi-hole. Past that point, the upstream sees nothing more than it would have without ECS in the picture.
 The full setup after setting up everything — image generated via ChatGPT
The dashboard finally tells the truth.
The captive portal problem — and how to solve it properly
There’s one real-world friction point with any encrypted DNS setup that we need to talk about honestly: airport Wi-Fi, hotel Wi-Fi, and any other network that uses a captive portal login page.
You know the drill — you connect to “AirportFreeWifi”, open a browser, and instead of Google you get a login page asking you to accept terms and conditions or enter a room number. That redirect is made possible by the router hijacking your DNS queries. When your device asks “where is google.com?”, the router intercepts the query on port 53 and returns its own local IP instead, which serves the login page.
Here’s the problem: DoH and DoT are specifically designed to prevent exactly that. Your DNS queries travel encrypted to your Pi-hole. The airport router can’t intercept them, can’t redirect them, can’t see them at all. Your Pi-hole resolves google.com correctly — but the captive portal never gets its chance to redirect you, so the login page never appears, and the network looks broken.
This is not a bug in our setup. It’s the privacy feature working exactly as intended. Unfortunately it happens to be incompatible with captive portals.
The wrong solution is whitelisting captive portal detection domains in Pi-hole. Even if Pi-hole resolves connectivitycheck.gstatic.com correctly to Google’s real IP, the captive portal router needs to intercept that query and return its own local IP. With DoH, the router never sees the query — whitelisting changes nothing.
The right solution is a smarter DoH client on Android that understands the problem.
RethinkDNS — the Android client that handles this gracefully
RethinkDNS is a free, open source Android app that combines a DoH/DoT client, a firewall, and an ad blocker in one — and it’s actively maintained with regular updates. Unlike Android’s native Private DNS setting (which is a blunt on/off switch system-wide), RethinkDNS gives you fine-grained control:
Per-network (SSID) rules — you can configure RethinkDNS to automatically behave differently on specific Wi-Fi networks. Add your home and office SSIDs as trusted (keep DoH on), and set unknown networks to fall back to system DNS automatically until you’ve logged in through the captive portal.
Per-domain bypass — specific domains bypass your DoH endpoint entirely and use the system’s default DNS instead. This is the captive portal fix — the key detection domains your OS uses to check for captive portals go through the local router’s DNS (and get hijacked as intended), while everything else stays encrypted through your Pi-hole.
Add these domains to RethinkDNS’s bypass list:
captive.apple.com
connectivitycheck.gstatic.com
connectivitycheck.android.com
detectportal.firefox.com
www.msftconnecttest.com
nmcheck.gnome.org
The result — connecting to airport Wi-Fi becomes completely transparent:
Connect to airport Wi-Fi
  → RethinkDNS detects unknown network
  → Captive portal detection domains bypass DoH → router hijacks them → login page appears
  → You log in, get internet access
  → All other queries go encrypted through your Pi-hole as normal
  → You never manually touched a setting
No toggling. No friction. The captive portal works, your privacy is preserved for everything else.
 Using RethinkDNS enables us to connect everywhere and bring our Pi-hole with us to everywhere without a hassle — Image generated via ChatGPT
What about iOS?
iOS is more limited here. There’s no equivalent of RethinkDNS for iOS — the system DoH profile we configure via .mobileconfig is also a fairly blunt instrument with no per-network or per-domain bypass options. iOS does have its own captive portal detection that runs before the DoH profile kicks in (it uses a pre-authentication network probe), so in practice many captive portals will work fine on iOS. But if you hit one that doesn’t, you’ll need to temporarily remove the DNS profile, log in, and reinstall it. Inconvenient, but rare in practice since most modern captive portals intercept at the HTTP layer rather than relying purely on DNS hijacking.
What about laptops/Linux?
Browsers like Brave and Chrome have their own captive portal detection that operates at the HTTP layer independently of DNS — they’ll typically show the login page regardless. For system-wide DoH on Linux via systemd-resolved or stubby, the same captive portal issue exists, and the same solution applies: configure a per-domain bypass for the detection domains in your resolver config.
The honest summary
Encrypted DNS and captive portals are fundamentally at odds — one is designed to prevent DNS hijacking, the other depends on it. The solution isn’t to weaken your DNS encryption, it’s to use a client smart enough to know when to step aside. On Android, RethinkDNS is that client. Set it up once, configure the bypass domains, and forget about it.
Appendix: What if you’re still using Cloudflare Tunnel?
In Part 4, we used Cloudflare Tunnel as the remote access solution — a clever approach that avoids opening any ports on your router by having your Pi establish an outbound connection to Cloudflare’s edge. Also, one of the only solution if your ISP provides you CG-NAT IP only, i.e., no public IP is assigned to your router or ONT device. If you never moved away from that setup and are still on Part 4’s architecture rather than Part 16’s nginx approach, here’s what changes.
The configuration that almost wasn’t a configuration change
Coming into this, I assumed the tunnel-based deployment would need a meaningful rework of the dnsdist config. Different ingress, different trust boundary, different proxy speaking to dnsdist on the backend — surely the Lua needed serious surgery.
It didn’t. The dnsdist config I ended up with is almost identical to the nginx-fronted version. The same h2o library (because cloudflared, like open-source nginx, speaks HTTP/1.1 to its origin). The same trustForwardedForHeader = true (Cloudflare sets CF-Connecting-IP and X-Forwarded-For at the edge, and dnsdist’s XFF parser handles the second one). The same path strictness via exactPathMatching = true (cloudflared does no path filtering of its own, so dnsdist becomes the gatekeeper). The same ECS globals from earlier in the post. Same upstream block pointing at Pi-hole. None of it needed to change.
Here is the slightly adjust DoH settings. The rest really can stay the same.
-- DoH listener — h2o library so cloudflared's HTTP/1.1 works
addDOHLocal("0.0.0.0:8053", nil, nil, "/dns-query", {
    reusePort               = true,
    library                 = "h2o",
    exactPathMatching       = true,
    trustForwardedForHeader = true,
    customResponseHeaders   = {
        ["Server"] = "dnsdist",
    },
})
That’s it. Cloudflare Tunnel doesn’t fundamentally change the dnsdist contract — it just replaces who’s calling it.
So where did the headache come from?
If the config was almost identical, the bring-up should have been trivial. It wasn’t. I spent considerable time chasing what looked like a deeply broken stack — dig would timeout, then fail with TLS error, then fail differently the next attempt. I rebuilt the cloudflared container, regenerated tunnel credentials, double-checked Cloudflare’s dashboard for the hostname routing, restarted dnsdist with verbose logging, watched packets fly past on the tunnel interface. Everything looked like it was working except dig. And dig is the canonical DoH test tool — so when it doesn’t work, your reflex is to assume your stack doesn’t work.
It turns out my stack was fine the whole time. The issue was dig itself.
When dig +https=/dns-query @doh.mydomain.com connects to the resolved IP (a Cloudflare edge IP for the tunnel), it establishes a TLS connection. Cloudflare requires the connection’s SNI (Server Name Indication) field (in the TLS Client Hello) to match the hostname — because Cloudflare’s edge serves thousands of customer tunnels behind the same set of IPs and uses SNI to route the request to the right one. Without correct SNI, the edge has no way to know which tunnel this request belongs to and aborts the TLS handshake.
The dig versions I tested didn’t set SNI consistently to the hostname when given an IP-based connection target. The result was a series of inscrutable TLS errors that looked like origin-server problems but were actually client-side. The packets reaching Cloudflare were getting rejected before any of my infrastructure was even consulted.
Here’s how to identify this is happening to you. Run an openssl test to confirm TLS works fine when SNI is set explicitly:
$ openssl s_client -connect doh.yourdomain.com:443 -servername doh.yourdomain.com </dev/null 2>&1 | \
  grep -E "subject|issuer|Verify"
If you see your certificate, the right issuer, and Verify return code: 0 (ok) — TLS is fine, and your problem is whatever client tool can’t get SNI right.
 Four hours of debugging. The stack was fine. dig just wouldn’t show its SNI to the door — Image generated via ChatGPT
Test with curl
Once you’ve sanity-checked TLS with openssl, prove DoH works with curl. This is the most reliable end-to-end test because curl sets SNI correctly from the URL automatically:
$ curl -s "https://doh.yourdomain.com/dns-query?dns=q80BAAABAAAAAAAAB2V4YW1wbGUDY29tAAABAAE" \
  -H "Accept: application/dns-message" \
  --output /tmp/dns-response.bin

$ xxd /tmp/dns-response.bin
The base64url string above is a pre-encoded DNS query for example.com A. If the stack is working, you’ll see a binary DNS response. Decoded with xxd, it looks something like:
00000000: abcd 8180 0001 0002 0000 0000 0765 7861  .............exa
00000010: 6d70 6c65 0363 6f6d 0000 0100 01c0 0c00  mple.com........
00000020: 0100 0100 0008 ad00 04ac 4293 f3c0 0c00  ..........B.....
00000030: 0100 0100 0008 ad00 0468 1417 9a         .........h...
Reading the relevant bits: abcd is the transaction ID echoed back, 8180 is the response flag with no error, 00 02 means two A records, and the two 4-byte sequences at the end (ac 42 93 f3 and 68 14 17 9a) are the answer IPs in raw form. If you see those, everything works.
Test with kdig (the dig replacement)
If you want a real DNS client that handles DoH properly, install kdig from the Knot DNS utilities. It’s significantly better at this than dig:
Debian / Ubuntu
# sudo apt install knot-dnsutilsFedora / RHEL
$ sudo dnf install knot-utilsArch
$ sudo pacman -S knotThen the equivalent of a DoH lookup is one line:
$ kdig @doh.yourdomain.com +https=/dns-query example.comYou get clean, formatted output exactly like dig’s default — but with DoH transport that actually works through Cloudflare’s edge.
So it works — and then something nice happens
With everything verified, I made a fresh canary query from my laptop and looked at the Pi-hole Query Log. The Client column showed:
bb121XXXXXXX.singnet.com.sg
Not the raw IP, not the dnsdist container — the actual reverse-DNS hostname of my home WAN gateway, provided by SingNet.
This is a small but lovely side-effect of how Pi-hole identifies clients. When FTL substitutes the ECS-supplied IP as the client, it then does a PTR lookup on it. If the result is a real hostname — which most ISPs provide for residential IPs — Pi-hole displays that instead of the number. Suddenly your Query Log reads like a list of locations and ISPs rather than opaque IPs. And this only works because the ECS chain from earlier propagates the real client IP all the way through — PTR-resolving a Docker container IP gets you nothing useful.
A reminder of what this deployment isn’t
Worth repeating, because it matters more now that this is the architecture I’m actually running: Cloudflare Tunnel terminates your TLS at Cloudflare’s edge. They hold the certificate, decrypt your DoH requests, read the DNS queries inside, and re-forward them through the tunnel to your Pi. The tunnel-side re-encryption doesn’t change that a Cloudflare server, somewhere, sees every domain you query in plaintext before any of your privacy infrastructure gets to participate.
For me this is an acceptable trade-off — the alternative is unencrypted DNS to my ISP, which is strictly worse, and I don’t have a public IP to do anything else. If you can open ports, the nginx-fronted setup from the main body of this post is a stronger privacy story: nobody between your device and your server can decrypt the traffic. End of trust chain.
If you can’t, Cloudflare Tunnel is the second-best option that actually exists. Your queries are still encrypted in transit between you and Cloudflare, still filtered by Pi-hole, still leave your network via DNSCrypt-Proxy. The middle hop is trusted on a privacy-policy basis rather than a cryptographic one. Use it knowing exactly what you’re doing, and you’re still ahead of where you started.
This is part of my ongoing series: How I Run My Entire Digital Life on a Raspberry Pi. If you found this useful, consider following along — we’ve got a lot more ground to cover.