
Part 3 — How I Run My Entire Digital Life on a Raspberry Pi: Protect the DNS communication of your entire home
Table of Contents
UPDATED: 08–2026
As we move into part 3, we’ll focus on taking your network privacy and security to the next level by combining Pi-hole and DNSCrypt-Proxy. Pi-hole acts as a powerful network-wide ad blocker, while DNSCrypt-Proxy encrypts your DNS queries and routes them through trusted public resolvers, protecting your browsing activity from surveillance and tampering. By integrating these tools, you’ll enjoy an ad-free experience with all DNS traffic leaving your network fully encrypted and distributed for maximum privacy.
 Image generated by chatGTP’s image generation function
Now that our Pi is set up with Portainer and Docker, the next steps will be much simpler — and they might even be surprisingly quick! 😊
DNS-crypt
dnscrypt-proxy is a versatile DNS proxy that encrypts and authenticates DNS traffic using protocols like DNSCrypt and DNS-over-HTTPS (DoH), shielding your DNS queries from eavesdropping, tampering, and man-in-the-middle attacks. Acting as a local forwarder, it routes your DNS requests through a pool of trusted public resolvers, supports advanced privacy features such as anonymized DNS relays, and can block ads, malware, or unwanted domains using customizable filters. I wrote an article about it back then, give it a look for more details.
Let’s start by crafting a docker-compose file in portainer. Navigate to our portainer web interface (http://192.168.22.70) and create a new stack by clicking on the Add stack button on the top right corner.
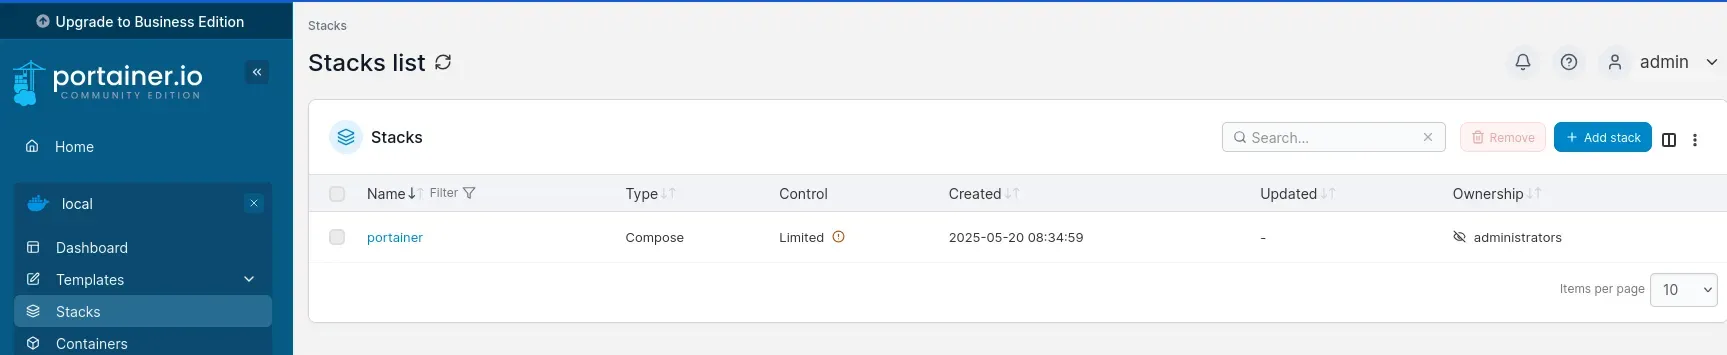 Add Stack
Name your stack as dns or whatever you feel so and we will use the webeditor to fill in our docker-compose description.
 Using the web editor for writing our docker-compose.yml file
Write the docker-compose file as follows:
services:
  dnscrypt-proxy:
    container_name: dnscrypt-proxy
    hostname: dnscrypt-proxy
    restart: unless-stopped
    image: klutchell/dnscrypt-proxy
    dns: 9.9.9.9
    volumes:
      - '/etc/localtime:/etc/localtime:ro'
      - '/etc/timezone:/etc/timezone:ro'
      - '/mnt/storage/docker/dns/dnscrypt-proxy/config:/config:rw'
      - '/mnt/storage/docker/dns/dnscrypt-proxy/log:/log:rw'
    environment:
      - "TZ=Asia/Singapore"
    networks:
      pi_docker_network:
        ipv4_address: 172.30.1.4

networks:
  pi_docker_network:
    external: true
We’re enforcing the container to use Quad9’s DNS resolver (such as 9.9.9.9) for any outbound DNS requests during setup, like fetching the list of available DNS resolvers. Since we haven’t yet established our own secure DNS infrastructure, relying on Quad9 at this stage helps ensure these initial communications aren’t intercepted or blocked by the ISP’s default DNS. The first two volume mounts are carried over from our previous setup, providing the same timezone as our system. Additionally, we mount the configuration and log directories for dnscrypt-proxy directly to the host, allowing straightforward access to these files without needing to use docker logs or enter the container via docker exec. Finally, we assign a fixed IP address to the container for consistent network access and easier management.
Configuration first
Before deploying the stack, we need to download a config file that will be mounted in the container. Get it from the github repo of DNSCrypt-proxy
$ cd /mnt/storage/docker/
$ mkdir -p dns/dnscrypt-proxy/config
$ cd dns/dnscrypt-proxy/config
$ wget https://raw.githubusercontent.com/DNSCrypt/dnscrypt-proxy/refs/heads/master/dnscrypt-proxy/example-dnscrypt-proxy.toml -O dnscrypt-proxy.toml
Now, edit the file to customize. Without showing the whole file, I just show the lines you have to pay attention to.
# this sets the listening port inside the container to 5053. It's not a
# big deal, we won't expose this anyway
listen_addresses = ['0.0.0.0:5053']

# enable all IPv4 servers with most of the encryption, we disable IPv6
# Use servers reachable over IPv4
ipv4_servers = true
# Use servers reachable over IPv6 -- Do not enable if you don't have IPv6 connectivity
ipv6_servers = false
# Use servers implementing the DNSCrypt protocol
dnscrypt_servers = true
# Use servers implementing the DNS-over-HTTPS protocol
doh_servers = true
# Server must support DNS security extensions (DNSSEC)
require_dnssec = true-
# disable TCP only and allow to use DoH3 servers if available
force_tcp = false
http3 = true

# This is the most important part. From the comments in the file you can
# see that this strategy checks all available resolvers (set by another
# config param later) and choose to use the best 2 ones (by default); best
# in terms of latency.
# Here, I would sacrifice some latency by using the 5 best ones instead of
# the two default ones. It will also demonstrate better the carousel feature
# lb_strategy = 'p2'
lb_strategy = 'p5'

# here as a bootstrap, we also set up quad9 (feel free to add more, like cloudflare too)
bootstrap_resolvers = ['9.9.9.9:53', '8.8.8.8:53']
# same for netprobe
netprobe_address = '9.9.9.9:53'

log_level = 2
log_file = 'dnscrypt-proxy.log'
log_file_latest = true
As of now (May 2025), the following config parameters are not (yet) supported by the containerized DNSCrypt-proxy we downloaded. Hence, we need to comment them out.
# http3_probe=false

# go down to the bottom where the [monitoring ui] part is and
# comment the whole section
Save the file, and now deploy the stack in Portainer.
You will from the logs in Portainer, how different DNS resolvers are contacted, the latency is measured, and then sorted based on that.
 Click on the small ‘file’ icon right next to the
 running state
As you can see, our container is up and running.
 The list of sorted DNS resolvers
Let’s try if we can resolve a domain using dnscrypt-proxy. Install dig tool first, then send a query to the container:
$ sudo apt install dnsutils
$ dig @172.30.1.4 -p 5053 google.com +short
172.217.194.101
172.217.194.138
172.217.194.139
172.217.194.113
172.217.194.102
172.217.194.100
As we can see it works as intended, it resolves our queries. Let’s plug in pi-hole in front of this proxy.
Pi-hole
Pi-hole is an open-source ad blocker that protects your entire network by filtering traffic at the DNS level. Instead of blocking ads within individual browsers, Pi-hole intercepts DNS queries from all connected devices and compares them against customizable blocklists. This prevents ads, trackers, and malicious domains from ever loading, boosting privacy and reducing bandwidth usage. By stopping unwanted content before it reaches your devices, Pi-hole speeds up browsing and minimizes data consumption. It also offers a user-friendly web interface for monitoring network activity, managing blocklists, and adjusting filtering settings. Since all DNS logs are stored locally, your data remains private. Acting as your network’s DNS server, Pi-hole delivers fast, ad-free, and secure internet access — without the need to install anything on each device.
![pi-hole takes your DNS to the next-level [source: pi-hole.net]](/_astro/img-05.CmH9mfiX_Z1Sp2pX.webp) pi-hole takes your DNS to the next-level [source: pi-hole.net]
pi-hole takes your DNS to the next-level [source: pi-hole.net]
Make pi-hole visible to your LAN
To begin, we want Pi-hole to appear as a distinct device on our LAN, rather than just exposing its ports on the Raspberry Pi. This means giving the Pi-hole container its own unique IP address, making it function as a separate network entity. To achieve this, we’ll first create a new Docker network.
Identify Your Parent Network Interface
First, determine the network interface connected to your LAN (e.g., eth0, eno1, etc.). You can find this by running:
# apt install net-tools
# ifconfig
...
eth0: flags=4163<UP,BROADCAST,RUNNING,MULTICAST>  mtu 1500
        inet 192.168.22.70  netmask 255.255.255.0  broadcast 192.168.22.255
        inet6 fe80::d211:ee95:b192:56d  prefixlen 64  scopeid 0x20<link>
        ether 2c:cf:67:9d:0b:ee  txqueuelen 1000  (Ethernet)
        RX packets 0  bytes 0 (0.0 B)
        RX errors 0  dropped 0  overruns 0  frame 0
        TX packets 0  bytes 0 (0.0 B)
        TX errors 0  dropped 0 overruns 0  carrier 0  collisions 0
        device interrupt 115
...
In my case, the pi has the typical eth0 interface, and the network we need to configure our macvlan network in is 192.168.22.0/24.
Let’s create a docker network accordingly:
# docker network create -d macvlan \
  --subnet=192.168.22.0/24 \
  --gateway=192.168.22.1 \
  -o parent=eth0 \
  priv_lan
Alright, that’s all we need from the CLI. Let’s go back to portainer and edit our docker-compose file.
services:
  dnscrypt-proxy:
    container_name: dnscrypt-proxy
    hostname: dnscrypt-proxy
    restart: unless-stopped
    image: klutchell/dnscrypt-proxy
    dns: 9.9.9.9
    volumes:
      - '/etc/localtime:/etc/localtime:ro'
      - '/etc/timezone:/etc/timezone:ro'
      - '/mnt/storage/docker/dns/dnscrypt-proxy/config:/config:rw'
      - '/mnt/storage/docker/dns/dnscrypt-proxy/log:/log:rw'
    environment:
      - "TZ=Asia/Singapore"
    networks:
      pi_docker_network:
        ipv4_address: 172.30.1.4

  pihole:
    container_name: pihole
    restart: unless-stopped
    image: pihole/pihole:latest
    hostname: pihole
    environment:
      - "TZ=Asia/Singapore"
      - "DNS1=172.30.1.4#5053"
      - "DNS2=no"
      - "WEBPASSWORD=admin"
      - "DNSMASQ_LISTENING=all"  # Add this to allow queries from the macvlan
    volumes:
      - '/etc/localtime:/etc/localtime:ro'
      - '/mnt/storage/docker/dns/pihole/config:/etc/pihole/'
      - '/mnt/storage/docker/dns/pihole/dnsmasq:/etc/dnsmasq.d/'
    networks:
      pi_docker_network:
        ipv4_address: 172.30.1.3
      priv_lan:
        ipv4_address: 192.168.22.252
    depends_on:
      - dnscrypt-proxy

networks:
  pi_docker_network:
    external: true

  priv_lan:
    external:
      name: priv_lan
Here’s a rephrased version of your explanation:
Let’s break down some key settings:
- With the
DNS1andDNS2options, you can specify up to two upstream DNS resolvers. In a typical Pi-hole setup, these might be public resolvers like 1.1.1.1 or 8.8.8.8. - However, since we want all DNS queries to be processed by our dnscrypt-proxy for added security, we’ll set only its IP address here. It’s perfectly fine to use the container’s IP, as Pi-hole and dnscrypt-proxy will be on the same network.
- The
WEBPASSWORDvariable sets the admin password for Pi-hole’s web interface—be sure to choose a strong, unique password instead of using my example! - In the network section, we assign a static IP to the Pi-hole container within the same subnet as our other containers. This is important because we’ll configure all future containers to use Pi-hole’s IP as their DNS server, ensuring that all DNS traffic from our containers is both protected and monitorable.
- Additionally, we assign an IP address for Pi-hole on our actual LAN as we wanted; however, make sure that this IP doesn’t conflict with existing devices on your network. The simplest approach is to pick an address outside your router’s DHCP range (for example, if your DHCP range is 192.168.22.50–200, choose an IP below 50 or above 200). You can also reserve this IP in your router settings later, but it’s not strictly necessary if you avoid the DHCP pool.
- Finally, we use the
depends_onproperty to ensure the Pi-hole container starts only after dnscrypt-proxy is running, and we define thepriv_lannetwork for clarity and organization.
Let’s update the stack and see what happens. As we can see, the container is up and running.
 Both containers in our
 dns stack are up and running.
Let’s start by reviewing the logs for any warnings. I noticed three WARNING messages, and two of them could potentially be problematic.
2025-05-22 22:39:28.174 +08 [181M] WARNING: Insufficient permissions to set process priority to -10 (CAP_SYS_NICE required), process priority remains at 0
2025-05-22 22:39:28.177 +08 [181M] WARNING: No database file found, creating new (empty) database
2025-05-22 22:39:28.716 +08 [181M] WARNING: Insufficient permissions to set system time (CAP_SYS_TIME required), NTP client not available
It’s clear that the database-related warning was automatically resolved by Pi-hole during the initial startup. However, to ensure accurate time synchronization (using the NTP protocol) and to allow Pi-hole to set process priorities correctly, we need to grant the container some additional administrative capabilities. Let’s update our docker-compose file for Pi-hole by adding the following lines:
cap_add:
  - CAP_SYS_NICE
  - CAP_SYS_TIME
After redeploying the stack, no more WARNINGs are present.
Dashboard
Let’s try out our pi-hole. Navigate your browser to http://192.168.22.252/admin ; replace the IP to the one you have set.
 The login screen of pi-hole
Enter our password we set in the docker-compose file and hit Log in.
And, we hit our first error already :)
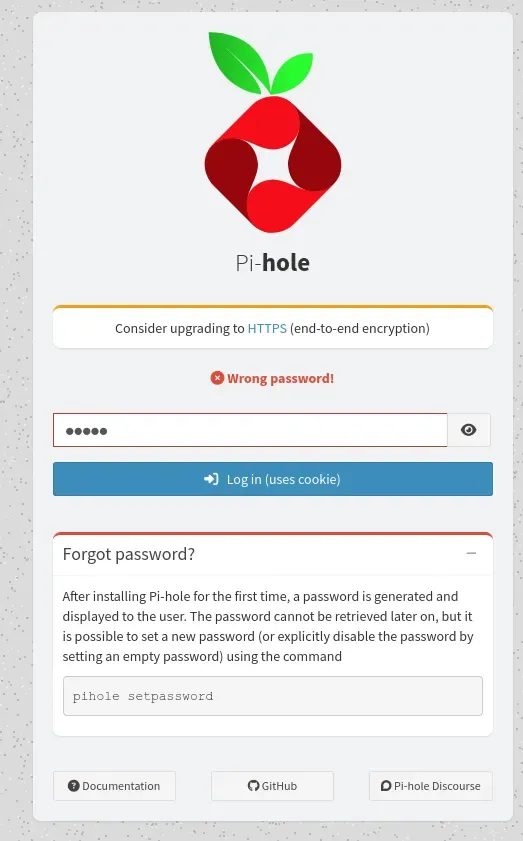 The WEBPASSWORD env variable was not picked up
Seems the WEBPASSWORD env variable was not picked up. I googled a bit and found other variable names for the same setting, like those with a pattern of FTL_*, however, neither of them was working. So, let’s follow the instructions instead.
Navigate to the container of the stack in portainer:
 Click on the exec console button
Click on the forth icon from the left next to “healthy” in the pi-hole row. It has an icon like >_. In the next screen, click on Connect:
 Click on Connect to bring up the console
Set up a new password:
 Add your new password twice
Now, type the new password into pi-hole admin webinterface and login.
 The initial page of the dashboard
You should now see the Pi-hole dashboard, which is very user-friendly. I won’t cover the details of using the interface here, as there are plenty of tutorials available online.
For now, let’s test our setup: open the Query Log tab, then perform a DNS query from your laptop to see it in action.
 Before issuing a query, we see a few queries from the localhost
Issue a DNS query:
$ dig @192.168.22.252 index.hu
dig @192.168.22.252 index.hu

; <<>> DiG 9.18.33-1~deb12u2-Debian <<>> @192.168.22.252 index.hu
; (1 server found)
;; global options: +cmd
;; Got answer:
;; ->>HEADER<<- opcode: QUERY, status: NOERROR, id: 30458
;; flags: qr rd ra; QUERY: 1, ANSWER: 7, AUTHORITY: 0, ADDITIONAL: 1

;; OPT PSEUDOSECTION:
; EDNS: version: 0, flags:; udp: 1232
;; QUESTION SECTION:
;index.hu.   IN A

;; ANSWER SECTION:
index.hu.  25 IN A 81.0.120.158
index.hu.  25 IN A 213.181.199.15
index.hu.  25 IN A 81.0.120.157
index.hu.  25 IN A 194.143.245.39
index.hu.  25 IN A 213.181.199.17
index.hu.  25 IN A 213.181.199.14
index.hu.  25 IN A 213.181.199.16

;; Query time: 7 msec
;; SERVER: 192.168.22.252#53(192.168.22.252) (UDP)
;; WHEN: Thu May 22 23:11:44 +08 2025
;; MSG SIZE  rcvd: 149
As can be seen, the domain index.hu was successfully resolved, and we can see the same on the dashboard too.
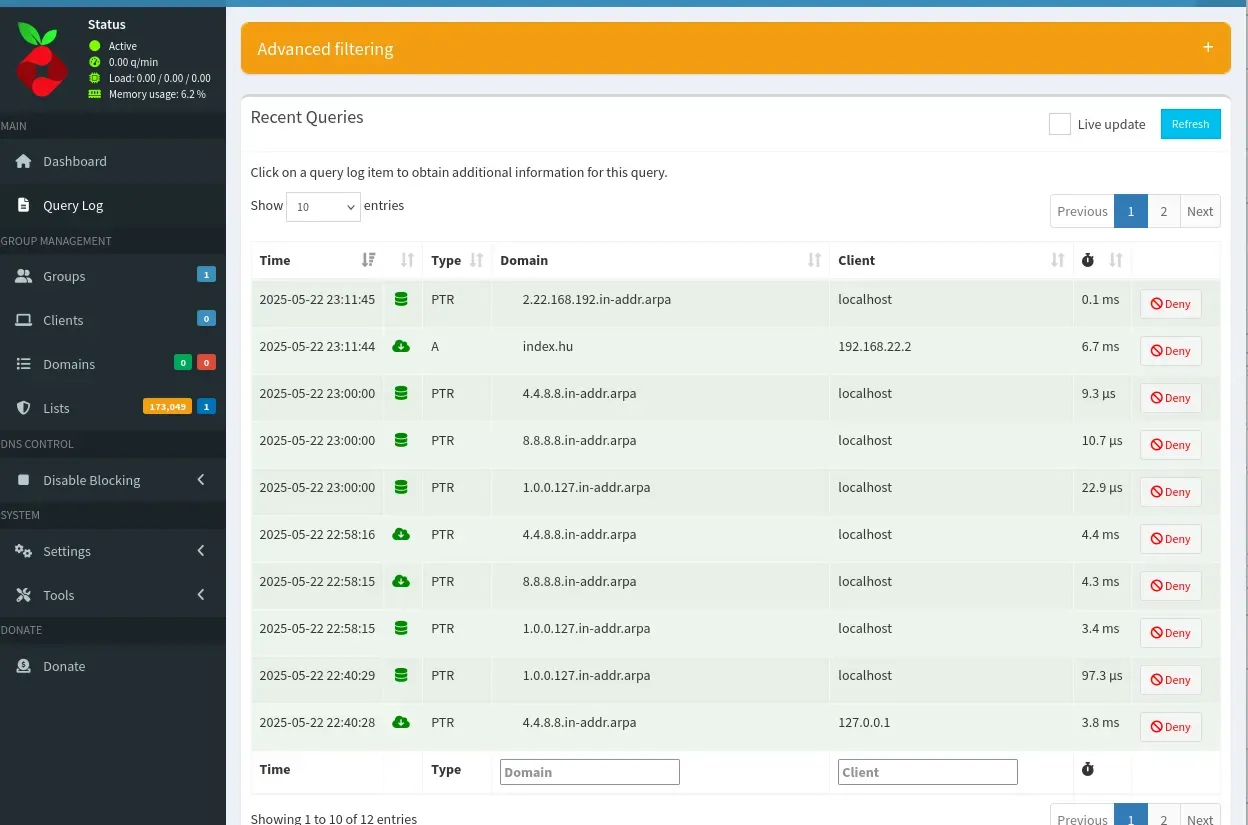 After refreshing the window, we can see our query in the log too
Now that we have a functioning DNS resolver (technically a forwarder), we want all devices on our network to use it instead of the default ISP DNS. There are two ways to achieve this: you can either explore Pi-hole further and configure it to act as your DHCP server (which is a more advanced topic and could be a separate blog post), or you can keep your router handling DHCP but modify its settings to assign Pi-hole’s LAN IP as the DNS server to all connected devices. For example, on my TP-Link router, the configuration looks like this:
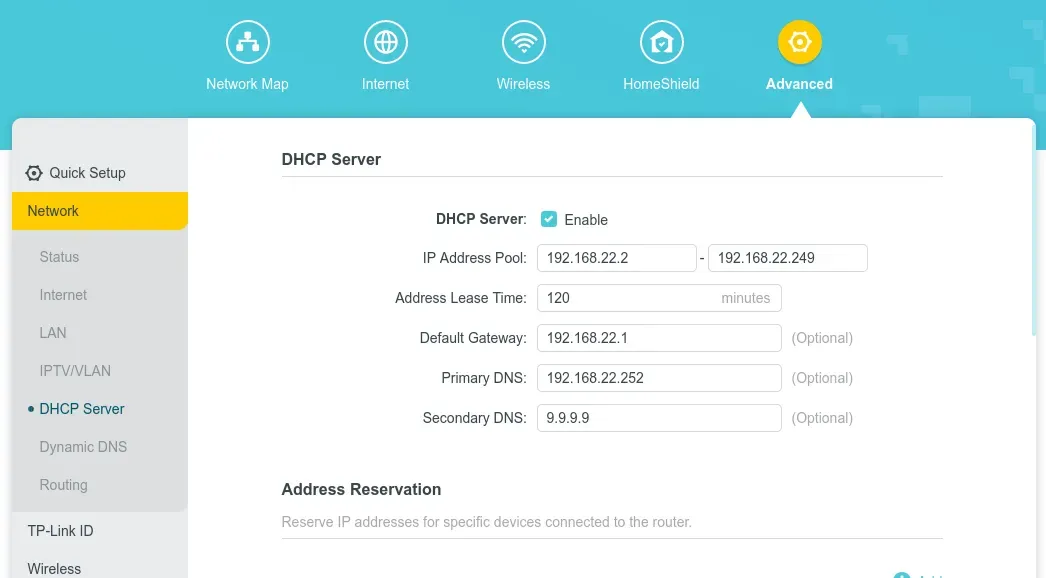 The primary DNS is set to pi-hole’s LAN IP address
For the secondary DNS, I’ve chosen Quad9. This way, if our Pi-hole ever goes down, the other devices on our network will still have a reliable fallback for DNS resolution.
One default setting away from breaking your own server
Ads are gone. DNS is encrypted. The dashboard is pretty. This is the point where most tutorials pat you on the back and wander off.
So let me hand you the landmine instead — because Pi-hole ships with a default blocking mode that is completely fine on your laptop, completely fine on your phone, and quietly catastrophic on the one machine you care about most: the Pi itself.
It took me an embarrassing number of hours to find it. Let’s make it take you four minutes.
 Blocking a domain by sending it to 0.0.0.0 doesn’t send it nowhere. It sends it home. — image generated via Nano Banana
The symptom (a.k.a. three hours I’m not getting back)
I had VS Code Remote-SSH open against the server. Every few minutes, the same popup: “The VS Code Server has died.” Reconnect. Works for three minutes. Dies again. Copilot — stone dead, every time.
So I debugged it like a professional. Memory? Fine. Swap? Fine. dmesg for OOM kills? Nothing. /proc/pressure/memory showing a grand total of 257 microseconds of cumulative memory stall since boot? So no, definitely not RAM. ufw? Clean. File permissions? Clean. Disk? 60% free.
Nothing. Nothing. Nothing.
Then I did the thing I should have done in minute one and actually read the log:
[error] https://mobile.events.data.microsoft.com/OneCollector/1.0 - error POST
Hostname/IP does not match certificate's altnames:
Host: mobile.events.data.microsoft.com is not in the cert's altnames:
DNS:*.[MYDOMAIN.COM], DNS:[MYDOMAIN.COM]
Read that twice. My server asked Microsoft for something — and got handed my own TLS certificate. [I redacted my own domain name!]
Why: 0.0.0.0 is not “nowhere”. It’s “here”.
Pi-hole’s default and officially recommended blocking mode is NULL, which answers every blocked query with the unspecified address — 0.0.0.0 (or :: for IPv6).
That sounds like the digital equivalent of /dev/null. It isn’t.
On Linux, 0.0.0.0 is INADDR_ANY, and when an application calls connect() on it, the kernel does you a “favour” and interprets it as this host. So the chain goes:
- An app on the Pi asks for a blocked domain
- Pi-hole answers
0.0.0.0 - The kernel quietly rewrites that to
127.0.0.1 - The connection lands on whatever is listening on port 443 — which, from Part 16 onwards, is your own nginx reverse proxy
- nginx has no idea who
mobile.events.data.microsoft.comis, shrugs, and serves your wildcard certificate anyway - TLS validation detonates
Your laptop never sees this, and that’s exactly why it’s so hard to spot. Your laptop has nothing listening on :443, so the connection is refused in microseconds — a fast, clean, well-handled failure that every HTTP client on earth knows how to swallow.
Your server is the machine that breaks, because your server is the one with a web server on it. The TCP connection succeeds, then dies at certificate validation instead. Slow failure. Weird failure. In Node’s case, an uncaught TLS error that takes the whole process down with it.
And here is the genuinely nasty part: this gets worse the more you self-host. Every service you add in the coming parts of this series is another thing that might touch a blocked domain — and every single one of them now gets routed straight into your own reverse proxy. Congratulations: you built a beautiful privacy stack that quietly man-in-the-middles itself.
The fix, in the GUI (ten seconds)
Head to Settings → All settings→ dns.blocking.mode and switch it from NULL to NXDOMAIN:
 One radio button between “working ad blocker” and “why is my editor dying every three minutes”
NXDOMAIN means this domain does not exist. Not “it exists at a weird address” — it does not exist. Every client, every language, every runtime on the planet knows exactly what to do with that answer: give up instantly. No connection. No handshake. No certificate to mismatch. No mystery.
NODATA works equally well if you prefer it — the docs note that some clients accept NODATA replies more gracefully than NXDOMAIN. What matters is that you stop handing out an IP address, because an IP address is an invitation.
In conclusion, setting up Pi-hole alongside dnscrypt-proxy provides a robust and privacy-focused DNS solution for your network. By combining network-wide ad blocking with encrypted DNS queries, you not only enhance security but also improve browsing performance and control. With the proper Docker configuration and network setup, this system integrates seamlessly into your home environment, giving you full visibility and management over DNS traffic. Moving forward, you can further customize and expand this setup to fit your specific needs, ensuring a safer and more efficient online experience for all your devices.