
Part 16 — How I Run My Entire Digital Life on a Raspberry Pi: True Remote Access Freedom via Battle-Tested NGINX and No External Gatekeepers
Table of Contents
In this episode, we will finally learn how to get rid of the last piece of the not-really-privacy-preserving puzzle, which is the reliance on Cloudflare tunnels. Now, we take our domain back to the registrar where we bought it, in my case, to Namecheap. Then, we will create a Let’s Encrypt wildcard certificate for all our domains and set up a dynamic DNS plugin that will update the IP address on Namecheap to the IP address the ISP has provided us. Subsequently, we will run Nginx in a container to act as a reverse-proxy for each of our services. The benefits of this approach include making our setup finally completely independent of any third-party (except the domain registrar which we cannot exclude), allowing us more flexibility and control over what protocols (e.g., HTTP2) and security policies we enforce (e.g., only TLS1.2 and above, strong Diffie-Hellman keys, remove unsafe ciphers, enforce HSTS).
 Image generated by ChatGPT
Step #0: Router setup
Most of you, like me, are probably behind a home router. Now that we’re no longer using a Cloudflare tunnel to connect from the outside, we need to configure our router to forward specific traffic to our Raspberry Pi. This process varies depending on your router model, so you’ll need to refer to its documentation. Look for settings called “Port Forwarding” or “DNAT” (Destination NAT). Once you locate the configuration page, create three rules to allow SSH (preferably on a custom port to avoid common botnet scanning), HTTP, and HTTPS traffic to reach your Pi.
Your rules should look something like this:
Name  | Destination Port | Forward to IP | Forward to Port
-----------------------------------------------------------
SSH   | 5544             | 192.168.1.2   | 22
HTTP  | 80               | 192.168.1.2   | 80
HTTPS | 443              | 192.168.1.2   | 443
Assuming your Pi’s local IP is 192.168.1.2 — adjust this to match your setup. You can also choose any custom port for SSH that suits your preference.
Step #1: Domain setup
Part 1: Configure Your Domain in Namecheap
Before you touch your Pi, you need to enable Dynamic DNS for your specific hostname(s) on the Namecheap website.
- Log in to your Namecheap account.
- Go to your Domain List: From your dashboard, click on Domain List on the left sidebar.
- Select your Domain: Find
your-domainand click the Manage button next to it. - Navigate to Advanced DNS: Click on the Advanced DNS tab at the top.
- Scroll down to the Dynamic DNS section and switch it to enabled.
- Crucially, copy the long Dynamic DNS password that appears. This is not your Namecheap account password; it’s a unique key for DDNS updates. Keep it secure!
 Enabling Dynamic DNS for your domain at Namecheap
Part 2: Create an A + Dynamic DNS record
Normally, you are supposed to make a DDNS record for the main domain, e.g., your-domain.tld. However, when I configured the ddnsclient (see later), Namecheap always threw an error. Therefore, the easiest way is to create a subdomain instead, e.g., server.your-domain.tld, which you will still be able to use, say to access your Pi via SSH. Accordingly, set server as Host, and for the Value, you can add any IP for now, e.g., set it to 127.0.0.1. Our ddnsclient will update this later.
 Create a Dynamic DNS record for a chosen subdomain
Step #2: DDNS client setup
A DDNS client in Linux is a vital utility for anyone running services like web servers, game servers, or remote access solutions from a home or small office network with a dynamic public IP address. Since most Internet Service Providers (ISPs) frequently change these dynamic IPs, a DDNS client automatically detects when your IP address changes and then communicates that new IP to a Dynamic DNS service provider. This ensures that your chosen domain name (e.g., your-domain.tld) always points to your current public IP address, allowing uninterrupted access to your hosted services without the need for constant manual updates.
Install the client on your Pi, via apt-get install ddclient. Then, create a config file /etc/ddclient.conf with the following content:
# Configuration file for ddclient generated by debconf
#
# /etc/ddclient.conf
#check every 300 seconds (5min)
daemon=300
# timeout after 10 sec
timeout=10
ssl=yes
#namecheap ddns server to get the IP of our current ISP subscription
use=web,web=dynamicdns.park-your-domain.com/getip
#protocol is for namecheap, as it is our registrar ma
protocol=namecheap
# our domain name
login=YOUR-DOMAIN.TLD
#password (token key from namecheap advanced DNS tab)
password='YOUR_TOKEN'

# Host to update
# We use @ for the root domain (e.g., yourdomain.com) as a DDNS record
server.YOUR-DOMAIN.TLD
Substitute the placeholder domain names with your actual desired settings. Then, to activate the service immediately and configure it to launch automatically upon system boot, execute the following commands:
$ sudo systemctl restart ddclient
$ sudo systemctl enable ddclient
$ sudo systemctl status ddclient
The final command will provide immediate feedback on any issues. If all operations report success, your Namecheap dashboard should quickly reflect your updated IP address.
Step #3: Free TLS cert via Let’s Encrypt
Time for the next quest in our domain adventure: conjuring up a shiny TLS certificate for our services! At first, I thought I’d just pick up a Comodo PositiveSSL from Namecheap — after all, it only sets you back $5.90 for a full year. Sounds simple, right? Well, here’s the catch: that budget-friendly cert only covers your main domain or just one lonely subdomain. Meanwhile, as the blog title hints, our trusty Raspberry Pi is juggling at least ten different services, each with their own subdomain hats!
Intrigued, I took a peek at Namecheap’s PositiveSSL wildcard certificate (the one that covers all your subdomains in one magical sweep). Suddenly, the price tag vaults to $39.99 per year. Not exactly “mortgage-your-house” expensive, but let’s face it: when you can snag a whole domain for $2 per year (scammy up-sells aside), even three years of domain registration often costs less — just $14.99 — than one year of wildcard coverage.
Clearly, it’s time to look for smarter options. Enter Let’s Encrypt — the superhero of TLS certificates! These folks hand out robust, free certificates that work for as many domains and subdomains as your heart desires. The only “gotcha”? You’ll need a dash of technical bravado, plus a reminder to renew every three months (because, you know, Let’s Encrypt likes to keep you on your toes).
Approach
Ready for some TLS magic tricks? Usually, there are two classic ways to persuade Let’s Encrypt to grant you a certificate for your domain. The first is a classic “web root” approach: if your website’s living room (a.k.a. web server) is in the same house as where you need your cert, you simply stash a secret acme_challenge file inside a special .well-known/ directory of your webroot. But here’s the twist — my main domain is parked with Namecheap hosting, while my subdomains power micro-services on my Raspberry Pi, where I have zero intentions of running any web server, especially not on the wild-west, unencrypted port 80.
While that first method is as easy as setting and forgetting, I like a challenge — and a bit more flexibility.
The second alternative is then the DNS-based validation. With this trick, you can summon the Let’s Encrypt client (e.g., certbot) from practically any device. It gives you a secret code, and all you need to do is add it as a special DNS TXT record for your domain — proving you’re the real domain owner, worthy of TLS power. This approach works like a charm, even if your server isn’t publicly accessible or you’re aiming for wildcard certificates. Ready? Let’s dive into the DNS challenge path below.
Install certbot
Setting up certbotthese days couldn’t be easier — no more hunting down obscure binaries, wrangling with Snap or Flatpak, or rolling your own from mysterious source tarballs. Thanks to Certbot’s popularity, it’s now a superstar in most Linux main repositories, including Raspbian.
$ sudo apt update
$ sudo apt install certbot
Then, simply issue the following command for getting a certificate for your main domain and all subdomains. It is important to note that you must specify the main domain along with the wildcarded ones.
$ sudo certbot certonly --manual --preferred-challenges dns  --email YOUR_EMAIL_ADDRESS -d your_domain.tld -d *.your_domain.tld

Saving debug log to /var/log/letsencrypt/letsencrypt.log

--------------------------------------------------------------------------------
Please deploy a DNS TXT record under the name
_acme-challenge.your_main_domain.tld with the following value:

<some-random-string-generated-by-certbot>

Before continuing, verify the record is deployed.
--------------------------------------------------------------------------------
Press Enter to Continue
Once you run the command, it will spit out a random string that you need to add to your DNS records. Just head over to Namecheap, navigate to Advanced DNS, and scroll down a little to add a new DNS record.
 Add the special DNS TXT record and click on the green tick
Once you’ve added that random TXT record to your DNS, hold off on pressing Enter in your certbotterminal just yet. Certbot immediately checks if the record is live, but DNS propagation isn’t instantaneous — it can take some time for your changes to spread across the internet. If Certbot doesn’t find the TXT record right away, it will throw a fit and fail the validation. The tricky part? You can’t just tell certbot to check again later for the same record. You’d have to restart the entire process, which means generating a new TXT record and adding that to DNS — potentially leading to an endless cycle of attempts.
What I usually do to avoid this loop is to lean on Cloudflare’s DNS servers as a quick check-point. From another terminal window, I keep pinging with dig commands against Cloudflare DNS to confirm the TXT record has propagated properly. Once I get a positive hit, I head back to Certbot and hit Enter to continue the magic.
$ dig @1.1.1.1 _acme-challenge.your_domain.tldOnce you get a positive hit confirming your DNS TXT record has propagated, feel free to hit Enter in the Certbot terminal. Voilà! Your domain is verified, and Let’s Encrypt will drop your certificate files neatly into /etc/letsencrypt/live/your-main-domain.tld/ for you to use. We will be able to use them in our Nginx reverse proxy setup in our next step.
Step #4: Reverse proxy with Nginx
When it comes to running a reverse proxy, NGINX isn’t just a rockstar — it’s your backstage pass to web traffic wizardry. Acting as a middleman, NGINX gracefully forwards incoming requests to the right backend service, keeping our already running services hidden while elegantly handling routing, load balancing, and even SSL termination if you wish. The best part? NGINX is ridiculously easy to containerize. Thanks to its official Docker image, we can spin up a fully-functional NGINX reverse proxy inside a container with just a few commands.
A quick caution before you charge ahead: this NGINX container will be the beating heart of your entire remote access setup. That’s why it’s wise to avoid deploying it through Portainer. Why? Because once you link remote access to Portainer via the NGINX reverse proxy, any attempt to restart or tinker with the proxy could instantly disconnect you from Portainer — the very tool managing your containers! Sure, maybe Portainer bravely soldiers on and completes the restart, even if your web session bites the dust, but why roll the dice? With SSH access to your server (secured by your custom domain and outside the Docker stack), you’ll always have a reliable back door — no matter what happens inside the container world. So, when it comes to running your NGINX Docker stack, sticking to SSH commands is the more convenient and error-proof path — leaving Portainer out of this particular loop keeps you safely in control and free from accidental lockouts.
Just a quick heads-up: my goal here is to lock down our configuration with the latest security best practices — think digital fortress, not a picket fence. We’re layering on modern defenses that make unauthorized access a real uphill battle, plus adding extra zero-trust features you simply can’t get for free with most tunnel-based solutions. The approach in this post ensures robust protection and peace of mind, keeping your setup resilient against even the craftiest of online intruders.
Docker-compose stack
Let’s create our stack fundamentals first. Go to our /docker/ directory, and create an nginx directory, and within, a docker-compose.yml file.
$ cd /docker
$ sudo mkdir nginx
$ cd nginx
$ nano docker-compose.yml
Directories to bind
There are three main directories I want to bind into the container.
- One is for the
logs, so later, I can easily check the logs of Nginx locally. - Second, the directories (yeah, more than one) for the Let’s Encrypt certificates we created above, i.e.,
/etc/letsencrypt/liveand/etc/letsencrypt/archive. - Third,
conf.ddirectory that will host each of our reverse-proxy configurations — think about it as the config directory for each our services served behind a subdomain. - Optionally, the fourth is a directory for mTLS certificates as a form of simple zero-trust approach. More on this later.
Files to bind
Some configuration files need to be bound individually when setting up NGINX in a container. You can’t simply mount an entire directory to /etc/nginx if you only have a single config file — NGINX needs to generate other essential files during its initial launch. Rather than starting NGINX, grabbing the freshly created files, and then binding the whole directory back, it’s much safer and more reliable to bind only the specific configuration files you need. This approach ensures NGINX can still do its job building out the rest of its required files, saving you from unexpected headaches down the line.
These files are the following
nginx.conf: The main nginx config file, which is more or less standard, but we still want to take full control.ssl.conf: Every subdomain needs its own set of SSL parameters, but let’s be honest — manually copying and pasting those settings everywhere is a recipe for mistakes and future headaches. Rather than juggling updates across multiple files (and inevitably missing one on a rushed Friday night), we’ll create a dedicated SSL configuration file. Each subdomain’s config will simply include this master SSL file, ensuring consistency and making future updates a breeze — change it once, and all your subdomains instantly benefit!proxy.conf: Just like we will do withssl.conf, it’s essential to set several proxy headers for the services running behind our NGINX reverse proxy. While some services might demand additional, more specific headers, including a sharedproxy.confin all our subdomain configurations gives us a solid, consistent baseline. From there, we can easily override or extend these settings with custom parameters on a per-subdomain basis—making management smooth, flexible, and mistake-proof.ssl-dhparams.pem: This file might be a bit of an outlier for the first time. This file in NGINX contains the Diffie-Hellman parameters used during the SSL/TLS handshake to securely establish encrypted connections. It is a public parameter file (not a secret) that helps strengthen the key exchange process by defining the prime and generator for the Diffie-Hellman group, enhancing security and preventing vulnerabilities in encrypted communication.robots.txt: This is a straightforward file designed to prevent compliant crawlers and bots from indexing our services. We’ll mount it and ensure its path is included in the configuration for each of our subdomains.
Alright, based on these requirements, let’s create our docker-compose.yml file:
services:
  nginx:
    image: nginx:stable-alpine
    container_name: nginx
    restart: unless-stopped
    ports:
      - "80:80"
      - "443:443"
    volumes:
#directories
      - "/docker/nginx/certs:/etc/ssl/mtls:ro" #for mTLS certs
      - "/etc/letsencrypt/live/YOUR_DOMAIN.TLD:/etc/nginx/letsencrypt/live/YOUR_DOMAIN.TLD:ro" #for the Let's Encrypt SSL symlinks
      - "/etc/letsencrypt/archive/YOUR_DOMAIN.TLD:/etc/nginx/letsencrypt/archive/YOUR_DOMAIN.TLD:ro" #for the Let's Encrypt SSL symlinks
      - "/docker/nginx/log:/var/log/nginx:rw" #for the logs
      - "/docker/nginx/config/nginx/conf.d:/etc/nginx/conf.d:ro" #conf.d for the reverse proxy conf
#individual files to avoid messing up with other files in the same dir
      - "/docker/nginx/config/nginx/nginx.conf:/etc/nginx/nginx.conf:ro" #nginx.conf
      - "/docker/nginx/config/nginx/ssl-dhparams.pem:/etc/nginx/ssl-dhparams.pem" #pre-generated strong DH param file 2048 bit
      - "/docker/nginx/config/nginx/ssl.conf:/etc/nginx/ssl.conf:ro" #for a separated SSL config file
      - "/docker/nginx/config/nginx/proxy.conf:/etc/nginx/proxy.conf:ro" #for a separated proxy param conf to be included for subdomai>
      - "/docker/nginx/html/robots.txt:/usr/share/nginx/html/robots.txt:ro" #for the robots.txt to disallow crawlers
    dns: 172.30.1.3
    networks:
      pi_docker_network:
        ipv4_address: 172.30.1.251

networks:
  pi_docker_network:
    external: true
Despite the lengthy intro above, the Docker Compose file itself remains pretty straightforward. Just be sure to replace YOUR_DOMAIN.TLD and adjust the file paths accordingly. We also allow for now connections on port 80, but we will later force our nginx to always do HTTP 301 redirection to port 443, thereby enforcing HSTS (HTTP Strict Transport Security) policy.
A quick extra note: any files generated on the host that NGINX doesn’t need to modify — like certificates and config files — are mounted as read-only. This safeguards them from accidental changes inside the container. On the other hand, directories like logs are mounted with write permissions since NGINX needs to update them.
You might wonder why we mount both the archive and live certificate directories. Here’s the deal: Certbot stores all your certificates in the archive subdirectory, creating new numbered versions (like 002, 003, etc.) with each renewal, so certificates are never overwritten. Meanwhile, symbolic links in the live directory always point to the latest certificate version. Mounting only archive would force constant updates to your SSL config, while mounting only live would give the container just the symlinks without the underlying cert files. That’s why we mount both directories—to keep everything consistent and functional inside the container.
Create those directories
# mkdir -p /docker/nginx/log
# mkdir -p /docker/nginx/config/nginx/conf.d
# mkdir -p /docker/nginx/html/
nginx.conf
Let’s see the main config file first. Open the file for edit and copy the following content:
user  nginx;
worker_processes  auto;

error_log  /var/log/nginx/error.log notice;
pid        /var/run/nginx.pid;

events {
    worker_connections  1024;
}

http {
    include       /etc/nginx/mime.types;
    default_type  application/octet-stream;

    log_format  main  '$remote_addr - $remote_user [$time_local] "$request" '
                      '$status $body_bytes_sent "$http_referer" '
                      '"$http_user_agent" "$http_x_forwarded_for"';

# Only send "Connection: upgrade" upstream when the client actually asked
    # to upgrade (WebSocket). Otherwise send "close". Sending "upgrade" on a
    # plain request — with an empty Upgrade header — is malformed HTTP.
    # Used by proxy.conf, so it applies to every proxied vhost.
    map $http_upgrade $connection_upgrade {
        default upgrade;
        ''      close;
    }
    # Zone 'mylimit', 10MB shared memory.
    # Allows an average of 1 request per second per IP.
    # Allows a burst of 10 requests beyond the rate.
    limit_req_zone $binary_remote_addr zone=mylimit:10m rate=1r/s;

    access_log  /var/log/nginx/access.log  main;
    error_log /var/log/nginx/error.log;
    sendfile        on;
    #tcp_nopush     on;

    keepalive_timeout  65;

    #gzip  on;

    #reverse-proxy conf
    include /etc/nginx/conf.d/*.conf;

}
Nothing out of the ordinary here —pretty much a standard setup with some protection agains bots (see more below). We’ve simply customized the logging by directing access and error logs to their respective files. Additionally, we’ve specified a dedicated directory for storing all subdomain configurations, so NGINX will automatically load every .conf file found within /etc/nginx/conf.d/.
To protect against bots and repeated attempts to probe our server, we’re setting a rate limit of roughly one request per second per IP address. This should work perfectly for solo use (since you’ll likely access everything from a single IP), but you can always adjust these numbers if you need to support multiple users — like your family. Just ask an AI chatbot for help if you want to fine-tune the limits to fit your needs (that’s what I did, too!). I want to note here that we’ll need to apply these and additional rate-limiting settings individually to each subdomain as part of the next steps.
ssl.conf
Let’s make our SSL-based access as secure as it can be (as of 2025):
ssl_protocols               TLSv1.2 TLSv1.3;
#ssl_ecdh_curve              secp512r1;
ssl_ecdh_curve              secp384r1;
ssl_prefer_server_ciphers   on;
ssl_dhparam                 /etc/nginx/ssl-dhparams.pem;
ssl_certificate             /etc/nginx/letsencrypt/live/YOUR_DOMAIN.tld/fullchain.pem;
ssl_certificate_key         /etc/nginx/letsencrypt/live/YOUR_DOMAIN.tld/privkey.pem;
#mTLS stuffs
#ssl_trusted_certificate     /etc/ssl/mtls/ca.crt;
#ssl_client_certificate      /etc/ssl/mtls/ca.crt;
#ssl_verify_client     on;
ssl_session_timeout         10m;
ssl_session_cache           shared:SSL:10m;
ssl_session_tickets         off;
ssl_ciphers                 "TLS_AES_256_GCM_SHA384:TLS_CHACHA20_POLY1305_SHA256:TLS_AES_128_GCM_SHA256:ECDHE-ECDSA-AES256-GCM-SHA384:ECDHE-RSA-AES256-GCM-SHA384:ECDHE-ECDSA-AES128-GCM-SHA256:ECDHE-RSA-AES128-GCM-SHA256";
## STRICT HTTPS (HSTS)
add_header                  Strict-Transport-Security "max-age=31536000; includeSubDomains; preload" always;
## other security measures
add_header                  X-Frame-Options "DENY" always;
add_header                  X-Content-Type-Options "nosniff" always;
add_header                  X-XSS-Protection "1; mode=block" always;
add_header                  Referrer-Policy "no-referrer-when-downgrade" always;
# when going to other domains (not our subdomains), do not not put anything else in referer just the domain
add_header                  Referrer-Policy "strict-origin-when-cross-origin" always;
# The following might require further tests
# add_header                  Content-Security-Policy "default-src 'self'; script-src 'self' 'unsafe-inline' 'unsafe-eval'; style-src 'self' 'unsafe-inline'; img-src 'self' data:; font-src 'self'; connect-src 'self'; media-src 'self'; object-src 'none'; frame-ancestors 'self'; form-action 'self'; base-uri 'self';" always;
add_header                  Permissions-Policy "geolocation=(), microphone=(), camera=(), fullscreen=(self), payment=(), usb=(), interest-cohort=()" always;
ssl_protocols TLSv1.2 TLSv1.3;enables only modern, secure protocols, deliberately excluding older, vulnerable versions like TLS 1.0 and 1.1. This balances compatibility with strong security, ensuring encrypted connections use up-to-date standards.ssl_ecdh_curve secp384r1;specifies a strong elliptic curve for ECDH key exchange; secp384r1 is considered highly secure and widely supported, offering excellent cryptographic strength without the performance cost of larger curves.ssl_prefer_server_ciphers on;directs NGINX to use the server’s preferred cipher suite order, improving control over secure cipher negotiation and preventing weaker client-preferred ciphers from being chosen.ssl_dhparam /etc/nginx/ssl-dhparams.pem;enables custom Diffie-Hellman parameters, enhancing forward secrecy by strengthening the ephemeral key exchange crucial for encrypted sessions.ssl_ciphers ...directive defines the precise set of encryption algorithms and key exchange mechanisms that your NGINX server will offer and prefer when establishing an HTTPS connection, aiming for the highest possible security. It prioritizes the most modern and secure cipher suites:TLS_AES_256_GCM_SHA384,TLS_CHACHA20_POLY1305_SHA256, andTLS_AES_128_GCM_SHA256for TLS 1.3 connections, which are designed for optimal performance and security. Following these, it lists the strongest Perfect Forward Secrecy-providing ciphers for TLS 1.2, specifically those utilizing Elliptic Curve Diffie-Hellman Ephemeral (ECDHE) for key exchange with either AES-256 GCM or AES-128 GCM encryption. By explicitly listing only these strong options and excluding older or weaker ciphers, this configuration ensures that your server negotiates the most robust possible encryption with compatible clients, contributing to a perfect score on SSL security tests.- **Disabling SSL session tickets with **
ssl_session_tickets off;reduces risk from certain known vulnerabilities affecting session resumption, boosting security. ssl_session_cache shared:SSL:10m;** and **ssl_session_timeout 10m;efficiently manage session caching, improving performance while maintaining security.- The HTTP Strict Transport Security (HSTS) header with
max-age=31536000; includeSubDomains; preloadenforces HTTPS across your domain and subdomains for one year and requests inclusion in browsers’ preload lists, a widely recommended practice to prevent downgrade attacks and enforce secure connections. - Additional security headers like
X-Frame-Options “DENY”, X-Content-Type-Options “nosniff”, X-XSS-Protection “1; mode=block, andReferrer-Policy “no-referrer-when-downgrade”, Referrer-Policy “strict-origin-when-cross-origin”add multiple layers of protection against clickjacking, MIME type sniffing, XSS, and referrer information leakage, aligning with OWASP best practices. - I have added too more recent HEADERS that tries to strenghten even more our services. The
Content-Security-Policy(CSP) acts as a robust defense against Cross-Site Scripting (XSS) and data injection by whitelisting permissible sources for all content (scripts, styles, images, etc.), thereby preventing browsers from loading unauthorized or malicious assets. Complementing this, thePermissions-Policyheader granularly controls which browser features and APIs (like geolocation, camera, or microphone) your site and any embedded third-party content are allowed to access, significantly enhancing user privacy and security by mitigating potential abuse of sensitive functionalities. Together, they provide the browser with explicit instructions to enforce a secure execution environment for your website. However, they might break your services, so if there is any error later, you might check them, especially theContent-Security-Policy, which i purposely commented for now — might revisit later.
Commented out lines for mutual TLS (mTLS) (ssl_trusted_certificate, ssl_client_certificate, ssl_verify_client) are not enabled yet they indicate preparedness for zero-trust or client certificate authentication scenarios (see details later).
ssl-dhparams.pem
Let’s generate the custom Diffie-Hellman parameters using OpenSSL. Note that a 2048-bit length is already sufficiently secure, and increasing it to 4096 bits only slows down connections — especially on resource-constrained devices like our Raspberry Pi. I would recommend reserving 4096-bit DH parameters for powerful servers, while 2048 bits strikes the right balance of strong security and performance for our Pi setup.
This approach aligns with best practices, ensuring robust encryption without unnecessary overhead.
To create the file, issue the following command in the right directory, i.e.,:
$ cd /docker/nginx/config/nginx
$ sudo openssl dhparam -out ssl-dhparams.pem 2048
On the Pi, this might take some time, so be patient :)
proxy.conf
Let’s have a look at the typical proxy headers we should set for all of our subdomains.
# Timeout if the real server is dead
proxy_next_upstream error timeout invalid_header http_500 http_502 http_503;

# Proxy Connection Settings
proxy_buffer_size 128k;
proxy_buffers 4 256k;
proxy_busy_buffers_size    256k;
proxy_connect_timeout 240;
proxy_headers_hash_bucket_size 128;
proxy_headers_hash_max_size 1024;
proxy_http_version 1.1;
proxy_read_timeout 240;
proxy_redirect  http://  https://;
proxy_send_timeout 240;

# Proxy Cache and Cookie Settings
proxy_cache_bypass $cookie_session;
proxy_no_cache $cookie_session;

# Proxy Header Settings
proxy_set_header Connection $connection_upgrade;
proxy_set_header Early-Data $ssl_early_data;
proxy_set_header Host $host;
proxy_set_header Proxy "";
proxy_set_header Upgrade $http_upgrade;
proxy_set_header X-Forwarded-For $proxy_add_x_forwarded_for;
proxy_set_header X-Forwarded-Host $host;
proxy_set_header X-Forwarded-Proto https;
proxy_set_header X-Forwarded-Ssl on;
proxy_set_header X-Real-IP $remote_addr;
# this is to not send this back more than once, as our nginx will send it once already
# this is set in ssl.conf as add_header X-Content-Type-Options "nosniff" always;
proxy_hide_header X-Content-Type-Options;
This proxy.conf ensures robust proxy handling by defining retry policies for upstream failures, tuning buffer sizes and timeouts for stable connections, and enforcing HTTPS redirects. It carefully manages caching by bypassing session cookies to prevent stale content and sets necessary headers like X-Forwarded-For and X-Real-IP to maintain client identity, while supporting protocol upgrades and SSL indicators— making it a solid, secure foundation for all subdomain proxies.
One final point about our setup: In the ssl.conf, we’ve set the X-Content-Type-Options: nosniff header, which is a crucial security measure. This header tells browsers not to perform MIME-type sniffing, preventing them from interpreting files as a different content type than what the server specifies — such as executing a .txt file as JavaScript. By blocking this behavior, nosniff helps mitigate certain attacks like XSS and is widely regarded as a best practice. While many backend services already include this header, having NGINX add it as well could result in it being sent twice, which may cause issues with some browsers. To avoid this, rather than auditing every backend service for its nosniff headers, we let NGINX consistently add X-Content-Type-Optionsand, in proxy.conf, explicitly remove any instance of this header coming from upstream services. This approach keeps things simple and reliable — makes sense, right?
robots.txt
Let’s create this simple robots.txt file.
$ mkdir /docker/nginx/html
$ nano /docker/nginx/html/robots.txt
Then, add the following lines to the robots.txt:
User-agent: *
Disallow: /
Step #5: Create a subdomain with configuration
Next, we’ll expose our Portainer service. I won’t cover all the services since they generally require the same configuration, but I will demonstrate how to enable mTLS at the end of this blog post.
Let’s go to conf.d and create a configuration file for our Portainer.
$ cd /docker/nginx/config/nginx/conf.d
$ nano portainer.conf
Add the following lines to the config:
###############################
###       PORTAINER         ###
###############################
### REDIRECT ANYTHING ON PORT 80 --> 443!
server {
    listen 80;
    server_name portainer.YOUR_DOMAIN.tld;
    return 301 https://$host$request_uri;
}

server {
  #variables - portainer is the docker service name so resulution should work
  set $portainer http://172.30.1.250:9000;
  #server info
  listen 443 ssl;
  http2 on;
  server_name portainer.YOUR_DOMAIN.TLD;
  #common ssl settings
  include /etc/nginx/ssl.conf;

  #mTLS
#  ssl_verify_client           on; #verify client certificate without exception

  location / {
    # --- REVISED RATE LIMIT APPLICATION ---
    # Applies the 'mylimit' zone.
    # Allows a burst of 10 requests.
    # 'nodelay' ensures requests within the burst are processed immediately.
    limit_req zone=mylimit burst=10 nodelay;
    proxy_pass              $portainer; #use the variable defined above
    #include common proxy settings
    include /etc/nginx/proxy.conf;
    #override some proxy settings ah
    proxy_set_header Upgrade $http_upgrade; # Redundant if in proxy.conf but safe
    proxy_set_header Connection "upgrade";  # Redundant if in proxy.conf but safe
    access_log on;
    access_log /var/log/nginx/access_portainer.log;
    error_log on;
    error_log /var/log/nginx/access_portainer.log;
  }
  # FOR THE robots.txt to be served and discourage crawlers
  location = /robots.txt {
    # 'alias' points directly to the file's path inside the container.
    alias /usr/share/nginx/html/robots.txt;
    allow all; # Allow all access to the robots.txt file itself
    log_not_found off; # Don't log 404s if the file is missing
    access_log off;    # Don't log every robots.txt access request
  }
}
The above reverse proxy configuration for our Portainer is well-structured and follows standard best practices for securely exposing the service behind HTTPS with HTTP/2 support. It includes:
- The HTTP server block that redirects all traffic from port 80 to HTTPS on port 443 for the subdomain
portainer.YOUR_DOMAIN.tld. - The main HTTPS server block listens on port 443 with SSL enabled, using our common SSL settings included from
/etc/nginx/ssl.conf. - The upstream Portainer service is set via an internal IP (
172.30.1.250:9000). Here, since our Nginx is also set to use our Pihole for DNS, using docker hostnames won’t work. In fact, even if you disable thedns:entry in thedocker-compose.ymlfile of Nginx, you might still encounter issues; actually I did. Hence, I hardwired the IP, but hey, that’s why we created our whole networking setup upfront to easily overcome hurdles like this. - As you can see, we include our shared proxy configuration (
/etc/nginx/proxy.conf) which covers headers, timeouts, and buffers, supporting WebSocket upgrades with redundant but safe explicitproxy_set_header UpgradeandConnectiondirectives. This is just to showcase, how overriding can be done. - Logging is enabled with separate access and error logs for Portainer, aiding in monitoring and troubleshooting.
- As mentioned above, the mTLS client certificate verification is commented out but provisioned for future use.
- Note, we added an extra
locationtag that does exact matching on/robot.txt. This is to be served for the crawlers.
Overall, this config ensures secure HTTPS access with HTTP/2, proper client header forwarding including WebSocket support for Portainer’s UI consoles, and structured logging. The HTTP to HTTPS redirection and inclusion of strict SSL settings align it with secure deployment recommendations for running Portainer behind an NGINX reverse proxy.
Rate-limit protection
Recall, we applied additional rate limiting measures against bots. In particular, the extra line limit_req zone=mylimit burst=10 nodelay; within a subdomain’s location block applies a predefined rate limit (we defined in nginx.conf) to all incoming requests for that specific subdomain. It uses the mylimit zone (which tracks request rates based on the client’s IP address) to ensure that traffic from any single IP does not exceed the specified average rate (e.g., 1 request per second). Additionally, the burst parameter allows for a temporary spike in requests (e.g., up to 10 requests) above the average rate, accommodating the typical rapid bursts of activity when a web page loads, while nodelay ensures these burst requests are processed immediately rather than being queued, thus maintaining a smooth user experience by preventing artificial delays for legitimate traffic within the defined limits.
Step #6: “Register” the actual subdomain with Namecheap
With our NGINX proxy configured and a wildcard certificate ready for the portainer subdomain, there’s just one more step — making sure the rest of the world can find it. If you’re familiar with DNS, this is a breeze! Since all our services run on the same Raspberry Pi behind a single IP address, there’s no need to mess with new DDNS records or tweak our ddnsclient setup. Instead, we can simply add a CNAME record that acts as an alias. Just head over to the Advanced DNS settings in Namecheap, create a new CNAME record with portainer as the Host, and set its value to the DDNS subdomain you established as your A+Dynamic DNS record. That’s it — the Portainer subdomain will automatically follow any IP changes handled by your DDNS, with zero extra fuss.
 Add a new CNAME record with Host portainer pointing to your A+Dynamic DNS Record
After set up, let’s verify with again with dig and a third-party DNS recursive resolver that the new subdomain is penetrated the DNS ecosystem.
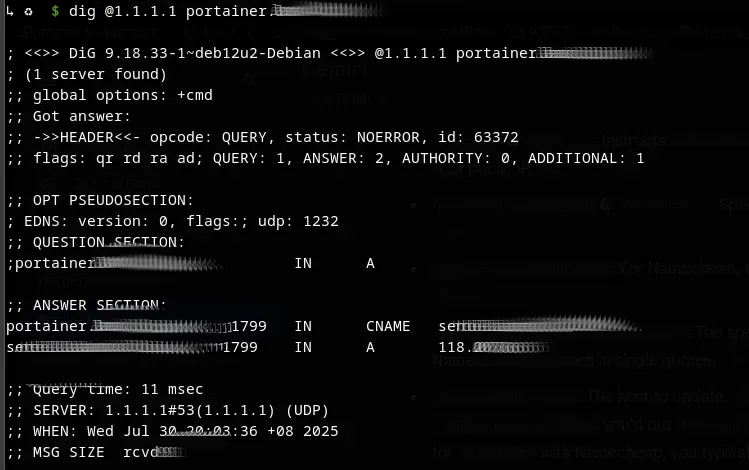 Our new CNAME record is now known to the world
“The proof of the pudding is in the eating.” — Let’s test access to Portainer in our browser — and just like that, it’s working perfectly. Our reverse proxy is fully operational, and by repeating these steps for each subdomain, the entire setup can run independently of the Cloudflare tunnel we set up in Part 4.
For context, I previously relied on Cloudflare Tunnels for remote access while my ISP assigned only a CG-NAT IP, making direct server access impossible. Thankfully, that’s no longer the case — I now have full control over my environment.
Security Hygene
Next, let’s evaluate our system’s security using passively collected data, without actively attempting to breach it.
Test #1: ssllabs.com
Let’s go to https://www.ssllabs.com/ssltest/, and key in your hostname for which you setup nginx, i.e., portainer.YOUR_MAIN_DOMAIN.tld.
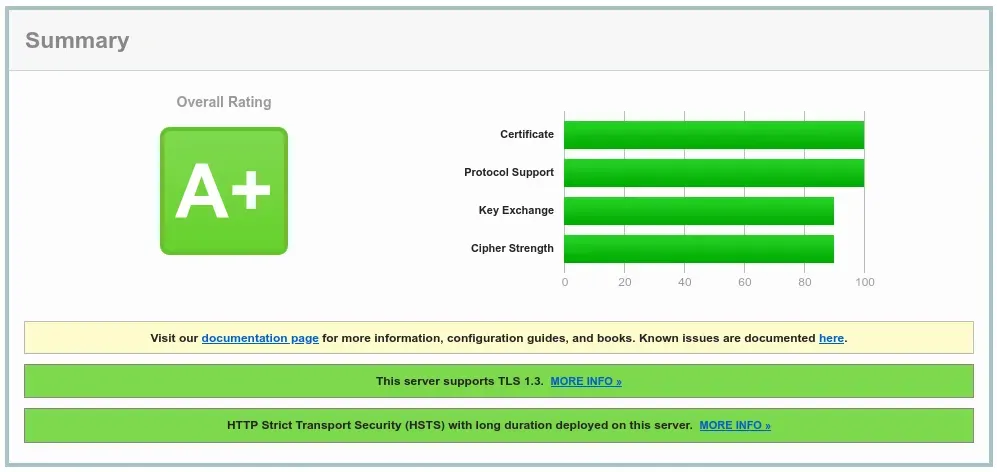 Our server got a overall rating of A+
I don’t know what you guys think, but getting A+ is the best grade we can get, right? You can scroll down and check the details. For instance, you can see that old browsers and systems actually fail to do handshake, because the ciphersuites they use are vulnerable and outdated, hence our server does not support.
 Outdate clients using vulnerable ciphersuites cannot downgrade our security and handshakes fail
Scrolling lower, we can see that many well-known vulnerables are not present either.
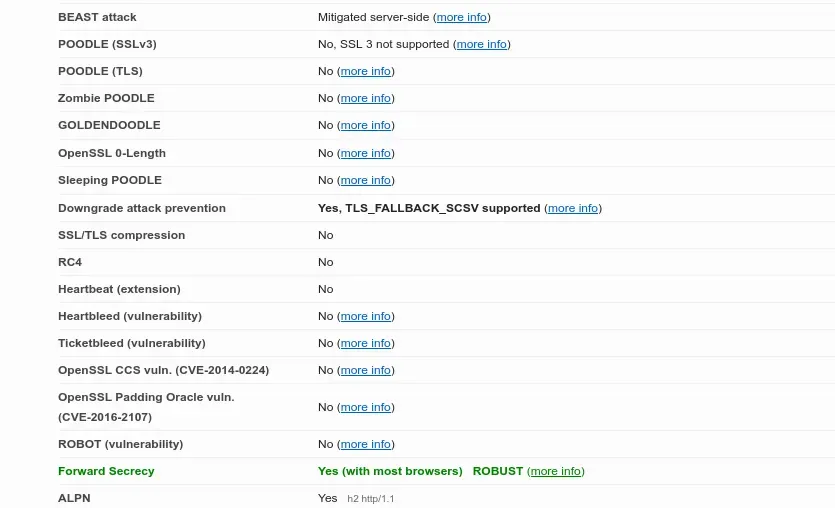 Not vulnerable to well-known issues
Test #2: ssltrust.com.au
I did another round with https://www.ssltrust.com.au/ssl-tools/ssl-checker. The results are quite similar (grade A+), the nosniff header thing seems to be working too as it is not sent multiple times.
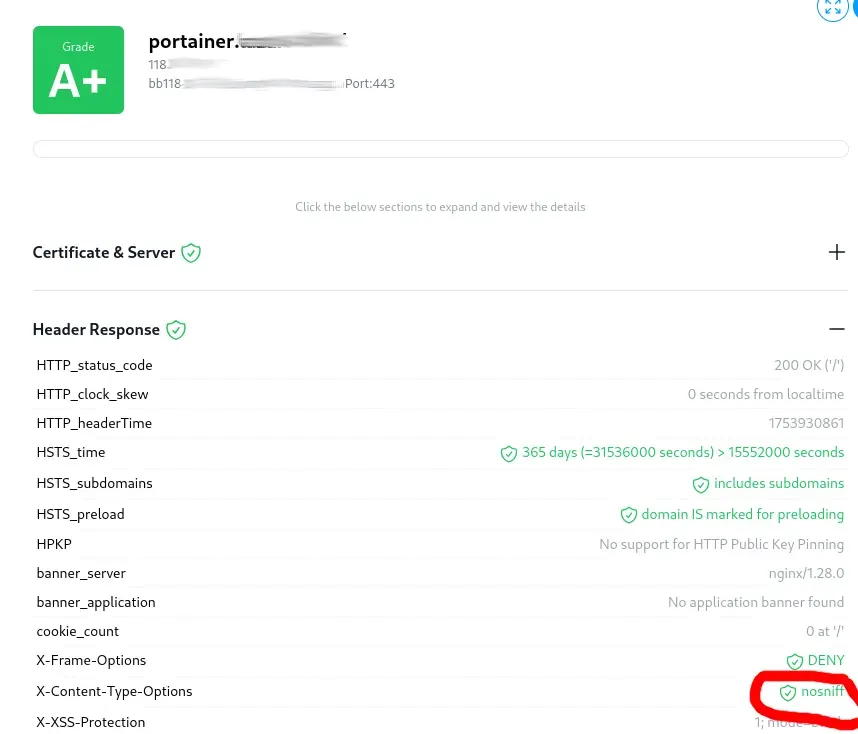 Grade A+ with nosniff headers sent only once
The other flag this site raises is about having gzipcompression on. This is generally a good practice for performance, but there is an attack called BREACH.
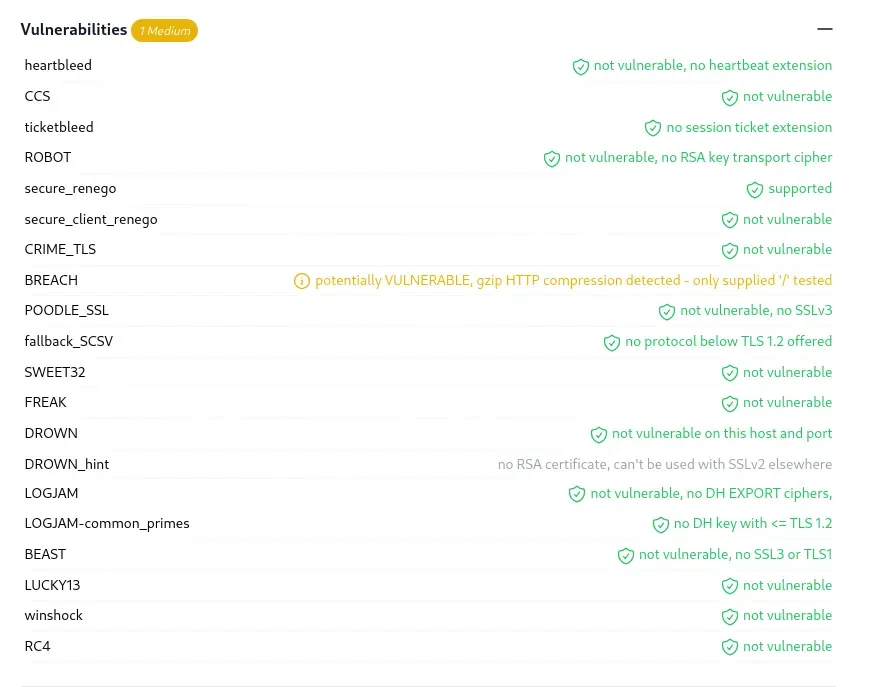 BREACH “vulnerability” can be handled with adequate rate-limiting
In a nutshell, BREACH works like this:
The attack relies on the fact that when data is compressed, identical strings compress better. If an attacker can control some input that is then echoed back in a compressed, encrypted response alongside a secret, they can make many requests, varying their input slightly. By observing tiny differences in the size of the compressed response, they can infer characters of the secret.
However, instead of disabling gzip compression (and losing the associated performance benefits), we mitigate this risk through our own rate-limiting. This strategy makes brute-force attacks — including those like BREACH — far less practical, effectively discouraging attackers from attempting such exploits.
Test #3: wormly
Yet another free online tool to check our Nginx configuration can be found at https://www.wormly.com/test_ssl/. The results are convincing here too.
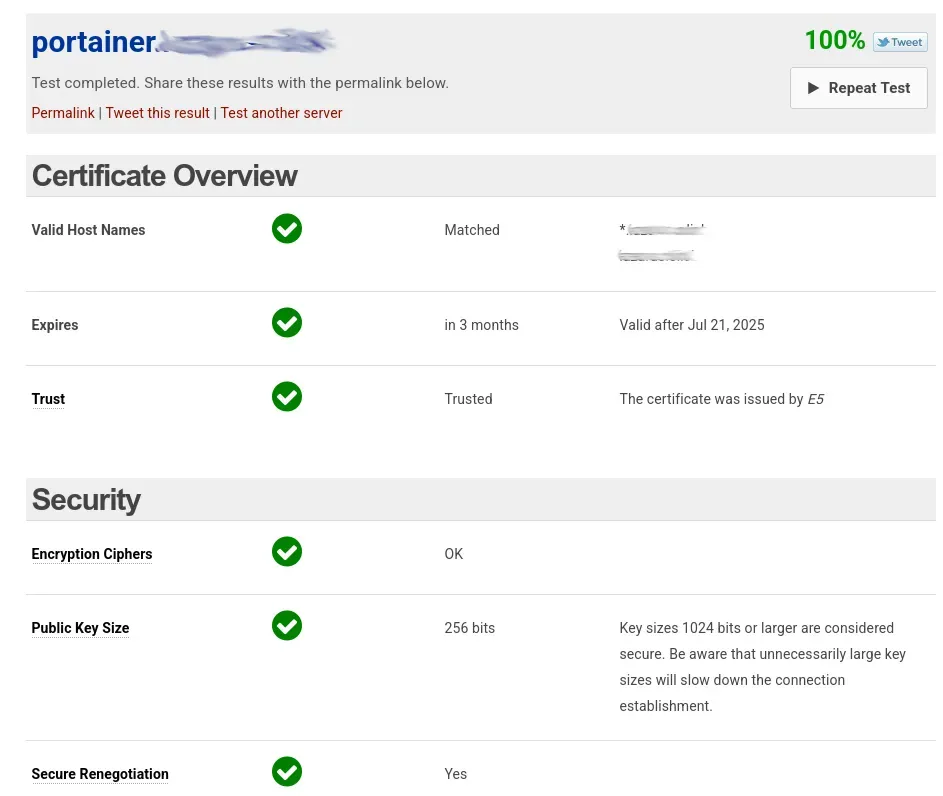 Results: 100%
Test #4: HTTP HEADERS checking with securityheaders.com
As I expected, there is a complain about the header Content-Security-Policy , which i commened out in our ssl.conf. I am just afraid now that it might break (some of) our services. So, I leave it to you guys to experiment with this, I will do the same and update you later.
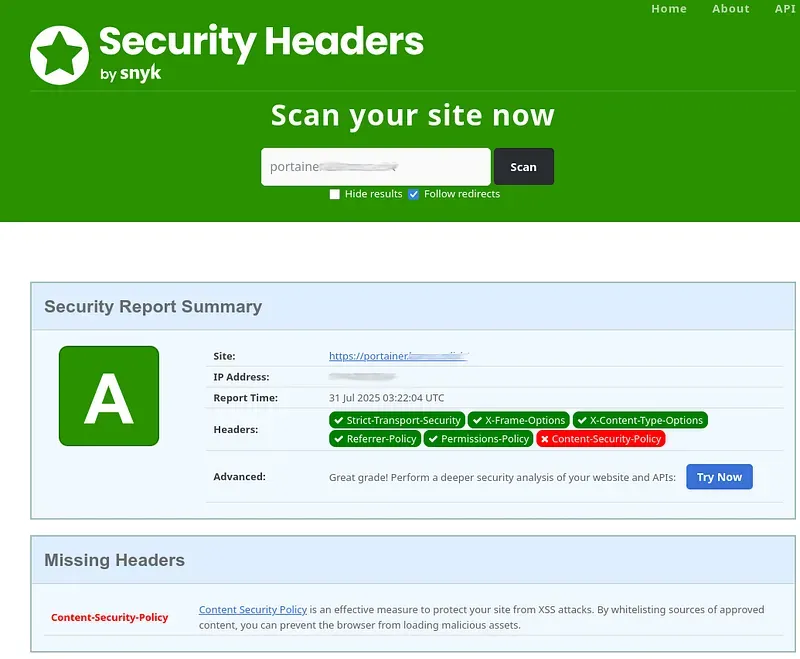 We still get a grade A
Test #5: HTTP Observatory report by Mozilla
Okay, my last trial with checks is with Mozilla’s HTTP Observatory Report. The grade we get is B, but it basically reports the same “warning” as the Test #4. So, until it is confirmed that that specific Content-Security-Policy header does not break our services, I leave it commented out in our ssl.conf.
 Results from Mozilla’s HTTP Observatory Report
Firewall
Now that Cloudflare is no longer shielding us from generic botnet activity or malicious automated attempts, it’s essential to deploy effective local protections. Fortunately, free tools like UFW (Uncomplicated Firewall) and community-driven IP blocklists are available to help. I’ve released a set of scripts to streamline this process — available open-source on GitHub at cslev/ipsets_to_block. Simply follow the README instructions to harden your Raspberry Pi against unwanted traffic; this layer of protection is crucial.
For convenience, I’ll outline the setup steps here, so you have all the guidance in one place.
To start, keep the scripts alongside your Docker configurations, then install both ipset and ufw, and enable UFW to activate your firewall.
$ cd /mnt/storage/docker/

# Install ufw first
$ sudo apt update
$ sudo apt install ufw ipset

# Enable ufw
$ sudo systemctl enable ufw
$ sudo systemctl start ufw
$ sudo ufw enable
Next, we need to get the block lists and create ipset for each of them. For this, we will use my scripts.
$ git clone http://github.com/cslev/ipsets_to_block
Cloning into 'ipsets_to_block'...
remote: Enumerating objects: 27, done.
remote: Counting objects: 100% (27/27), done.
remote: Compressing objects: 100% (19/19), done.
remote: Total 27 (delta 9), reused 18 (delta 6), pack-reused 0 (from 0)
Receiving objects: 100% (27/27), 22.73 KiB | 7.58 MiB/s, done.
Resolving deltas: 100% (9/9), done.
Update the lists
$ sudo  ./update_spamhaus_drop.sh
No arguments were provided, falling back to defaults...
--- Fri 01 Aug 2025 11:45:46 AM +08 ---
Checking for 'ipset' command...                                                                      [FOUND]
Checking for 'curl' command...                                                                       [FOUND]
Using the following variables:
 IPSET_NAME: spamhaus_drop
 SPAMHAUS_URL: https://www.spamhaus.org/drop/drop.txt
--- Fri 01 Aug 2025 11:45:46 AM +08 ---
Starting update for ipset 'spamhaus_drop' from 'https://www.spamhaus.org/drop/drop.txt'...
Ipset set 'spamhaus_drop' does not exist. Creating it now...                                       [DONE]
Downloading and filtering threat intelligence list...                                                [DONE]
Creating temporary ipset set for atomic swap...                                                      [DONE]
Adding IP addresses to the temporary set...
Adding 1,577 of 1,577 addresses...
Added  entries to temporary set.                                                                   [DONE]
Swapping new set with active set...                                                                  [DONE]
Destroying old (temporary) set...
Spamhaus DROP list update finished for ipset 'spamhaus_drop'.
--- End Fri 01 Aug 2025 11:46:05 AM +08 ---

$ sudo ./update_sans_dshield.sh
No arguments were provided, falling back to defaults...
--- Fri 01 Aug 2025 11:46:15 AM +08 ---
Checking for 'ipset' command...                                                                      [FOUND]
Checking for 'curl' command...                                                                       [FOUND]
Using the following variables:
 IPSET_NAME: sans_dshield
 SANS_ISC_URL: https://isc.sans.edu/block.txt
Starting update for ipset 'sans_dshield' from 'https://isc.sans.edu/block.txt'...
Ipset set 'sans_dshield' does not exist. Creating it now...                                        [DONE]
Downloading and filtering threat intelligence list...                                                [DONE]
Creating temporary ipset set for atomic swap...                                                      [DONE]
Adding IP addresses to the temporary set...
Adding 20 of 20 addresses...
Added  entries to temporary set.                                                                   [DONE]
Swapping new set with active set...                                                                  [DONE]
Destroying old (temporary) set...
SANS ISC DShield list update finished for ipset 'sans_dshield'.
--- End Fri 01 Aug 2025 11:46:16 AM +08 ---

$ sudo ./update_blocklist_de.sh
No arguments were provided, falling back to defaults...
--- Fri 01 Aug 2025 11:46:20 AM +08 ---
Checking for 'ipset' command...                                                                      [FOUND]
Checking for 'curl' command...                                                                       [FOUND]
Using the following variables:
 IPSET_NAME: blocklist_de
 BLOCKLIST_DE_URL: http://lists.blocklist.de/lists/all.txt
Starting update for ipset 'blocklist_de' from 'http://lists.blocklist.de/lists/all.txt'...
Ipset set 'blocklist_de' does not exist. Creating it now...                                        [DONE]
Downloading and filtering threat intelligence list...                                                [DONE]
Creating temporary ipset set for atomic swap...
[DONE]
Adding 22598 IP addresses to the temporary set...
Adding 22,598 of 22,598 addresses...
Added  entries to temporary set.                                                                   [DONE]
Swapping new set with active set...                                                                  [DONE]
Destroying old (temporary) set...
Blocklist.de list update finished for ipset 'blocklist_de'.
--- End Fri 01 Aug 2025 11:49:26 AM +08 ---
Update ufw
Edit before.rules:
$ sudo nano /etc/ufw/before.rulesScroll to the bottom, before the COMMIT, and add these lines:
# Drop all packets from ipset "spamhaus_drop" and add specific LOG tag
-A ufw-before-input -m set --match-set spamhaus_drop src -j LOG --log-prefix "UFW-SPAMHAUS-DROP: "
-A ufw-before-input -m set --match-set spamhaus_drop src -j DROP

# Drop all packets from ipset "sans_dshield" and add specific LOG tag
-A ufw-before-input -m set --match-set sans_dshield src -j LOG --log-prefix "UFW-SANS-DROP: "
-A ufw-before-input -m set --match-set sans_dshield src -j DROP

# Drop all packets from ipset "blocklist_de" and add specific LOG tag
-A ufw-before-input -m set --match-set blocklist_de src -j LOG --log-prefix "UFW-BLOCKLISTDE-DROP: "
-A ufw-before-input -m set --match-set blocklist_de src -j DROP
This will add special tags for the logs too, so later it /var/log/ufw.log or somewhere else (e.g., /var/log/kern.log, /var/log/syslog), you can easily find blocked IPs based on which ruleset.
Additionally, let’s comment out the line that allows ping (ICMP ECHO REQUEST), then add a rule that purposely blocks it.
# Comment out this line
# -A ufw-before-input -p icmp --icmp-type echo-request -j ACCEPT

# Drop all incoming ICMP echo request
-A ufw-before-input -p icmp --icmp-type echo-request -j LOG --log-prefix "UFW-PING-DROP:"
-A ufw-before-input -p icmp --icmp-type echo-request -j DROP
Reload ufw
Next, we need to reload ufw and check if the rules took place.
$ sudo ufw reload
$ sudo iptables -L ufw-before-input -v -n

[REDACTED]
55  4620 LOG        1    --  *      *       0.0.0.0/0            0.0.0.0/0            icmptype 8 LOG flags 0 level 4 prefix "UFW-PING-DROP:"
55  4620 DROP       1    --  *      *       0.0.0.0/0            0.0.0.0/0            icmptype 8
13   524 LOG        0    --  *      *       0.0.0.0/0            0.0.0.0/0            match-set spamhaus_drop src LOG flags 0 level 4 prefix "UFW-SPAMHAUS-DROP: "
0     0 DROP       0    --  *      *       0.0.0.0/0            0.0.0.0/0            match-set spamhaus_drop src
9   440 LOG        0    --  *      *       0.0.0.0/0            0.0.0.0/0            match-set sans_dshield src LOG flags 0 level 4 prefix "UFW-SANS-DROP: "
0     0 DROP       0    --  *      *       0.0.0.0/0            0.0.0.0/0            match-set sans_dshield src
0     0 LOG        0    --  *      *       0.0.0.0/0            0.0.0.0/0            match-set blocklist_de src LOG flags 0 level 4 prefix "UFW-BLOCKLISTDE-DROP: "
0     0 DROP       0    --  *      *       0.0.0.0/0            0.0.0.0/0            match-set blocklist_de src
Okay, all good. Our blocklist is now in place. After a short period and also trying to ping my server, I already see the rules are working effectively. In my case, the specific logs are in /var/log/kern.log:
$ sudo tail -f /var/log/kern.log
2025-08-01T17:33:52.104616+08:00 [REDACTED] kernel: [9362950.193988] UFW-PING-DROP:IN=wan OUT= [REDACTED]
2025-08-01T17:33:53.128894+08:00 [REDACTED] kernel: [9362951.218203] UFW-PING-DROP:IN=wan OUT= [REDACTED]
2025-08-01T17:34:06.083713+08:00 [REDACTED] kernel: [9362964.172703] UFW-SPAMHAUS-DROP: IN=wan OUT= [REDACTED]
2025-08-01T17:34:06.675290+08:00 [REDACTED] kernel: [9362964.764301] [UFW BLOCK] IN=wan OUT=[REDACTED]
I was not expecting the bots from the blocklist to find my server so fast. Lucky, we implemented our blocklist rule fast too.
Disable all port except SSH,HTTP,HTTPS
We can use UFW to block access to all ports except those needed for our services. However, if you’re behind a router — as most people are — you’re already protected, since only the ports specified in your router’s DNAT (port forwarding) settings are exposed. Conversely, if you’re not behind a router, it’s wise to use UFW to restrict all traffic except what’s essential.
Now, we will use the CLI to add rules; they are also persistent. However, they are added to a different chain, called ufw-user-input. These rules can be viewed via iptables -L ufw-user-input as well as with ufw status numbered.
First, set default deny, this is crucial.
$ sudo ufw default deny incoming
$ sudo ufw default allow outgoing
Enable ports (assuming SSH to be on 5445).
$ sudo ufw allow 5445/tcp
$ sudo ufw allow 80/tcp
$ sudo ufw allow 443/tcp
Add extra ports for X11 forwarding through SSH
$ sudo ufw allow from 127.0.0.1 to any port 6000:6010 proto tcpAlso allow communication via lo:
$ sudo ufw allow in on lo
$ sudo ufw allow out on lo
Restart ufw and check the updated list. Below is an example, I added my rules in a different order, so you might see different numbers.
$ sudo ufw reload
$ sudo ufw status numbered
Status: active

     To                         Action      From
     --                         ------      ----
[ 1] 5445/tcp                   ALLOW IN    Anywhere
[ 2] Anywhere on lo             ALLOW IN    Anywhere
[ 3] Anywhere                   ALLOW OUT   Anywhere on lo
[ 4] 6000:6009/tcp              ALLOW IN    127.0.0.1
[ 5] 80/tcp                     ALLOW IN    Anywhere
[ 6] 443/tcp                    ALLOW IN    Anywhere
If you want to delete a rule, you can use the number and issue the command ufw delete NUMBER.
Staying up-to-date
Let’s make our blocklist scripts to be executed everyday, then we can keep ourself up-to-date. Simply create a cron entry for each.
$ sudo crontab -eThen, add these lines (adjust your path if needed):
# Run blocklist scripts daily at 3:00 AM
0 3 * * * /docker/ipsets_to_block/update_spamhaus_drop.sh >/dev/null 2>&1
0 3 * * * /docker/ipsets_to_block/update_sans_dshield.sh >/dev/null 2>&1
0 3 * * * /docker/ipsets_to_block/update_blocklist_de.sh >/dev/null 2>&1
You might stop here, your setup is secure already. The next section is about enabling mutual TLS for clients and services to provide an additional layer of security.
UPDATE [09/2025]
When you reboot your Pi, you may find that its internet connection is gone, even though it can still forward traffic for other devices, and services like Pi-hole are working fine. This is because ipsets, which your firewall rules depend on, don’t persist across reboots. Without the ipsets, ufw rules that reference them will fail to load, blocking the Pi’s own access to the internet. This issue can easily go unnoticed unless you try to do a system update or perform another task that requires a stable connection from the Pi itself. To solve this, we need a method to save and restore these ipsets, ensuring they are loaded before UFW starts at boot. I’ve updated the GitHub page for the scripts, but we’ll also detail the solution here.
Let’s save the ipset to a file
# ipset save -file /etc/ufw/rules.v4.ipsetsService to (re)store
Create a systemd service
# nano /etc/systemd/system/restore-ipset.serviceCopy-paste the following into it (modify the path at will)
[Unit]
Description=Restore IPsets for Firewall
Before=ufw.service
After=network-online.target

[Service]
Type=oneshot
ExecStart=/sbin/ipset restore -exist --file /etc/ufw/rules.v4.ipsets
ExecStop=/sbin/ipset save -file /etc/ufw/rules.v4.ipsets

[Install]
WantedBy=multi-user.target
As you can see, the important part is ExecStart, which restores the ipsets from the file we created above. It also stores it when the service stop is being called to have the latest set in the memory to be stored. The second important setting is the Before part that tells systemd to call this before ufw starts, so they will be readily available for ufw.
Enable service
# systemctl enable restore-ipset.servicemTLS — A leap towards zero-trust
Mutual TLS (mTLS) is a protocol in which both client and server present digital certificates during the connection handshake, enabling mutual authentication before any sensitive data is exchanged. Unlike standard TLS — where only the server’s identity is verified — mTLS ensures that both parties are authenticated by trusted certificate authorities, significantly reducing the risks of impersonation and unauthorized access.
 Image generated via chatGPT
Within a zero-trust framework, mTLS stands out by enforcing strict identity checks for every connection, regardless of network or location, embodying the “never trust, always verify” approach. Moreover, mTLS can serve as a form of two-factor authentication (2FA), since a client must possess a unique private certificate in addition to standard credentials — adding a valuable layer of security by requiring something the client has and something they know. This makes mTLS a robust solution for both strong authentication and data confidentiality in sensitive deployments.
Below is the full walkthrough, though if you want a simple and quick scripted solution, check out the mTLS VIP club article.
Workflow in a nutshell
To implement mutual TLS (mTLS) on your server, the process begins by creating a root certificate authority (CA) that will be used to sign and validate all other certificates within our ecosystem. Note, that this will not overwrite our Let’s Encrypt certificate, for that we still have the normal non-self-signed cert.
First, generate a root CA key and self-signed root certificate, which will act as our trusted authority. Then, create a server certificate signing request (CSR) and sign it using the root CA to produce your server certificate, enabling our Nginx to identify itself securely. For each client that will connect, generate individual client keys and CSRs, then sign those client certificates with the root CA as well. During connection, our Nginx will require clients to present their client certificates, which it will verify against the trusted root CA.
Step #1: Create a root cert
Let’s create a self-signed root cert with the common name of my-ca for three years (1096 days)
$ sudo openssl req \
  -new \
  -x509 \
  -nodes \
  -days 1096 \
  -subj '/CN=my-ca' \
  -keyout ca.key \
  -out ca.crt
$ sudo chmod 600 ca.*
Let’s see what we have created (only showing the important parts):
$ sudo openssl x509 \
  --in ca.crt \
  -text \
  --noout

Certificate:
    Data:
        Version: 3 (0x2)
        ...
        Issuer: CN = my-ca
        Validity
            Not Before: Aug 1 10:45:05 2025 GMT
            Not After : Aug 1 10:45:05 2028 GMT
        Subject: CN = my-ca
...
Step #2: Create server key and certificate signing request (CSR)
This server certificate will be used in the mTLS connection for the server side and will be signed my our CA.
First, create a key for the server’s cert, protect it with a strong password, and change its permission:
$ sudo openssl genrsa -aes256 -out server.key 2048
Enter PEM pass phrase:
Verifying - Enter PEM pass phrase:
$ sudo chmod 600 server.key
Now, create a Certificate Signing Request (CSR) with the common-name of my-pi. You will be prompted for the password you just set for the server.key.
$ sudo openssl req \
  -new \
  -key server.key \
  -subj '/CN=my-pi' \
  -out server.csr
Enter pass phrase for server.key:
Step #3: Sign the CSR
Now, we use our CA to sign the CSR of our server. We make the certificate of the server to valid for 3 years (-1 day).
$ sudo openssl x509 \
  -req \
  -in server.csr \
  -CA ca.crt \
  -CAkey ca.key \
  -CAcreateserial \
  -days 1095\
  -out server.crt
Certificate request self-signature ok
subject=CN = my-pi

$ sudo chmod 600 server.*
Step #4: Create Client Key and Cert
Here, we basically repeat step #2 and step #3, but for a new client.
Creat a key with a strong password again.
$ sudo openssl genrsa -aes256 -out client.key 2048
Enter PEM pass phrase:
Verifying - Enter PEM pass phrase:
Create a CSR for the client.
$ sudo openssl req \
  -new \
  -key client.key \
  -subj '/CN=my-pi-client' \
  -out client.csr
Enter pass phrase for client.key:
Create and sign the client cert with the CA.
$ sudo openssl x509 \
  -req \
  -in client.csr \
  -CA ca.crt \
  -CAkey ca.key \
  -CAcreateserial \
  -days 1095\
  -out client.crt
Certificate request self-signature ok
subject=CN = my-pi-client
Step #5: Create a bundle for the client
A PKCS#12 file, also known by its file extension .p12 or .pfx, is a standard archive file format used to store a bundle of cryptographic objects in a single, password-protected file. Again, use your password for the client.key as well as create a new one for export password.
$ sudo openssl pkcs12 -export -out client.p12 -inkey client.key -in client.crt -certfile ca.crt
Enter pass phrase for client.key:
Enter Export Password:
Verifying - Enter Export Password:
Step #6: Enable mTLS in Nginx
First, we need to uncomment the mTLS-specific lines in our ssl.conf that reference our self-signed certificate authority. Let’s open the configuration file and locate those lines.
#mTLS stuffs
ssl_trusted_certificate     /etc/ssl/mtls/ca.crt;
ssl_client_certificate      /etc/ssl/mtls/ca.crt;
#ssl_verify_client          on;
Keep the third ssl_verify_client on; directive commented out for now, as enabling it globally would require mTLS for all services. Instead, we’ll enable this setting individually for each service, since applying it universally could cause issues in some cases (as we’ll discuss later).
Second, head over to conf.d/portainer.conf, uncomment/add the ssl_verify_client on; to the service itself; of course, for the server {} block created for HTTPS/443.
...
server {
  #variables - portainer is the docker service name so resulution should work
  set $portainer http://172.18.1.250:9000;
  #server info
  listen 443 ssl;
  http2 on;
  server_name portainer.YOUR_DOMAIN.tld;
  #common ssl settings
  include /etc/nginx/ssl.conf;

  #mTLS
  ssl_verify_client           on;

  location / {
    # Applies the 'mylimit' zone.
    # Allows a burst of 30 requests.
    # 'nodelay' ensures requests within the burst are processed immediately.
    limit_req zone=mylimit burst=30 nodelay;
    proxy_pass              $portainer;
...
Now, restart Nginx and see how it will respond to an unauthenticated client request.
$ cd /docker/nginx
$ sudo docker-compose down
$ sudo docker-compose up -d
Go to your browser and try to access Portainer again.
 No Client certificate was presented by the client
This is exactly what we wanted to see as an extra protection. Now, let’s download our client cert, the client.p12 file, and add it to our browser. This is (most likely) a manual process, as my browser did not ask before visiting portainer, whether I have any certificate to load.
Go to your browser’s Security & Privacy settings (or something similar), and look for the certificates button.
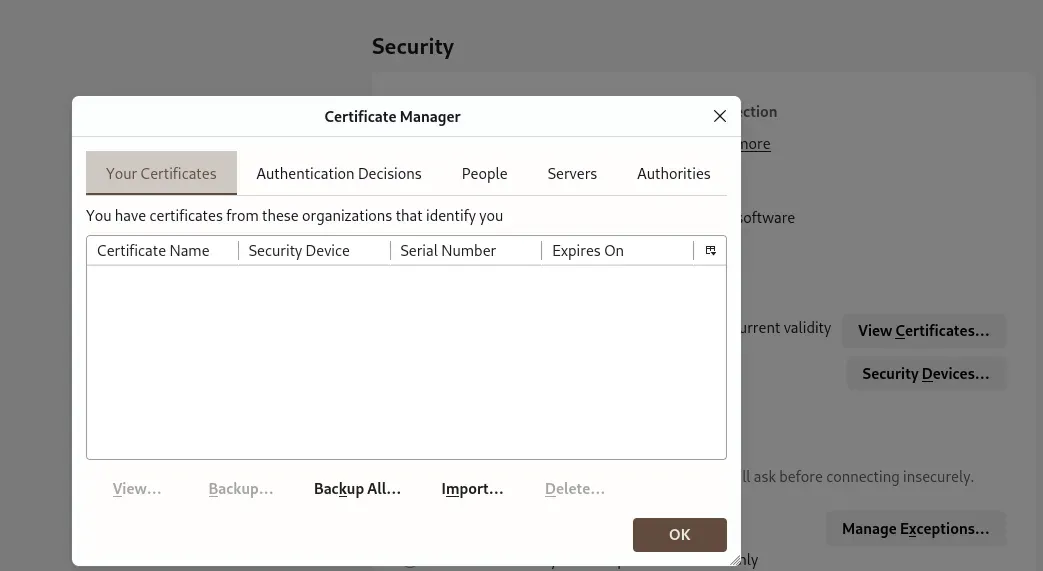 In firefox-based browsers it looks like this
Click on the Your certificates then Import -> and select the client.p12 file you downloaded. You will need the password for the file too for the client.key part in the bundle.
After adding it, you can see all its details (I renamed my client cert to *-client-levi from my-pi-client), but most importantly, you can see the expiration time.
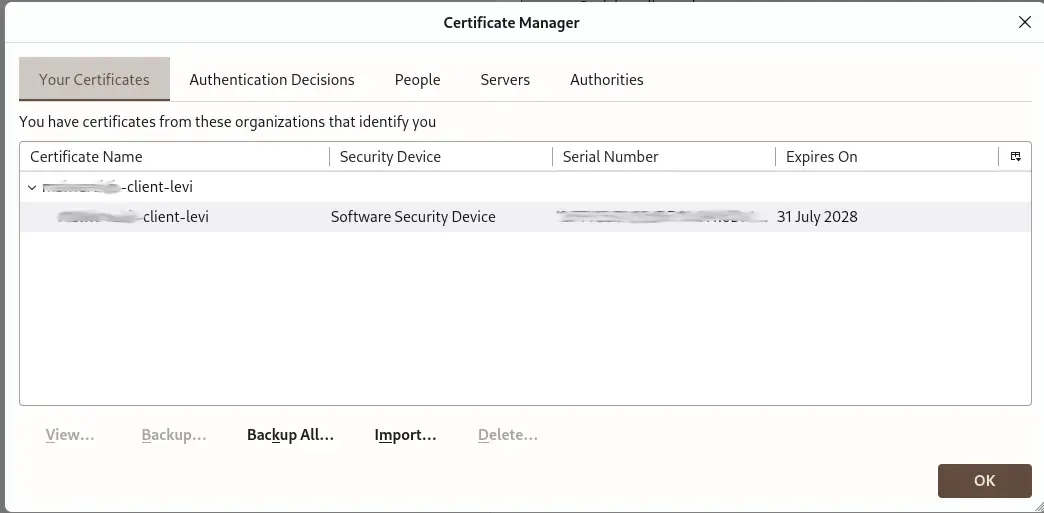 Successfully added client certificate to our browser
Let’s try reloading our portainer tab.
 pop-up from our browser to send the client certificate to the server
As you can see, when the browser detects a client certificate available for this domain, it prompts you to select whether to use it and, if so, gives you options on how long to remember your choice.
After clickin on Ok, our portainer services becomes available.
 mTLS authenticated access
Final thoughts
While mTLS adds a strong layer of security, it comes with certain limitations — chief among them, the need for client applications to support mTLS in order to present a client certificate to the server. In our setup, using a browser to access Portainer works seamlessly because browsers natively support mTLS, allowing you to provide the client certificate as needed. However, some services running on our Raspberry Pi rely on dedicated client apps that may not support mTLS. For example, enabling mTLS for Nextcloud will work if you access it via a browser, but you’ll lose access from its official apps, since they don’t have mTLS support. This issue also affects services like the Transmission torrent server. On the other hand, Home Assistant fully supports mTLS, so both the web interface and the mobile app can use client certificates for secure access. For Android users, importing a p12 certificate is straightforward — just download the file, open it, and add it to your trusted certificates.
If you want more fine-grained mTLS management, check out my follow-up post.
In this post, you took a hands-on journey to build ironclad remote access with NGINX — no third-party gatekeepers in sight! You dodged shady bots with smart rate limiting, armor-plated your traffic with top-notch security headers, and kept performance zippy without falling for BREACH tricks. We geeked out over router port forwarding to beam your connections straight to your Raspberry Pi, whipped up an impenetrable firewall with UFW, and slammed the door on bad guys using open-source blocklists. The grand finale? Rolling out mutual TLS — giving you spy-movie-grade, two-way identity checks for bulletproof remote access. You saw how to mint your own certificates, rocked hassle-free browser logins, and tackled real-world quirks like app compatibility — and even learned how to get mTLS running on your phone. DIY, secure, and totally in your control — your home lab just leveled up!
Extra configs for other services
While setting up a PGadmin container behind an Nginx proxy was never part of this series, I was playing around with it for a different scenario.
One key takeaway from setting up our strict configurations is the importance of correctly setting the X-Frame-Options HTTP header. For certain services, it’s essential to hide this header but at the same time adding a new one with explicitly setting it to ALLOW-FROM followed by the specific domain you’ve registered for your service. While this might seem like a hassle, it’s actually a crucial step: it ensures that only browsers “redirected” from your authorized domain (subdomain in your nginx configuration) can display your content, effectively blocking other (potentially malicious) sites from embedding it. In short, to maintain security while allowing legitimate functionality, this configuration must be made clear and deliberate.
Keycloak
I encountered a similar issue with Keycloak where the admin console would never fully load. Despite no visible errors, proper proxy redirection, and the admin console appearing to start loading when navigating to the main domain, the interface just showed a continuously spinning blue circle in the top-left corner. Eventually, I received an obscure error message in an alert window, which added to the confusion and made debugging quite time-consuming.
 The meaningless error that brought me nowhere
Eventually, the docker-compose remains more or less the same for Keycloak with some additional enforced settings:
services:
  keycloak:
    image: quay.io/keycloak/keycloak:26.0.7
    container_name: keycloak
    environment:
      KC_BOOTSTRAP_ADMIN_USERNAME: keycloak_admin
      KC_BOOTSTRAP_ADMIN_PASSWORD: keycloak_secret
      KC_PROXY: edge
      KC_PROXY_ADDRESS_FORWARDING: true
      KC_PROXY_HEADERS: xforwarded
      KC_HOSTNAME: <your_keycloak_domain>
      KC_HOSTNAME_STRICT: true
      KC_HOSTNAME_STRICT_HTTPS: true
      KC_HTTP_RELATIVE_PATH: /
    # ports:
    #  - "$KEYCLOAK_HOST_PORT:8080"
    #   - "9000:9000" # Management port for health/metrics endpoints
    volumes:
      - /mnt/storage/docker/keycloak/h2:/opt/keycloak/data/h2
    command: start
    dns: 172.30.1.3
    networks:
      mydocker_network:
        ipv4_address: 172.30.1.30

networks:
  pi_docker_network:
    external: true
While, the nginx subdomain config should be this:
######################$$$#########
###       KEYCLOAK-SSO         ###
#########################$$$######
### REDIRECT ANYTHING ON PORT 80 --> 443 sia!
server {
    listen 80;
    server_name <your_keycloak_domain>;
    return 301 https://$host$request_uri;
}

server {
  #variables
  set $service http://172.30.1.30:8080;
  #server info
  listen 443 ssl;
  http2 on;
  server_name <your_keycloak_domain>;
  #common ssl settings
  include /etc/nginx/ssl.conf;

  #mTLS
  ssl_verify_client           on;

  location / {
    # Applies the 'mylimit' zone.
    # Allows a burst of 30 requests.
    # 'nodelay' ensures requests within the burst are processed immediately.
    limit_req zone=mylimit burst=30 nodelay;
    #include common proxy settings
    include /etc/nginx/proxy.conf;
    #override some proxy settings ah
    proxy_set_header X-Forwarded-Proto $scheme;
    proxy_hide_header X-Frame-Options;
    add_header X-Frame-Options "ALLOW-FROM https://<your_keycloak_domain>";
    proxy_pass              $service;
    access_log on;
    access_log /var/log/nginx/access_keycloak_sso.log;
    error_log on;
    error_log /var/log/nginx/error_keycloak_sso.log;
  }
  location = /robots.txt {
    # 'alias' points directly to the file's path inside the container.
    alias /usr/share/nginx/html/robots.txt;
    allow all; # Allow all access to the robots.txt file itself
    log_not_found off; # Don't log 404s if the file is missing
    access_log off;    # Don't log every robots.txt access request
  }
}
Applying these settings for Keycloak makes it accessible through nginx. For other services, you might apply the same technique if you encounter a similar issue.