
Part 7 — How I Run My Entire Digital Life on a Raspberry Pi: Seamless Torrenting via Running Transmission Securely Behind a VPN
Table of Contents
Ready to take your torrenting to the next level? In this post, we’ll show you how to run Transmission alongside a VPN, ensuring your downloads stay fast, private, and secure. Say goodbye to exposure and hello to peace of mind — let’s unlock safe, anonymous torrenting together!
 Image generated by ChatGPT
Torrenting itself is legal in most countries, but downloading or sharing copyrighted content without permission is illegal in many places and can lead to serious consequences, including fines or criminal charges. Laws vary widely: for example, some countries like Spain, Switzerland, and Poland allow downloading copyrighted material for personal use, while in the US, UK, Germany, and many others, both downloading and sharing are strictly prohibited and actively enforced. Always check your local laws before torrenting — what may be allowed for private use in one country could be a crime in another, especially if you share files. Stay informed and make sure your activities comply with the regulations where you live. My guide here is not to circumvent your local laws or censorship, it serves purely as a technical guide on what is possible with a simple Raspberry pi.
I’m pretty sure this is the only episode in my series where I don’t need to explain what Transmission or a VPN is. One thing’s clear, though: if you’re facing geographic restrictions, combining these two is a must.
Transmission docker container
The haugene/transmission-openvpn container, which we will use, is a popular Docker image that seamlessly combines the Transmission torrent client with OpenVPN, ensuring that Transmission only runs when a secure VPN tunnel is active. It features built-in support for many major VPN providers, making setup straightforward, and includes a web-based interface for easy management. This container is ideal for anyone who wants to torrent privately and securely—if the VPN connection drops, Transmission is automatically paused, protecting your privacy at all times.
Alright, then let’s create the docker-compose for our transmission container. Go to your Portainer and create a new stack; name it torrent, then copy the following:
services:
   torrent:
     container_name: torrent
     hostname: torrent
     restart: unless-stopped
     image: haugene/transmission-openvpn:latest
     volumes:
       - '/etc/localtime:/etc/localtime:ro'
       - '/mnt/storage/docker/torrent/:/etc/openvpn/custom/'
       - '/mnt/storage/data:/data'
     environment:
       - VPN_TYPE=openvpn
       - OPENVPN_PROVIDER=custom
       - OPENVPN_CONFIG=keepsolid_openvpn_config/fr_openvpn
       - OPENVPN_USERNAME=$VPN_USERNAME
       - OPENVPN_PASSWORD=$VPN_PASSWORD
       - PUID=1000
       - PGID=1000
       - LOCAL_NETWORK=192.168.22.0/24
       - TRANSMISSION_DOWNLOAD_DIR=/data/
       - TRANSMISSION_RPC_AUTHENTICATION_REQUIRED=true
       - TRANSMISSION_RPC_USERNAME=$USERNAME
       - TRANSMISSION_RPC_PASSWORD=$PASSWORD
       - TRANSMISSION_DOWNLOAD_QUEUE_SIZE=2
       - TRANSMISSION_INCOMPLETE_DIR_ENABLED=false
       - TRANSMISSION_SPEED_LIMIT_UP_ENABLED=true
       - TRANSMISSION_WATCH_DIR_ENABLED=false
     logging:
        driver: json-file
        options:
          max-size: 10m
     #since 12/2024 we need to add tun device specifically
     devices:
       - /dev/net/tun
     cap_add:
       - NET_ADMIN
     networks:
       pi_docker_network:
         ipv4_address: 172.30.1.9

networks:
  pi_docker_network:
    external: true
In my setup, as shown above, I use KeepSolid VPN, which offers three servers (France, Romania, and Canada) that permit torrenting. While the container provides built-in configuration for several VPN providers like NordVPN, with KeepSolid it’s best to use the CUSTOM option and upload your OpenVPN configuration files directly to your Pi. I downloaded my configs and placed them in /mnt/storage/docker/torrent/keepsolid_openvpn_config, which I then mount to /etc/openvpn/custom inside the container. You’ll also need to mount your download target directory—ideally your encrypted storage—so that everything downloaded by Transmission is saved there. Inside the container, paths are relative to /data, so for example, if your media is at /mnt/storage/data/Linux_distros, you’ll set it as /data/Linux_distros in Transmission. Don’t forget to set your VPN credentials as environment variables. To avoid overloading the Pi, I limit Transmission to two active torrents at a time, which also helps maximize VPN bandwidth. Setting the PID and GID to 1000 ensures compatibility if you later share this directory over NFS on your LAN, allowing files to be deleted from other devices as well. For instance, after downloading a movie, you can share it via NFS to your home theater PC running Kodi, and once you’ve watched it, delete it directly from Kodi with no permission issues. We also provide the necessary capabilities to create the required tun device for the VPN connection.
Last but not least, we again fix the docker IP of this container to set it later for remote access. Let’s deploy this stack and try out.
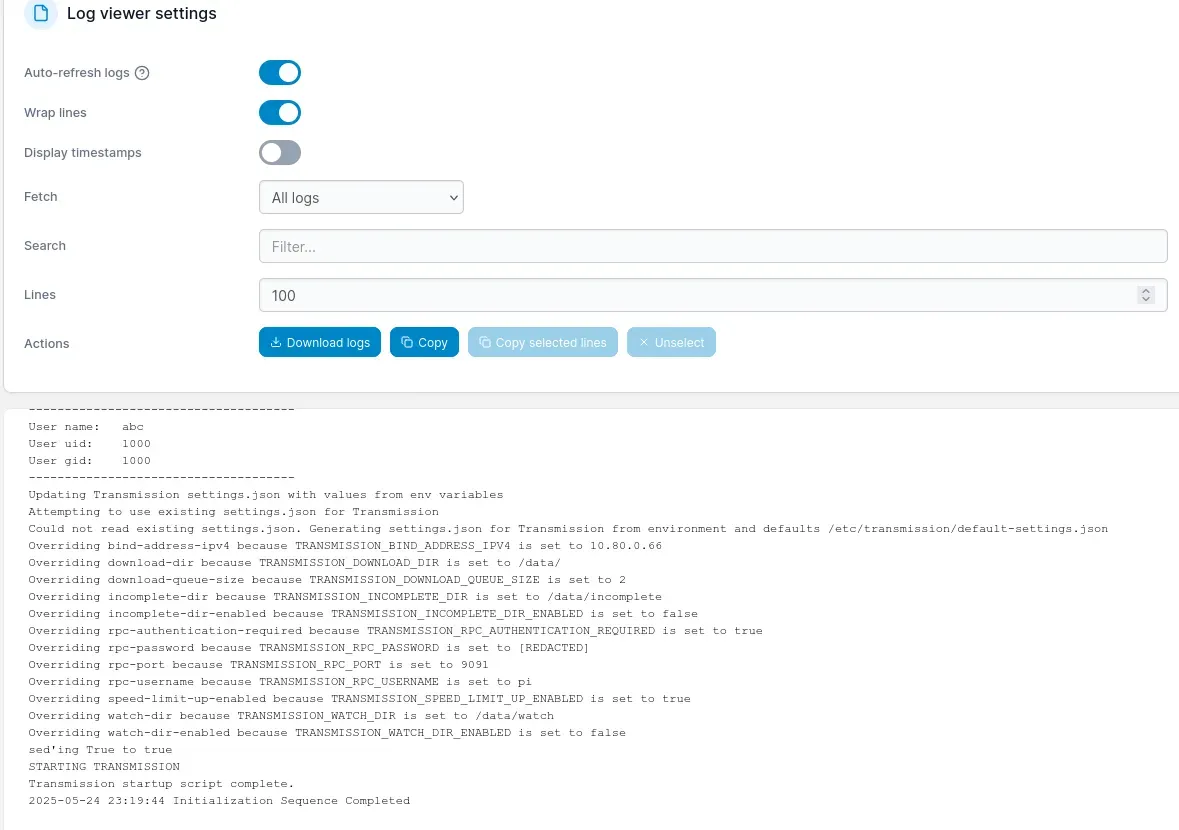 The log reports everything is fine
Remote access
Similarly to all our previous episodes, let’s configure straight away our remote access for this container. Go to your cloudflare tunnel and add a new public hostname as usual.
 add a new public hostname
There is one thing you should pay attention to. This time, we need to specify the path properly for the client applications. So instead of a wildcard *, let’s define /transmission.
Okay, once set, launch the Remote Transmission GUI app on your laptop. On Linux, it is called transgui , and can be installed via apt install.
# apt install transguiOnce installed and started, set the freshly configured domain and connect. If everything goes well, you will see an empty list of torrents :)
 We connected to our transmission daemon
Check VPN
Verify that your VPN is functioning correctly by SSHing into your Pi and checking the external IP address — specifically, the IP visible after your traffic exits your ISP’s network. You can run the following command on your Pi, or on any device within your LAN, such as your laptop:
$ curl ipecho.net/plain
210.x.x.x
My ISP’s IP address starts with 210. Now, to verify your torrent client’s external IP, download a special test torrent file and add it to your download list. Let’s go to this website. Download the provided magnet link and open it with transgui as your default application. The torrent will be added to Transmission, and although it may display an error, you’ll be able to see the IP address reported in the Tracker field — this is the IP that peers and trackers see as yours, confirming whether your VPN is working as intended.
 Our VPN works properly as shown in the Tracker field
As you can see, at the bottom of the interface, it displays Tracker: IP: 62.210.188.244, which is different from my ISP’s address. This confirms that the VPN tunnel within the Transmission container is functioning correctly.
With your Transmission client securely running behind a VPN, you’ve unlocked a powerful combination that keeps your torrenting private, safe, and unrestricted by geographic barriers. This setup not only protects your identity but also ensures smooth, efficient downloads without compromising your network’s security. Whether you’re a casual downloader or a power user, integrating Transmission with a VPN on your Raspberry Pi or server is a game-changer — giving you peace of mind and full control over your digital freedom. Ready to take your torrenting to the next level? Let’s keep exploring!
Wanted to publish this post on the same day where i posted many previous ones, but first time in my life, I bumped into this error:
 Unexpected error
Seems like, I spent too much time in front of the computer…then let’s add more to this :)
Share your files on your local LAN
Downloading content to your Pi and managing the download queue remotely is only truly useful if you can easily access those files once you’re back home. As mentioned earlier, by setting the UID and GID correctly for Transmission, you lay the groundwork for seamless file management. Now, let’s take it a step further — share the download directory in a compatible way, such as via NFS, so you can conveniently access, organize, or delete your files from any device on your network. This way, your downloads are always at your fingertips, no matter where you are or what device you’re using.
Install NFS libraries on the Pi
# apt install nfs-common nfs-kernel-serverEnable NFS server as a service, and enable RPCbind too as it is sometimes needed
# systemctl enable --now nfs-server
# systemctl enable --now rpcbind
Define the shares
We want to share our /mnt/storage, so let’s edit the file /etc/exports, and add the following line (replace the IP address range if you are in a different subnet):
/mnt/storage 192.168.22.0/255.255.255.0(insecure,rw,sync,no_subtree_check,all>Then, export it
# exportfs -a -v
exporting 192.168.22.0/255.255.255.0:/mnt/storage
and restart the server to make sure all take effect
# systemctl restart nfs-serverIf everything completed without errors (which should be the case), you now have a fully functional NAS! To mount the NFS share on your local Linux machine, simply open your file manager and connect to:
nfs://192.168.22.70:/mnt/storage
Keep in mind, your Pi’s IP address might differ, but we’ve used this IP throughout the guide for consistency.
NGINX config
In case your remote access is based on NGINX and you followed along Part 16, this is how you can add a config to provide secure access to your torrent stack.
###############################
###      TRANSMISSION       ###
###############################
server {
    listen 80;
    server_name bt.cslev.vip;
    return 301 https://$host$request_uri;
}

server {
  set $transmission http://172.30.1.9:9091;

  listen 443 ssl;
  http2 on;
  server_name bt.cslev.vip;
  include /etc/nginx/ssl.conf;

  # Redirect root to the Transmission web UI path
  location = / {
    return 301 https://$host/transmission/web/;
  }

  # RPC endpoint — no rate limit (polls frequently for torrent status)
  location /transmission/rpc {
    proxy_pass $transmission;
    include /etc/nginx/proxy.conf;
    proxy_pass_header X-Transmission-Session-Id;  # critical — must not be stripped
    access_log /var/log/nginx/access_transmission.log;
    error_log  /var/log/nginx/error_transmission.log;
  }

  # Web UI assets — no rate limit
  location /transmission/web/ {
    proxy_pass $transmission;
    include /etc/nginx/proxy.conf;
    proxy_pass_header X-Transmission-Session-Id;
    access_log /var/log/nginx/access_transmission.log;
    error_log  /var/log/nginx/error_transmission.log;
  }

  # Upload endpoint (adding torrents via URL/file) — no rate limit
  location /transmission/upload {
    proxy_pass $transmission;
    include /etc/nginx/proxy.conf;
    proxy_pass_header X-Transmission-Session-Id;
    client_max_body_size 10m;  # allow .torrent file uploads
    access_log /var/log/nginx/access_transmission.log;
    error_log  /var/log/nginx/error_transmission.log;
  }

  # Everything else under /transmission/
  location /transmission/ {
    limit_req zone=mylimit burst=20 nodelay;
    proxy_pass $transmission;
    include /etc/nginx/proxy.conf;
    proxy_pass_header X-Transmission-Session-Id;
    access_log /var/log/nginx/access_transmission.log;
    error_log  /var/log/nginx/error_transmission.log;
  }

  location = /robots.txt {
    alias /usr/share/nginx/html/robots.txt;
    allow all;
    log_not_found off;
    access_log off;
  }
}
Transmission’s web UI lives under /transmission/ by default, so the root / just redirects there immediately. The config then splits into three unrated locations: /transmission/rpc (the backend API that polls constantly for torrent status), /transmission/web/ (static UI assets), and /transmission/upload (for .torrent file uploads, which also needs client_max_body_size bumped so nginx doesn’t reject the file). All three get proxy_pass_header X-Transmission-Session-Id — without this, nginx strips that non-standard header and every RPC call returns a 409 because Transmission’s built-in CSRF protection can’t complete its token handshake. The catch-all /transmission/ gets a light rate limit purely as a safety net for anything not explicitly matched above, since the endpoints that actually matter (RPC and uploads) are already handled before nginx reaches it.