
Part 5 — How I Run My Entire Digital Life on a Raspberry Pi: Password management with Bitwarden
Table of Contents
Get ready to take your digital security to the next level! In this episode, we’re diving into the world of self-hosted password management by deploying Vaultwarden — the open-source alternative to Bitwarden — right on your own hardware. Imagine having full control over your most sensitive data, with your passwords stored securely on-premise and accessible only by you. We’ll walk through setting up Vaultwarden, then seamlessly connect your Bitwarden client to your brand new, private password vault — made accessible from anywhere via the Cloudflare tunnel we built in the last episode. Say goodbye to third-party vaults and hello to total password freedom!
 Image generated by ChatGTP image generator
Vaultwarden
Vaultwarden is a lightweight, open-source server implementation of the Bitwarden password manager designed for self-hosting. Written in Rust, it offers exceptional speed and efficiency, making it ideal for running on low-powered devices like a Raspberry Pi or home server. Vaultwarden is fully compatible with official Bitwarden clients — including browser extensions, mobile apps, and desktop apps — allowing you to enjoy the familiar Bitwarden experience while maintaining complete control over your data. It supports core features such as password storage, secure notes, two-factor authentication, attachments, and organizations.
Deploy
Luckily, deploying Vaultwarden does not require a lot of configuration, just deploy the container, configure our tunnel and done. Let’s jump into the docker-compose part and navigate our browser again to our Portainer.
Create a new stack and name it vaultwarden.
services:
  vaultwarden:
    container_name: vaultwarden
    restart: unless-stopped
    image: vaultwarden/server:latest
    hostname: vaultwarden
    volumes:
      - "/mnt/storage/docker/vaultwarden:/data"
      - "/etc/localtime:/etc/localtime:ro"
    dns: 172.30.1.3
    networks:
       pi_docker_network:
         ipv4_address: 172.30.1.6

networks:
  pi_docker_network:
    external: true
As you can see, the setup is straightforward. We simply specify a local directory to be mounted as a volume inside the container, ensuring that our data remains persistent — an essential step, since losing the container would otherwise mean losing all our passwords. For DNS, any queries made by the container will be handled by our well-configured in-house Pi-hole.
Lastly, we assign a static IP address to the container. This will come in handy when we set up a new public hostname for Vaultwarden in our Cloudflare Tunnel configuration later on.
Let’s deploy the stack and check the logs.
 Seems like it is all ok
Instead of testing Vaultwarden locally first, let’s go ahead and configure our tunnel to access it remotely right away. However, it’s a good idea to confirm that port 80 is accessible within the container. To do this, SSH into your Pi and run a quick telnet command to check connectivity.
$ ssh callisto
$ telnet 172.30.1.6 80
Trying 172.30.1.6...
Connected to 172.30.1.6.
Escape character is '^]'.
Alright, it is up and running.
Remote Access
Cloudflare tunnel
Go to our Cloudflare dashboard and add a new public hostname to our tunnel. I chose vaultwarden, but feel free to use anything else. Then, set the service type to HTTP and direct it to our vaultwarden container. Again, as you observed above, there is no need for exposing ports, as the cloudflared container has access to it. This also protects our host more, as any service that is exposed to the Internet is in containers, and can only access the containers from outside — makes it very difficult to get to the host eventually.
 Create a public hostname for bitwarden in our cloudflare tunnel
Similarly to Part 4, we don’t setup any further access control as it can easily break simple bitwarden clients to seamlessly connect.
NGINX
If you have checked Part 16 already, you know what is NGINX and how to surely provide secure and private remote access to our stack. Below, I show you the corresponding NGINX config for our vaultwarden.
###############################
###      VAULTWARDEN        ###
###############################
server {
  listen 80;
  server_name vaultwarden.YOURDOMAIN.TLD;
  return 301 https://$host$request_uri;
}

server {
  set $vaultwarden http://172.30.1.6:80;

  listen 443 ssl;
  http2 on;
  server_name vaultwarden.VAULTWARDEN.TLD;
  include /etc/nginx/ssl.conf;

  client_max_body_size 10M;   # attachments / Bitwarden Sends — adjust to taste

  # WebSocket — live sync between devices/browser extensions, no rate limit
  location /notifications/hub {
    proxy_pass $vaultwarden;
    include /etc/nginx/proxy.conf;
    access_log off;
  }

  location /notifications/hub/negotiate {
    proxy_pass $vaultwarden;
    include /etc/nginx/proxy.conf;
    access_log off;
  }

  # Admin panel — strict rate limit, this is the master key to the whole vault
  location /admin {
    limit_req zone=mylimit burst=5 nodelay;
    proxy_pass $vaultwarden;
    include /etc/nginx/proxy.conf;
    access_log /var/log/nginx/access_vaultwarden.log;
    error_log  /var/log/nginx/error_vaultwarden.log;
  }

  # Identity/login endpoint — strict rate limit, master password brute force target
  location /identity/ {
    limit_req zone=mylimit burst=5 nodelay;
    proxy_pass $vaultwarden;
    include /etc/nginx/proxy.conf;
    access_log /var/log/nginx/access_vaultwarden.log;
    error_log  /var/log/nginx/error_vaultwarden.log;
  }

  # Favicon proxy — one request per vault entry on every unlock, so hundreds
  # can arrive in a burst. Nothing sensitive is served here.
  location /icons/ {
    limit_req zone=vaultwarden_icons burst=300 nodelay;
    proxy_pass $vaultwarden;
    include /etc/nginx/proxy.conf;
    access_log /var/log/nginx/access_vaultwarden_icons.log;
    error_log  /var/log/nginx/error_vaultwarden.log;
  }

  # Everything else (web vault, API)
  location / {
    limit_req zone=vaultwarden burst=100 nodelay;
    proxy_pass $vaultwarden;
    include /etc/nginx/proxy.conf;
    access_log /var/log/nginx/access_vaultwarden.log;
    error_log  /var/log/nginx/error_vaultwarden.log;
  }

  location = /robots.txt {
    alias /usr/share/nginx/html/robots.txt;
    allow all;
    log_not_found off;
    access_log off;
  }
}
Vaultwarden’s config splits out the WebSocket notification hub (/notifications/hub and its /negotiate companion) with no rate limit and long timeouts, since that’s the persistent connection keeping your browser extension and mobile app in sync the moment an entry changes. Both /admin and /identity/ get the strictest rate limit in the whole setup — tighter even than Keycloak’s login — because unlike a navigation-heavy console, Vaultwarden’s admin panel is a single password gate, and /identity/ is the prelogin/token endpoint guarding your master password against brute force. There is also a separate /icons, as the app tries to download icons for every entry so it has to be handled differently. The catch-all / covers the web vault UI and general API traffic with a moderate limit, and client_max_body_size 10M is set generously to accommodate attachments and Bitwarden Sends. Given this app is the one guarding every other credential you own, the whole config leans tighter on rate limiting by default compared to the other services we set up.
The Limits
The limits defined above are set in the nginx.conf as follows:
    # Vaultwarden — web vault and browser extensions fire many parallel
    # API/asset requests on unlock and sync.
    limit_req_zone $binary_remote_addr zone=vaultwarden:10m rate=20r/s;

    # Vaultwarden favicon proxy — the extension requests one /icons/ URL per
    # vault entry, all at once, every time the vault is unlocked. These are
    # unauthenticated static images, so they need a much wider allowance.
    limit_req_zone $binary_remote_addr zone=vaultwarden_icons:10m rate=100r/s;
Connect remotely to Vaultwarden
Let’s try to connect to it, but first with a browser, as we need to create an account. Go to the domain you just configured.
 Create an account before trying to login
Fill in the details and create a very strong password, this will be your key to all your passwords — so don’t make it your name+birthdate, etc.
 After filling in the details, click on Create account
Then, you are in.
 The userinterface is intuitive and looks just like bitwarden
If you’re already using Bitwarden, you can export your data from the cloud and import it into your new setup. After that, you can delete your online account :), ensuring your passwords are only stored securely and exclusively on your own encrypted device on-premise.
Bitwarden app
Let’s open our app, and add setup our account. Before typing your details, make sure you switch the hosting from bitwarden.com to self-hosted.
 switch to self-hosted
Then, set your cloudflare tunnel-provided domain name for access and click on save.
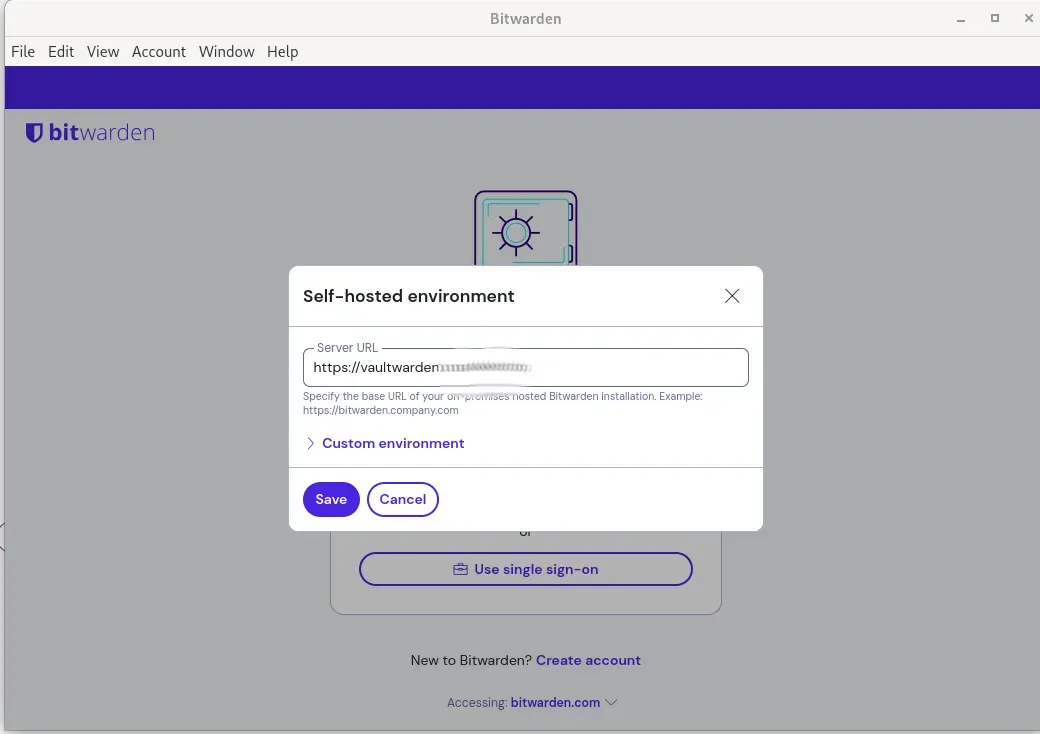 set up self-hosted backend
Finally, we have managed to access our very own bitwarden server.
 Successfully connected our bitwarden client to our backend
With your own self-hosted Vaultwarden up and running, you’ve taken a huge leap toward total password freedom and digital independence! Now, your most sensitive information is shielded from prying eyes, stored safely on your own hardware, and accessible only by you — no third-party cloud required. Not only have you reclaimed control over your data, but you’ve also unlocked a new level of privacy and peace of mind. Welcome to the world of secure, self-hosted password management — where you’re always in charge!