
mTLS: The “VIP Club” of Network Security (and how to implement it without crying)

Let’s be honest: Managing TLS certificates is about as fun as doing taxes while walking on Lego bricks. If you’ve ever tried to memorize openssl commands, you know the pain. ”Wait, was it -x509 or -req? Do I need a config file? Why is my browser screaming at me?”
But here’s the thing: Mutual TLS (mTLS) is a superpower compared to standard HTTPS. An example for the the latter is when you show up to meet an informant. You ask for a secret code word to make sure they are who they say they are. Once they say it, you give them the briefcase. You’ve verified them, but they haven’t verified you — they just took the case.
For mTLS: You ask for their code word, and they ask for yours. Neither of you opens the briefcase or speaks a word of intel until both parties have proven their identity. It’s a “trust nobody by default” handshake.
This concept lies at the very heart of Zero Trust Architecture. In the old days, we relied on perimeter security — firewalls acting as castle moats. Once you were inside the network “castle”, you were trusted implicitly. That model is dead. In a Zero Trust world, we operate on the principle of ”Never Trust, Always Verify.” mTLS enforces this by ensuring that every single connection — whether it’s an external user or an internal microservice — requires strict, cryptographic identity verification before a single byte of data is exchanged. It effectively turns every relationship into a dedicated, encrypted tunnel, making it the bedrock of modern secure infrastructure.

Today, I’m diving into the absolute chaos of certificate management, explaining why it matters, and introducing CertWiz-mTLS — a toolkit I built to turn this nightmare into a 4-step bash party. But first, let’s get the fundamentals right.
Part 1: The Crux of TLS Management
If you’ve ever tried to set up mTLS “by the book,” you know the drill. You open a terminal, furiously Google search or ChatGPT for the difference between root and intermediate certificates, and eventually find yourself staring at a confusing soup of OpenSSL flags like -x509, -newkey, -nodes, and -days.
The “State of the Art” for certificate management usually forces you to choose between two equally frustrating extremes. On one hand, you have enterprise-grade solutions like HashiCorp Vault or Kubernetes Cert-Manager, which are powerful but require immense effort to configure for a simple project. On the other hand, you have the “Text File” method, where you manually execute fifteen different commands, copy-paste keys into haphazardly named backup folders, and pray you didn’t accidentally invalidate the basic constraints.
The true headache, however, isn’t just generating the keys; it is managing their entire lifecycle. It is a fragile ecosystem where one wrong flag — mistaking -new for -x509 — leaves you with a useless file and a cryptic error message. You have to figure out how to rotate a client certificate without breaking production, or ensure that when an employee leaves, their access is actually revoked. This involves the dark arts of the Certificate Revocation List (CRL), a component that is notoriously difficult to maintain and often ignored by server configurations entirely.
Before I unleash the scripts that solve this, let’s break down the cast of characters in this security theater.
1. The Root CA (The “Godfather”)
Every VIP club needs an owner. In TLS, that’s the Certificate Authority (CA).

The Job (The Trust Anchor): The Root CA acts as the ultimate source of truth in your security model. Its primary function is to digitally sign other certificates — either intermediate CAs or leaf certificates — using its private key. When a client (like a browser or a backend service) connects, it verifies the signature chain all the way up. If the chain ends at a Root CA that is stored in the client’s “Trust Store,” the connection is allowed. Ideally, this root signature is the only thing your systems need to know to trust thousands of different client devices.
The Risk (Key Compromise): The private key of your Root CA (ca.key) is the most sensitive file in your entire infrastructure — the “Crown Jewels.” If an attacker steals it, they can silently mint valid, trusted certificates for any user or server in your system. Unlike a standard certificate, you cannot simply revoke a Root CA; the only remediation is to manually scrub the trusted root from every single laptop, server, and phone in your organization. It is a “burn it all down” scenario.
Self-Signed vs. Public (Internal Sovereignty): For public websites, you use authorities like DigiCert or Let’s Encrypt because browsers trust them by default. However, for internal traffic (database connections, microservices, or admin panels), relying on a public CA is often expensive, slow, and privacy-leaking. By running your own Private CA, you gain absolute control. You can issue certificates with 10-year lifespans or specific internal usage flags without asking permission from a third party. You effectively become Verisign for your own network.
2. mTLS Client Certificates (The “VIP Badge”)
In standard HTTPS (One-Way TLS), only the server presents a certificate to prove its identity (e.g., “I am google.com”). In Mutual TLS (mTLS), the protocol is symmetric: the client (user, IoT device, or microservice) also presents a digital certificate to the server.
Why it is Superior (Cryptographic Identity): It effectively deprecates the concept of “something you know” (passwords, API keys) in favor of “something you have” (a private key and your own device). Passwords can be guessed, phished, or leaked in database dumps. In contrast, mTLS relies on valid X.509 certificates tied to 2048-bit (RSA) or 256-bit (ECC) private keys. For an attacker to impersonate a client, they cannot simply intercept a password string; they must steal the actual private key file. If that key is generated and stored securely, impersonation becomes mathematically infeasible.
The “Pass” (The Handshake Mechanics): The “ticket” isn’t a single file, but a cryptographic pair. The Public Certificate (client.crt) acts as the ID card — it contains metadata like the Common Name (CN), Organization, and the CA’s signature. The Private Key (client.key) is the proof of ownership. During the TLS handshake, the server challenges the client to digitally sign a piece of data. If the signature validates against the public certificate and the certificate chains up to a trusted CA, the server grants access — all before a single byte of HTTP application data is exchanged.
3. Certificate Periods (The “Expiration Date”)
Nothing lasts forever, especially trust. In a secure PKI (Public Key Infrastructure), validity periods are a critical security control, not just an administrative annoyance.
Short-lived Client Certificates (Limiting the Blast Radius): Security best practices now favor “ephemeral” credentials. By issuing client certificates with short lifespans — such as 24 hours to 30 days — you significantly reduce the window of opportunity for an attacker. If a developer’s laptop is stolen or a server is compromised, the stolen certificate will naturally expire and become useless before the attacker can do significant damage. This reduces the pressure on your revocation infrastructure, as expiration acts as a failsafe “auto-revocation.”
Long-lived Root CAs (Operational Stability): Conversely, your Root CA is the foundation of your entire trust model. Rotating a Root CA is a massive logistical undertaking that involves touching every single client and server in your organization to update their “Trust Store.” Therefore, Root CAs are typically valid for long periods (e.g., 10 to 20 years). They are often generated on strictly secured, sometimes air-gapped machines, and are used solely to sign Intermediate CAs, ensuring the root private key remains offline and secure for the majority of its life.
4. Revocation (The “Ban Hammer”)
Imagine a scenario where a trusted employee leaves the company on bad terms, or a developer’s laptop containing a valid production certificate is stolen. You cannot simply ask them to delete the file. Without a revocation mechanism, that stolen certificate acts as a valid key to your castle until it naturally expires — which could be months or years away. This is the “Zombie Certificate” problem: the credential is dead to you, but alive to your server.
The Mechanism (CRL): The most common mechanism for internal CAs is the Certificate Revocation List (CRL). Think of it as a “No Fly List” published by the CA. When a server receives a client certificate, it shouldn’t just check if the signature is valid; it must also cross-reference the certificate’s serial number against this list of banned IDs. If the serial is found, access is denied immediately, regardless of the expiration date.
The Industry Blind Spot (The “Fail-Open” Crisis): Shockingly, revocation is frequently the “Achilles’ heel” of PKI implementations. A significant number of tutorials and even production deployments completely omit revocation checking because it adds operational friction. Security officers often assume that “access management” handles the user, forgetting that the device holds a valid cryptographic token. If your infrastructure does not explicitly check the CRL (e.g., using the ssl_crl directive in NGINX) or if the list isn’t updated, the system defaults to “fail-open.” This means a revoked, stolen certificate will continue to grant access as if nothing happened, leaving a gaping hole in your Zero Trust architecture that often goes undetected until audit time.
Part 2: Enter CertWiz-mTLS 🧙♂️
I built CertWiz-mTLS because I was tired of the “OpenSSL amnesia” loop: knowing exactly how to generate a certificate on Monday and completely forgetting the correct flags by Friday. I needed a tool that was simpler than enterprise vault solutions but more robust than a folder full of loose shell scripts.
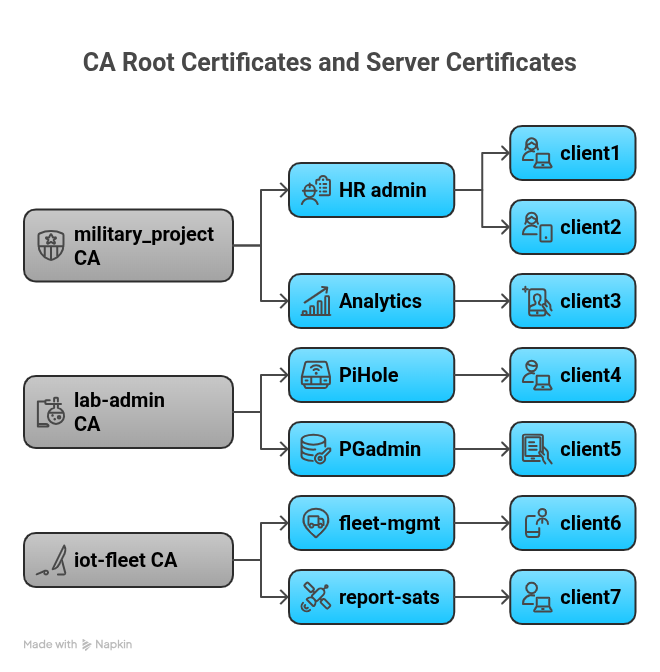
CertWiz-mTLS is designed as an opinionated “Swiss Army Knife” for TLS management that abstracts away the complexity of the OpenSSL CLI. At its core, it introduces the concept of Profiles. Instead of dumping all your keys into one chaotic directory, the tool isolates different environments (like military_project, lab-admin, or iot-fleet) into self-contained workspaces. Each profile gets its own Certificate Authority (CA), its own database of issued serial numbers, and its own revocation list.
Under the hood, the toolkit automates the tedious bookkeeping that makes manual OpenSSL management so error-prone. It initializes the CA directory structure, tracks valid and revoked certificates in a flat-file database (index.txt), and automatically bundles keys into browser-friendly formats like PKCS#12 (.p12). Most importantly, it enforces a correct lifecycle: you cannot issue a client certificate without a CA, and you cannot revoke a certificate that doesn’t exist. It handles the plumbing so you can focus on the security.
Here is how you secure your infrastructure in less than 60 seconds.
Step 1 — Become the Boss (Generate CA)
Everything starts here. I use the first script to initialize a new “Profile,” which sets up the directory structure, creates the flat-file database (index.txt), and generates the all-important self-signed Root Certificate. This root certificate (ca.crt) is the “Trust Anchor” — the only file you need to distribute to your clients or install in your browsers to tell them “Trust everything signed by this entity.”
./1_gen_ca.sh -p my-app-p stands for Profile. Mandatory. Don’t forget it.
Output: You now have a specialized workspace in certs/my-app/ containing your ca.key (keep this safe!) and ca.crt.
Step 2 — Open the Club (Generate Server Cert)
Next, I need a certificate for the server itself so it can prove its identity to connecting clients. This script generates a private key for the server and signs a matching certificate using the Root CA we just created.
*Note: If your server is public and you already have a certificate from a trusted public authority (like Let’s Encrypt/Certbot or DigiCert), you can skip this step! You only need this if you want to use your private CA to sign your server certificates (common for internal DNS or IPs).*
./2_gen_server_cert.sh -p my-app -n myserver.local -d 365-n for server name (Common Name), and -d for validity days (default is 365).
Step 3 — Invite the Guests (Generate Client Cert)
Now for the mTLS magic. I generate a unique “ID Badge” for a specific client — whether it’s a developer’s laptop (john-doe) or an automated microservice (payment-bot). The script doesn’t just create the certificate; it bundles the private key, the public certificate, and the CA chain into a single PKCS#12 (.p12) file. This is crucial because standard tools like web browsers or Postman prefer importing a single file rather than juggling three separate PEM files.
./3_gen_client_cert.sh -p my-app -n bot-01 -u-u means “Unencrypted” key (useful for automated bots/scripts), so then the client cert will not require password to be used; but it’s optional argument.
Step 4 — The Ban Hammer (Revoke)
Eventually, credentials need to die. Maybe bot-01 was decommissioned, or a laptop was lost. This script finds the serial number associated with the client name, marks it as revoked in the database, and — most importantly — regenerates the Certificate Revocation List (CRL). Once NGINX reloads this new CRL, that specific certificate will be rejected instantly, even if it is technically still “valid” according to its expiration date.
./4_revoke_client.sh -p my-app -n bot-01Part 3: Configuring NGINX (The Bouncer)
Generating certs is half the battle. Now you need NGINX to enforce the rules. I included modular configs in the configs/nginx folder to keep things clean.
The Standard Configs
I split the config into reusable chunks so you don’t have massive spaghetti code.
1. ssl.conf (The Hardening Layer): This file contains the “Fort Knox” settings that every server should have but few do. It disables old, insecure protocols (like SSLv3 or TLS 1.0/1.1) and enforces TLS 1.2 or 1.3. It also prioritizes modern Elliptic Curves (like X25519) which are both faster and more secure than traditional RSA key exchange. Additionally, it injects HSTS (HTTP Strict Transport Security) headers, forcing browsers to remember allowing only HTTPS connections in the future.
2. proxy.conf (The Application Bridge): Your backend application (whether it’s Python, Node, or Go) shouldn’t have to deal with the complexities of handshake validation. NGINX handles the cryptography, but your app still needs to know who is connecting. This config forwards the client’s identity as simple HTTP headers:
proxy_set_header X-Client-Cert-Subject $ssl_client_s_dn;
proxy_set_header X-Client-Verify $ssl_client_verify;
This turns a complex X.509 verification problem into a simple string check. Your backend code just looks at Request.Headers[“X-Client-Cert-Subject”]. If it says CN=admin-user, you grant admin rights. If the header is missing, NGINX didn’t let them in.
3. The Master Config (mtls_proxy.conf): This is where we assemble the Lego blocks. It defines the virtual server and enables the critical ssl_verify_client directive:
server {
  listen 443 ssl;
  # 1. Verification Logic
  ssl_client_certificate /path/to/ca.crt; # The Root CA to trust
  ssl_crl /path/to/crl.pem; # The "No Fly List" -  revocation list
  ssl_verify_client on; # The magic line. "on" = Strict mode, no access w/o mTLS cert
  location / {
  include proxy.conf; # Pass the identity headers to the app
  proxy_pass http://localhost:8080;
  }
}
Part 4: How to Connect (Client Examples)
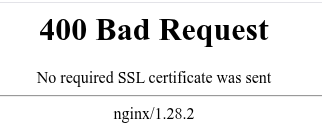
The door is now stronger than a bank vault. If you try to open https://myserver.local in Chrome right now, you won’t just get a warning — you’ll get a connection reset or a ERR_BAD_SSL_CLIENT_AUTH_CERT. The server will essentially hang up on you immediately because you didn’t present your credentials during the handshake.
So, how do we get in?
The CURL Way
The command line is the first place I test to ensure the plumbing is working. While most tutorials show you how to pass separate .crt and .key files, modern curl actually supports the PKCS#12 bundle directly. This is much cleaner as you only need to manage one file.
Here is a somewhat more advanced example (based on the examples/CLI/curl_ollama.nfo in the repo), which shows how mTLS can be used to provide authentication to a traditionally unauthenticated ollama instance:
curl \
--cert-type P12 \
--cert client.p12:password123 \ # Path to P12 file : Password
--cacert ca.crt \ # Trust the customized Root CA
-X POST https://myserver.local/api/generate \
-H "Content-Type: application/json" \
-d '{
"model": "mistral:7b",
"prompt": "Why is the sky blue?"
}'
By using--cert-type P12, I can pass the same file I give to my browser users directly to my CLI tools. One file, one password, everywhere.
The Python Way
For automated scripts or microservices, you don’t want to shell out to curl. While the standard Python `requests` library supports mTLS, it historically forces you to manage the .crt and .key as separate files on the filesystem. In production, carrying around loose key files is messy.
I prefer using the requests-pkcs12 library because it lets you use the single, portable .p12 bundle. This is the exact same file you would give to a human to import into their web browser.
from requests_pkcs12 import post
# Verify using the p12 itself (it contains the CA!)
response = post(Turn your server into a VIP club with mTLS. 🕶️ Master Zero Trust security without the OpenSSL tears using CertWiz-mTLS.
"https://myserver.local/api",
pkcs12_filename="client.p12", # One file to rule them all
pkcs12_password="", # Empty if you used -u flag
verify=True # Verify server against the CA inside the P12
)
print(response.text)
Conclusion
mTLS doesn’t have to be scary. With CertWiz-mTLS, you move from “copy-pasting StackOverflow OpenSSL commands” to a structured, repeatable automated workflow.
Your servers are now a VIP club. And guess what? You’re on the list 🕶️