
Part I — How to run your private docker registry securely behind Nginx and integrate it with Keycloak
Ever found yourself juggling software development, version control, and on-prem container management all at once? Yeah…same here, not exactly my weekend hobby either. But truth be told, there are situations where it makes perfect sense — like when a project demands strict confidentiality, or if you’re a die-hard privacy enthusiast who just prefers to run everything off-cloud and under your own roof.
In my earlier blog series, How to run your entire digital life on a Raspberry Pi, I showed how I manage all the daily services I depend on using nothing more than a tiny 15W Raspberry Pi — completely cloud-free and tucked safely behind a battle-hardened Nginx reverse proxy.
In this chapter, I will demonstrate how to deploy your own Docker registry using Harbor, securely placed behind an Nginx proxy. While I am not running this setup on a Raspberry Pi — Harbor’s requirements go beyond what a Pi can realistically handle — I will be building upon the concepts from Part 16 of my series, where I explained how to configure a reliable, production-grade Nginx instance once you have a registered domain.
Before we get started, ensure you have either followed my previous article or already have Nginx properly configured for other services. That setup is essential as our foundation. From there, we’ll proceed to deploy Harbor, a self-hosted Docker registry, in containers, configure Nginx to securely serve Harbor on a dedicated subdomain, and integrate user authentication with Keycloak.
Regarding Keycloak, this guide assumes you have a basic understanding of what Keycloak is, how to set it up, and how to manage clients and user onboarding within it. If you’re new to Keycloak, no worries — you’re in luck! I have a dedicated episode in this series that covers how to install and configure Keycloak for service authentication and user management. Familiarity with Keycloak realms, clients, and user workflows will provide a crucial foundation before continuing with this Harbor and Nginx integration.
Harbor — the docker registry
About
Harbor is an open-source, enterprise-grade Docker registry designed to provide a secure and scalable platform for storing, signing, and scanning container images. Compared to the basic Docker registry container, Harbor offers a wealth of advanced features such as role-based access control, image vulnerability scanning, LDAP/Active Directory integration, and crucially, support for Single Sign-On (SSO) with OpenID Connect — enabling seamless integration with identity providers like Keycloak. This SSO capability enhances security and user management by centralizing authentication, a feature that the simple Docker registry lacks. Additionally, Harbor supports image replication across multiple registries, high availability setups, and comprehensive audit logging, making it a robust, full-featured container image management system. These capabilities position Harbor as the superior choice for organizations seeking a secure, compliant, and user-friendly container registry solution that goes far beyond the limitations of the standard Docker registry.
Install
Download Harbor’s offline installer from Github. The latest version as of writing is v2.13.2.
# mkdir harbor
# cd harbor
# wget https://github.com/goharbor/harbor/releases/download/v2.13.2/harbor-offline-installer-v2.13.2.tgz
Unzip the installer, and rename the harbor.yml.tmpl to harbor.yml.
# tar -xzvf harbor-offline-installer-v2.13.2.tgz
# cd harbor
# mv harbor.yml.tmpl harbor.yml
Based on this YAML config file, the installer script can generate the docker-compose.yml for us, and will start the services — basically it does all the heavy-lifting. Open the file with your favorite editor and make the necessary changes; below, I only show the lines you need to pay attention.
hostname: dockerhub.<your-domain.tld>
...
harbor_admin_password: PICK_A_STRONG_PASSWORD_FOR_ADMIN
...
# modify the path if you want to have them somewhere else
data_volume: ./data
# same applies for log: -> location
    location: ./log/harbor
And essentially, that’s all there is to it. While there are numerous additional options available to enhance the setup for a fully production-grade environment, these fundamental configurations are sufficient to get the job done effectively for most use cases.
Now, let Harbor install itself, get the containers, and run them accordingly.
# ./install.sh
If everything is configured correctly, you’ll see the containers up and running smoothly. Harbor includes its own built-in Nginx proxy that handles access to the portal, registry, logs, and other services. In the docker-compose.yml file, the proxy is the last service listed, with its port exposed on the localhost at port 80. It’s important to ensure that no other service is occupying port 80 on your host. If a conflict arises, simply stop the Docker stack and adjust the port mapping to fit your environment before restarting.
Nginx configuration
Below, I’ll guide you through properly configuring the subdomain for Harbor. From experience, running services behind a proxy often requires careful handling of proxy headers — they sometimes need to be added, removed, or rewritten to ensure everything functions smoothly. I spent an entire day fine-tuning my setup to make not only the web-based dashboard and portal work but also to ensure docker login and docker push commands function correctly. Take a close look at the subdomain configuration to avoid common pitfalls and achieve a seamless Harbor deployment.
### REDIRECT ANYTHING ON PORT 80 --> 443 sia!
server {
    listen 80;
    server_name dockerhub.YOUR_DOMAIN.TLD;
    return 301 https://$host$request_uri;
}

server {
  #variables
  set $service http://[YOUR_HARBOR_IP]:80;
  #server info
  listen 443 ssl;
  http2 on;
  server_name dockerhub.YOUR_DOMAIN.TLD;
  #common ssl settings
  include /etc/nginx/ssl.conf;

  #mTLS
  # ssl_verify_client           optional;

  # disable filesize limit
  client_max_body_size 0;

  location / {
    # Applies the 'mylimit' zone.
    # Allows a burst of 30 requests.
    # 'nodelay' ensures requests within the burst are processed immediately.
    limit_req zone=mylimit burst=100 nodelay;
    #include common proxy settings
    include /etc/nginx/proxy.conf;
    #override some proxy settings ah
    proxy_redirect http://[YOUR_HARBOR_IP] https://dockerhub.YOUR_DOMAIN.TLD;

    proxy_pass_request_headers on;

    proxy_pass  $service;

    access_log on;
    access_log /var/log/nginx/access_dockerhub.log;
    error_log on;
    error_log /var/log/nginx/error_dockerhub.log;
  }
  location = /robots.txt {
    # 'alias' points directly to the file's path inside the container.
    alias /usr/share/nginx/html/robots.txt;
    allow all; # Allow all access to the robots.txt file itself
    log_not_found off; # Don't log 404s if the file is missing
    access_log off;    # Don't log every robots.txt access request
  }
}
As you can see, here I follow the guides and standards I set up in my previous blog post — again, have a look at it to see how ssl.conf or proxy.conf are made.
Let’s quickly review the most critical settings. The first section ensures that any requests made via unencrypted HTTP are automatically redirected to the secure HTTPS version.
Regarding mTLS, which we configured in Part 16, you can safely disregard it here. In fact, I set mTLS to optional due to several compatibility issues — most notably, if the client application doesn’t support mTLS, it simply won’t work. While browser-based access to the Harbor dashboard continues to function, docker login commands and authentication with Keycloak (which we will set up later) would fail. As a result, neither Harbor nor Keycloak can have mTLS enabled in this setup.
Next, we address the location / section, where we adjusted the rate-limiting parameters to allow for a higher burst capacity—from 30 to 100 requests. Specifically, in the original nginx.conf, I increased the mylimit zone rate limit from 20 requests per second to 100 requests per second. This adjustment is crucial because when performing a docker push, the number of layers in your container image can trigger too many simultaneous connections to the Harbor instance. To prevent these uploads from being blocked by rate limiting, we need this increased threshold.
#In nginx.conf !!!
limit_req_zone $binary_remote_addr zone=mylimit:10m rate=100r/s;
Next comes the most crucial configuration, one that caused me the greatest difficulty. The issue centered around docker push—each time I attempted to push an image to the registry, the process kept retrying indefinitely without any explicit error messages from Harbor, the core services, or Nginx. This kind of silent failure can be frustrating since there are no clear logs to guide troubleshooting. However, after the docker push eventually timed out, I encountered the following error message:
unsupported protocol scheme ""
At that point, I realized the issue had to be related to the headers — particularly because Harbor wasn’t explicitly aware that it was operating behind an HTTPS proxy, which I was unable to configure. I preferred not to have Harbor manage certificates or handle TLS termination, as that would complicate the setup significantly. Even setting the external_url in the harbor.yml configuration didn’t resolve the problem. The core issue is that the URLs returned in the response headers from Harbor don’t match what the Docker CLI expects; they use an IP-based URL instead of the required subdomain-based URL. To fix this, we need to rewrite these headers accordingly.
Finally, it’s essential to ensure that all request headers are properly forwarded to Harbor to maintain full functionality via proxy_pass_request_headers on;
Keycloak setup
Again, a standard Nginx configuration for Keycloak is presented in my previous Part 16 post. To make the process easier, I just “blindly” copy-paste the docker-compose.yml and Nginx config for Keycloak below.
docker-compose.yml
services:
  keycloak:
    image: quay.io/keycloak/keycloak:26.0.7
    container_name: keycloak
    environment:
      KC_BOOTSTRAP_ADMIN_USERNAME: keycloak_admin
      KC_BOOTSTRAP_ADMIN_PASSWORD: keycloak_secret
      KC_PROXY: edge
      KC_PROXY_ADDRESS_FORWARDING: true
      KC_PROXY_HEADERS: xforwarded
      KC_HOSTNAME: <your_keycloak_domain>
      KC_HOSTNAME_STRICT: true
      KC_HOSTNAME_STRICT_HTTPS: true
      KC_HTTP_RELATIVE_PATH: /
    # ports:
    #  - "$KEYCLOAK_HOST_PORT:8080"
    #   - "9000:9000" # Management port for health/metrics endpoints
    volumes:
      - /mnt/storage/docker/keycloak/h2:/opt/keycloak/data/h2
    command: start
    dns: 172.30.1.3
    networks:
      mydocker_network:
        ipv4_address: 172.30.1.30

networks:
  pi_docker_network:
    external: true
nginx subdomain config
######################$$$#########
###       KEYCLOAK-SSO         ###
#########################$$$######
### REDIRECT ANYTHING ON PORT 80 --> 443!
server {
    listen 80;
    server_name <your_keycloak_domain>;
    return 301 https://$host$request_uri;
}

server {
  #variables
  set $service http://172.30.1.30:8080;
  #server info
  listen 443 ssl;
  http2 on;
  server_name <your_keycloak_domain>;
  #common ssl settings
  include /etc/nginx/ssl.conf;

  #mTLS
  ssl_verify_client           optional;

  location / {
    # Applies the 'mylimit' zone.
    # Allows a burst of 30 requests.
    # 'nodelay' ensures requests within the burst are processed immediately.
    limit_req zone=mylimit burst=30 nodelay;
    #include common proxy settings
    include /etc/nginx/proxy.conf;
    #override some proxy settings ah
    proxy_set_header X-Forwarded-Proto $scheme;
    proxy_hide_header X-Frame-Options;
    add_header X-Frame-Options "ALLOW-FROM https://<your_keycloak_domain>";
    proxy_pass              $service;
    access_log on;
    access_log /var/log/nginx/access_keycloak_sso.log;
    error_log on;
    error_log /var/log/nginx/error_keycloak_sso.log;
  }
  location = /robots.txt {
    # 'alias' points directly to the file's path inside the container.
    alias /usr/share/nginx/html/robots.txt;
    allow all; # Allow all access to the robots.txt file itself
    log_not_found off; # Don't log 404s if the file is missing
    access_log off;    # Don't log every robots.txt access request
  }
}
Connect Harbor with Keycloak
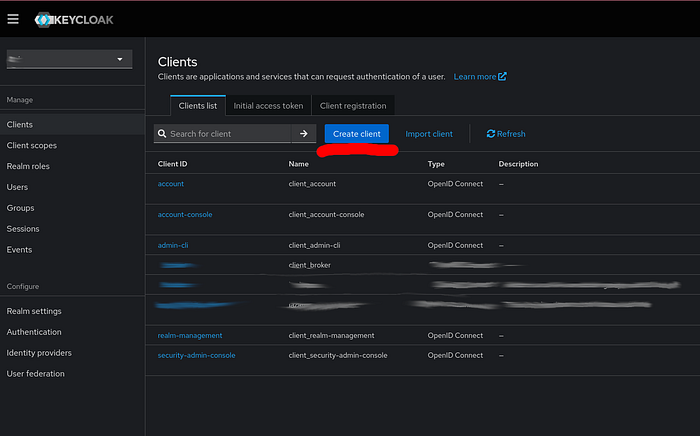
Step #1: Let’s create a client in Keycloak for harbor. Choose your realm that you created before (if not, simply click on the create realm button), and select Clients on the left panel. Then, Create client button on the right hand side.
In the details section, set a Client name, e.g., harbor, and set the URLs as shown in the picture below.
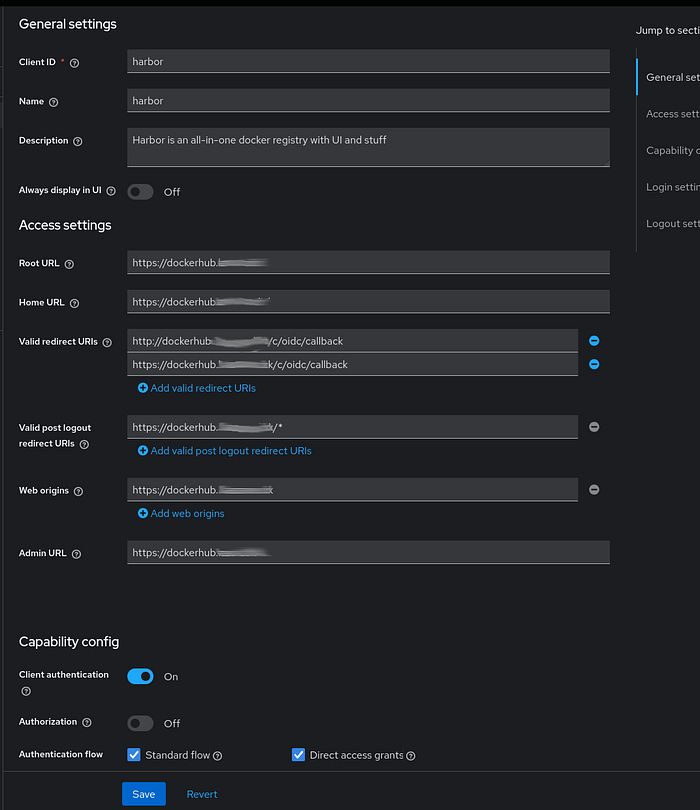
Be sure to use your own top-level domain for the subdomains — I’ve simply masked mine, but everything else should remain the same for your setup. Also, don’t forget to configure the Capabilities section at the bottom, enabling Client Authentication, and for the authentication flow, activate the two essential options: Standard Flow and Direct Access Grants.
It’s essential to configure both valid redirect URIs with http and https, although the HTTP version is particularly important. Harbor operates using HTTP internally within its stack, so it expects the redirect URI to use HTTP. However, don’t be confused — our Nginx proxy correctly manages all external traffic by performing HTTPS redirection while preserving the original headers Harbor requires. In other words, this setup is completely secure, and there’s no risk of accessing the Docker registry over unencrypted HTTP.
Step #2: Navigate to your Harbor instance, log in using the admin account, and access the Configuration section from the left-side menu. Then, select the Authentication tab and enter the required details as demonstrated in the image below.
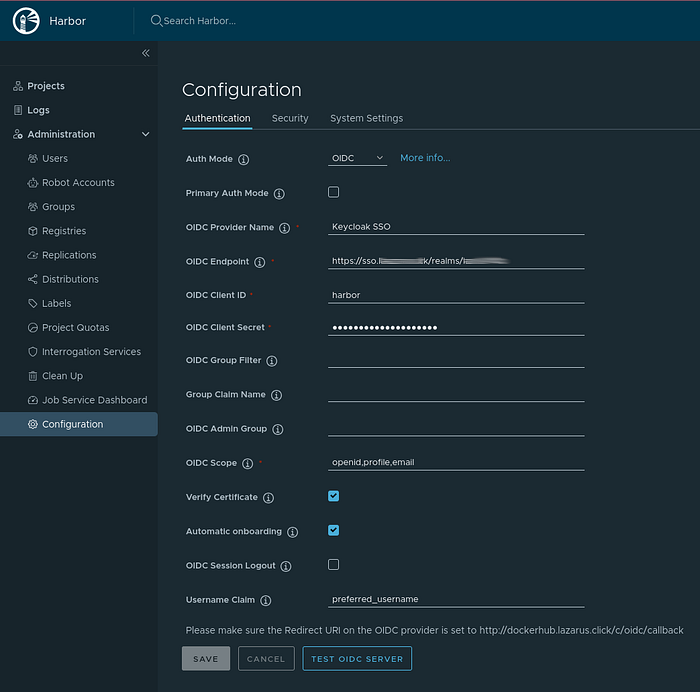
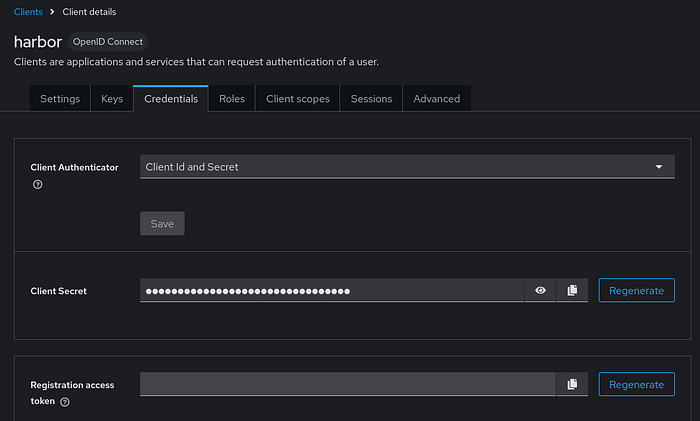
For the authentication mode, select OIDC. Provide a name for your identity provider, then set the OIDC endpoint URL to your realm’s address: https://<YOUR_KEYCLOAK_DOMAIN>/realms/<YOUR_REALM_NAME>. Use the Client ID harbor from your Keycloak configuration, and retrieve the Client secret from the Credentials tab.
In Harbor’s OIDC settings, add the scopes openid, profile, and email. Then, enable Automatic Onboarding, which allows any user in your Keycloak realm to be automatically registered in Harbor upon their first login. Additionally, set the username claim to preferred_username. This setting is effective only when onboarding is enabled and simplifies user management by ensuring that usernames in Harbor match exactly those configured in your Keycloak realm.
Now, logout, and you will see that Harbor has an option to login with Keycloak SSO — the name we set for our OIDC provider.

Later, you can assign your Keycloak user a full admin role and designate Keycloak-based authentication as the primary login method. This configuration will disable any secondary login options, ensuring all access is managed through Keycloak — Better to have some experiments first, before locking yourself out.
Docker CLI
Let’s see, how we can use our self-hosted Docker-registry. One thing we need to note about the authentication is that docker does not support OIDC. However, each user authenticated once, i.e., onboarded to Harbor, has a CLI secret that can be used for authentication. This is what docker can use to login.
First, create a project in your Harbor instance once logged in. Go to your User Profile.

Within the Profile, you can see what is your actual Username and CLI secret, which you should copy now.

Now, go to your terminal and login
# docker login dockerhub.<YOUR_DOMAIN.TLD>
Set the username and CLI secret as password and you will be successfully logged in. Let’s tag and push an image to our registry. For this, I will be using the stock hello-world container.
Tag the container image first:
# docker tag hello-world:latest dockerhub.<YOUR_DOMAIN.TLD>/<YOUR_HARBOR_PROJECT>/hello-world:latest
Once it’s tagged, we can push to Harbor.
# docker push dockerhub.<YOUR_DOMAIN.TLD>/<YOUR_HARBOR_PROJECT>/hello-world:latest
After pushed, you can see it in the dashboard too.

Deploying a secure, self-hosted Docker registry with Harbor, properly configured behind an Nginx reverse proxy and integrated with Keycloak for authentication, provides a powerful and scalable solution for modern container image management. By following this guide, you not only gain a registry with advanced features like role-based access control, vulnerability scanning, and image replication, but also a seamless Single Sign-On experience with Keycloak using OIDC.
While setting up Harbor behind a secure proxy involves nuanced configurations — especially with header rewriting and handling authentication flows — the effort ensures a robust, production-grade environment that enhances security and usability. Whether you are a developer, DevOps engineer, or system administrator, leveraging Harbor with Keycloak simplifies user management and secures container workflows effectively.
Continue exploring further customizations and production optimizations as your infrastructure grows, but with this foundation, you have a reliable, enterprise-ready Docker registry designed to meet the demands of your containerized applications.
In Part II of this small series, I show you how you can integrate multiple realms in to the same Dockerhub or to any service.