
Part II— How to run your private docker registry securely behind Nginx and integrate it federated Keycloak realms
In this next episode, we’ll explore a common challenge faced when using Keycloak for authentication across multiple groups or teams: managing multiple realms within a single Keycloak instance. Since each application — including Harbor — can only connect to one OIDC provider tied to a single realm, integrating several realms can become a complex hurdle. We’ll dive into strategies to overcome this limitation, allowing you to leverage a unified Keycloak instance to authenticate users from multiple realms seamlessly. This approach ensures streamlined user management, enhanced security, and flexibility for diverse organizational structures without needing separate Keycloak deployments for each group. Stay tuned to learn how to configure and optimize your authentication setup for multi-realm environments efficiently.
Federate realms with a hub realm
One effective approach is to create a separate realm designated as a hub realm, which contains no users but only clients — such as a client for Harbor configured similarly to what we covered in the previous episode. Then, in the other realms you want to federate, you create identity provider (IDP) clients. By linking these IDP-provider clients within the hub realm, you establish a chain of trust between realms. This setup enables users to select their designated sub-realm during the login process, allowing seamless authentication across multiple realms while using a single Keycloak instance as the centralized authentication hub.
The hub realm
Create a new realm and setup a client exactly the same way we did in the previous episode.
Sub-realms
Next, assume you have one group of people in RealmA, while another group of people in RealmB. We need to repeat the following steps in each realms. Let’s do it for RealmA.
Go to RealmA and create a Client just as you would do for any normal setting. Let’s name this client hub-idp-client. Fill in further details as shown in the image below.
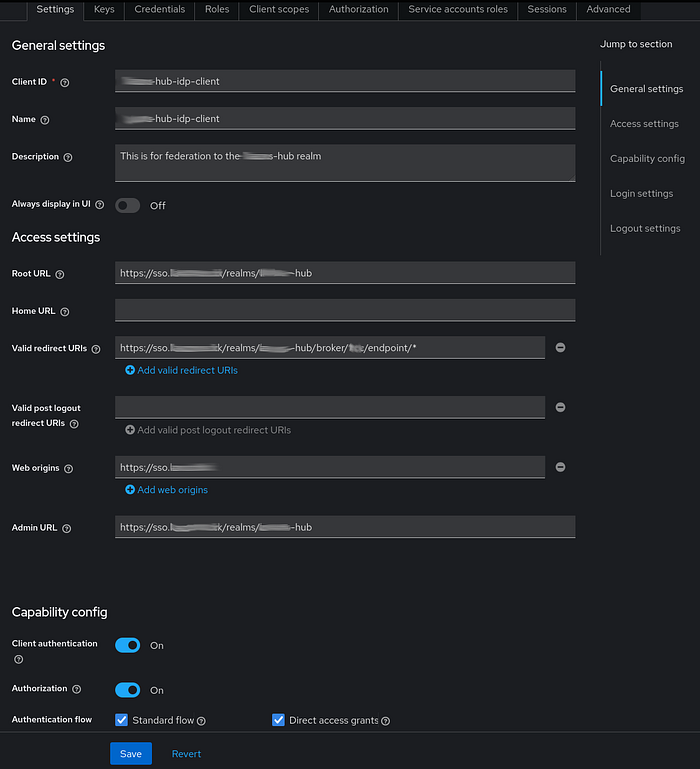
For the Root URI, simply set it according to our hub realm, i.e., https://sso.<YOUR_DOMAIN.TLD>/realms/hub. For the Valid redirect URIs, follow this pattern: https://sso.<YOUR_DOMAIN.TLD>/realms/hub/broker/realmA/endpoint/*. The web origin is just our main SSO domain, while the Admin URL is the same as the Root URL.
For the capability config, ensure you switch on Authorization as well along with the standard authentication flows and Client authentication.
Repeat the same steps for RealmB.
Federate sub-realms
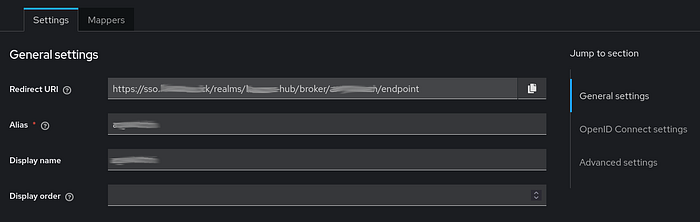
Now, go back to our hub realm, and select Identity providers on the left-side menu, then click on Add provider -> Keycloak-OIDC provider. Here, we will add RealmA as an identity provider first.
In the general settings, we set RealmA (or whatever you like) as Alias and Display name. For the redirect URI, follow this pattern: https://sso.<YOUR_DOMAIN.TLD>/realms/hub/broker/realmA/endpoint
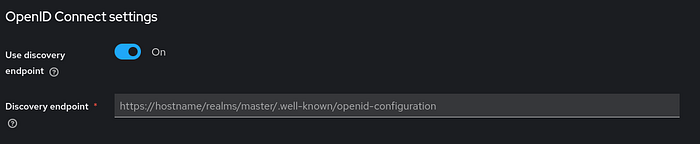
Then, set the Discovery endpoint based on the template it shows. If it is set correctly, it will get the JSON from the URL and automatically configures all all URIs. Pattern to follow for the discovery endpoint: https://sso.<YOUR_DOMAIN.TLD>/realms/realmA/.well-known/openid-configuration
Lastly, configure the Client parameters as you would add your client to an application, i.e., set the proper Client name and Secret from RealmA’s IDP client.
Again, repeat the same process for RealmB.
That’s it — you’ve successfully federated RealmA and RealmB under your Hub realm. By configuring the Hub realm’s client for Harbor or any other service, users can select which realm they want to authenticate against. For example, when clicking “Login with Keycloak SSO” on Harbor, users will be presented with this unified SSO login screen.

Since there are no users in the Hub realm itself, you need to select the appropriate sub-realm from the options at the bottom of the login screen. Once you choose a realm, you’ll be redirected to that realm’s login page. After authenticating, you will be logged into Harbor.
As you may have realized by now, federation does not require a single “master” realm to manage sub-realms. For example, you could designate RealmA as your primary realm — set up as in the previous post — and then create RealmB, federating it with RealmA. Users from RealmA would log in as usual, while only RealmB users would need to select their realm during login.