
Part 14 — How I Run My Entire Digital Life on a Raspberry Pi: Host Your Own Secure Chat Server for True Privacy
Table of Contents
Scroll down to UPDATE 2 before going through the whole thread.
In a world dominated by centralized chat platforms like Slack, Discord, Teams, and WhatsApp, privacy and control over your own data have become rare commodities. These popular services often lock users into closed ecosystems, where your messages, contacts, and metadata are stored on servers you don’t own. But the risks go even deeper than most people realize. Even so-called “encrypted” apps collect vast amounts of metadata — who you talk to, when, from where, and on what device. This metadata can be as revealing as the messages themselves, mapping out your social circles and daily routines for corporations, governments, or hackers. Most mainstream messengers also force you to register with a phone number or email, tying your digital identity to your real-world self and eroding true anonymity. And because these platforms run on centralized servers, your private conversations are always just one breach, subpoena, or algorithm update away from exposure or loss.
Enter Matrix, a revolutionary open standard for decentralized, federated communication that flips this model on its head. In this post, I’ll show you how to set up my own Matrix server right on a Raspberry Pi, reclaiming control over your private chats and joining the future of open, federated communication.
 Image generated with ChatGPT
You wanna chat about it? Federate with and DM me :) @xdentalhacker:matrix.nakedon.top
Matrix
Matrix lets you run your own homeserver, giving you full ownership of your messages and identity. Unlike traditional platforms, Matrix servers communicate with each other seamlessly, forming a distributed network where you can chat with anyone on any server — whether they’re on your own self-hosted instance or a public server like matrix.org. This federation ensures no single company controls the network, reducing reliance on centralized gatekeepers.
Privacy is baked into Matrix’s design. End-to-end encryption protects your conversations so that only you and your chat partners can read the messages — homeservers only store encrypted data, making mass surveillance or data harvesting far more difficult. Plus, because it’s an open protocol, you’re not locked into a single vendor or client; you can choose or even build your own apps.
Compared to Slack or Discord, which are proprietary and often require paid plans for advanced features, Matrix offers a free, open, and extensible alternative that respects your privacy without sacrificing collaboration power. With Matrix, you get the best of both worlds: secure, encrypted messaging combined with the flexibility of a truly decentralized network.
Deploy
Synapse is the flagship open-source homeserver for the Matrix protocol, developed by the Matrix.org Foundation. Written in Python, Synapse is the backbone that enables our decentralized and federated chat. Additionally, it supports SSO, so we again can ride on the waves of our Keycloak setup.
Bootstrap
Before we can simply spin up Synapse with a docker-compose file, we need to initialize it with the configuration settings tailored to our setup. This means bootstrapping the server first: start by creating a dedicated directory for your Matrix instance in our good old/mnt/storage/docker— and then use the official Synapse Docker image with the generate command to create the necessary base configuration files. (Be sure to replace <your-matrix-domain> with the domain you plan to use for your Matrix server.)
$ cd /mnt/storage/docker
$ mkdir matrix
$ sudo docker run -it --rm \
  -v ./matrix:/data \
  -e SYNAPSE_SERVER_NAME=<your-matrix-domain> \
  -e SYNAPSE_REPORT_STATS=yes \
  matrixdotorg/synapse:latest generate

Unable to find image 'matrixdotorg/synapse:latest' locally
latest: Pulling from matrixdotorg/synapse
b16f1b166780: Already exists
8a45c7e905d6: Pull complete
dc110bfd751c: Pull complete
f01499923487: Pull complete
4f4fb700ef54: Pull complete
4e343c04c070: Pull complete
606f828e9c26: Pull complete
b18148b51057: Pull complete
52b3b11d97da: Pull complete
54dfbcfcae77: Pull complete
Digest: sha256:e1986db27803f4685e81797c58e3fbfc28e64cc22267e751b837dac60a05925b
Status: Downloaded newer image for matrixdotorg/synapse:latest
Creating log config /data/<your-matrix-domain>.log.config
Setting ownership on /data to 991:991
Generating config file /data/homeserver.yaml
Generating signing key file /data/<your-matrix-domain>.signing.key
A config file has been generated in '/data/homeserver.yaml' for server
name '<your-matrix-domain>'. Please review this file and customise it
to your needs.
As you can see, this created homeserver.yaml and other files in ./data. We will use that later, but first, let’s setup a Keycloak client for matrix.
Keycloak setup
Alright, after we have the basic configuration set. Let’s head to our Keycloak to create a client for our Matrix. You must be very proficient in setting this up after all the previous posts. Create a new client then in our pi5 realm, or whatever you have and name it matrix. Select OpenID Connect for the client type just as usual.
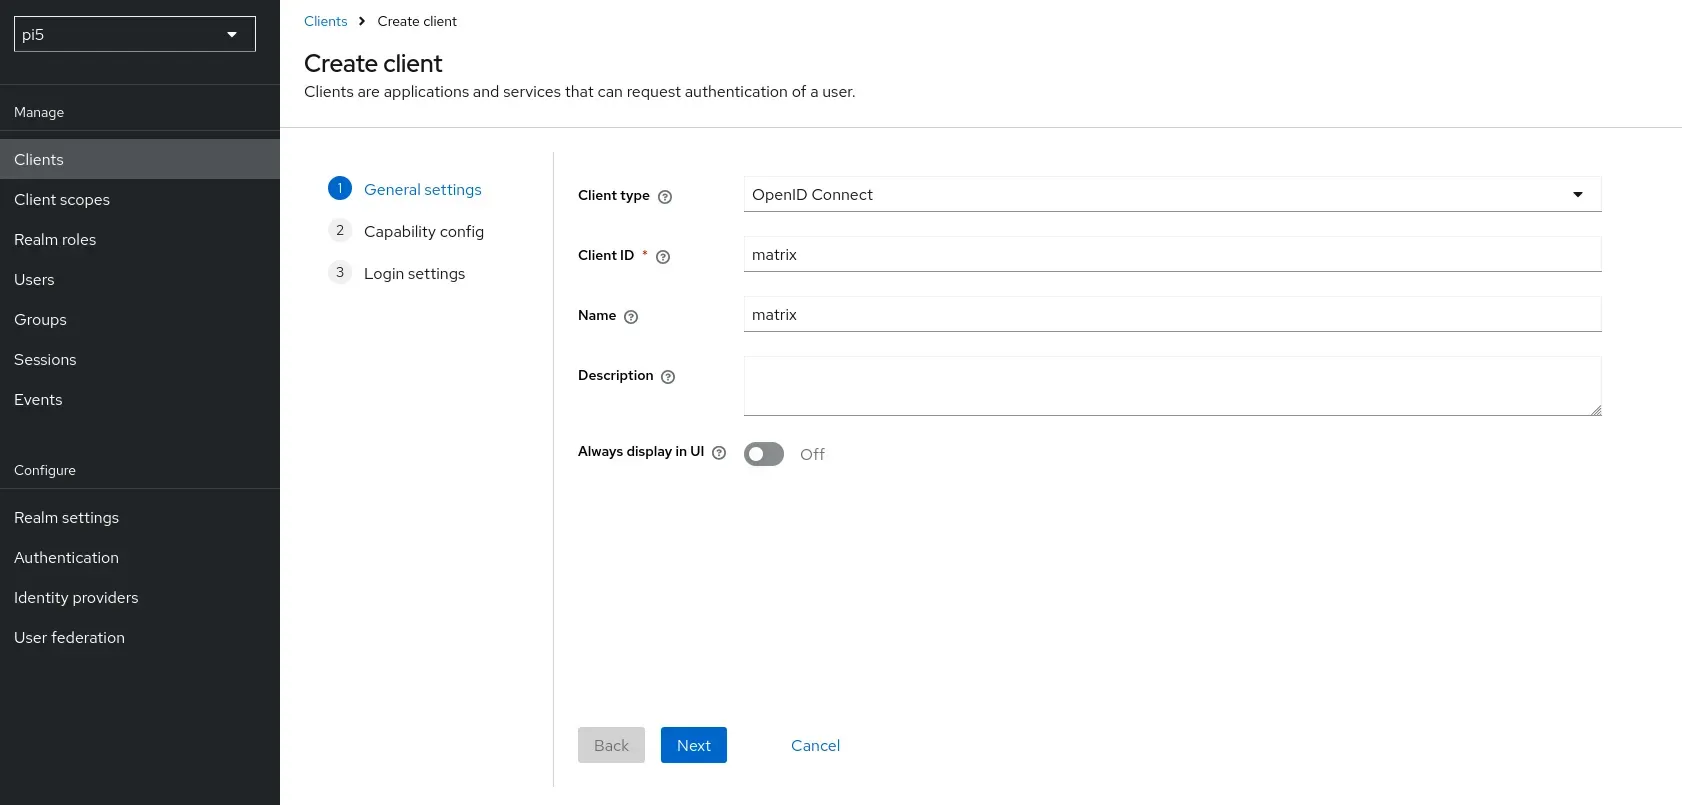 Creating a new client for matrix
For the capability config, do what we always do: leave the flow as it is yet enable Client authentication.
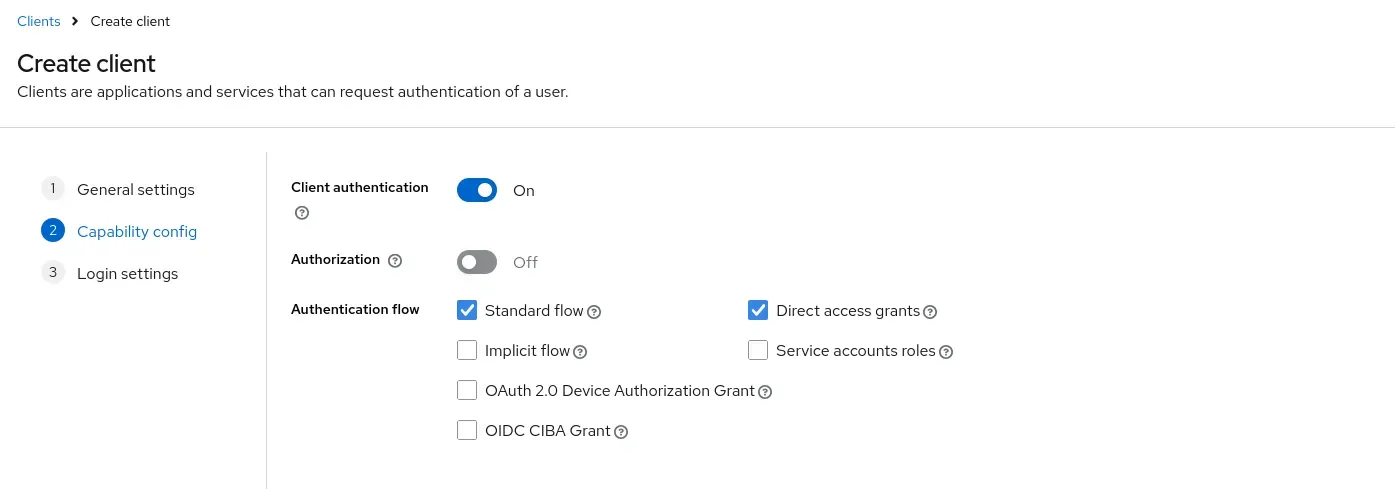 Capability settings
For the URLs, let’s have our usual setup:
- Root URL:
https://<your-matrix-domain>/ - Home URL:
https://<your-matrix-domain>/ - Valid redirect URIs:
https://<your-matrix-domain>/_synapse/client/oidc/callback - Valid post logout redirect URIs:
https://<your-keycloak-domain>/realms/<your-realm>/protocol/openid-connect/logout?post_logout_redirect_uri=https%3A%2F%2F<your-matrix-domain>%2F - Web origins:
https://<your-matrix-domain>
Configure Matrix for Keycloak SSO
Open ./matrix/homeserver.yaml in your editor and add (or modify) the following section:
oidc_providers:
  - idp_id: keycloak
    idp_name: "Keycloak"
    discover: true
    issuer: "https://<your-keycloak-domain>/realms/<your-realm>"
    client_id: "matrix"
    client_secret: "YOUR_KEYCLOAK_CLIENT_SECRET"
    scopes: ["openid", "profile", "email"]
    user_mapping_provider:
      config:
        subject_claim: "sub"
        localpart_template: "{{ user.preferred_username }}"
display_name_template: "{{ user.name }}"- Replace
<your-keycloak-domain>andyour-realmwith your Keycloak domain and realm name, respectively. - Set
client_idandclient_secretto match the Keycloak client you’ll create.
Deploy the stack
Finally, go to your Portainer and create a new stack called matrix. Copy-paste the following as its docker-compose.yaml:
services:
  synapse:
    image: matrixdotorg/synapse:latest
    container_name: synapse
    restart: always
#    ports:
#      - "8008:8008"   # Client-server API (HTTP)
#      - "8448:8448"   # Federation (HTTPS)
    volumes:
      - /mnt/storage/docker/matrix:/data
    environment:
      - SYNAPSE_SERVER_NAME=<your-matrix-domain>
      - SYNAPSE_REPORT_STATS=yes
    dns: 172.30.1.3
    networks:
      pi_docker_network:
        ipv4_address: 172.30.1.23

networks:
  pi_docker_network:
    external: true
Again, replace <your-matrix-domain> as per your setup. Similarly to previous cases, I leave the ports commented as we will direct our Cloudflare tunnel to go directly into the containers, but good to leave it there as comments, then we know what ports are the ones we need :). According to our whole series, the IP I chose should also be free, but feel free to change it.
Tunnel setup
As you saw above, Matrix uses two different ports for its core functions: port 8008 for client connections (such as registration and chat via apps like Element) and port 8448 for federation, which allows your server to communicate with other Matrix servers across the decentralized network. Cloudflare Tunnel, however, only allows you to map one port per subdomain, so you can’t expose both ports on a single hostname through the tunnel. To overcome this, you set up two subdomains — one (e.g., matrix.<your-matrix-domain>) routed to port 8008 for client access, and another (e.g., federate.<your-matrix-domain>) routed to port 8448 for federation. You then create a .well-known/matrix/server file on your main subdomain to inform other servers that federation traffic should be directed to your federation subdomain instead. This approach ensures both client access and federation work seamlessly, despite the Cloudflare limitation.
Let’s create the domain for client connection and registration. Go to our very own Cloudflare One dashboard and create a new public hostname for our tunnel.
 Tunnel configuration for our newly created matrix subdomain
After this, once you open your new domain in your browser, you will see that Synapse is up and running.
 Our matrix server is up and running
What you’re seeing is expected: you’re accessing the Synapse server’s API endpoint, not a user-friendly registration or login page. Synapse itself does not provide a web interface for user registration or chat—it only exposes APIs for Matrix clients to use.
To register or log in, you need to use a Matrix client such as Element (Web, Desktop, or Mobile).
Create our first user
For my Matrix client, I use Element, but I actually prefer managing all my chats through Rambox — my all-in-one communication hub. Rambox not only offers a generous free version, but also supports more messaging protocols and services than I ever thought possible, making it the ultimate tool for keeping all my conversations organized in one place. This isn’t an endorsement — I don’t receive anything for mentioning Rambox; I simply like the app. Feel free to use whichever client you prefer.
 The starting window of the Element application
Let’s click on the Create Account button, as we don’t have account yet.
 Creating an account
Click on Edit, since we’ll be setting up an account with our own private Matrix server rather than connecting to the public one.
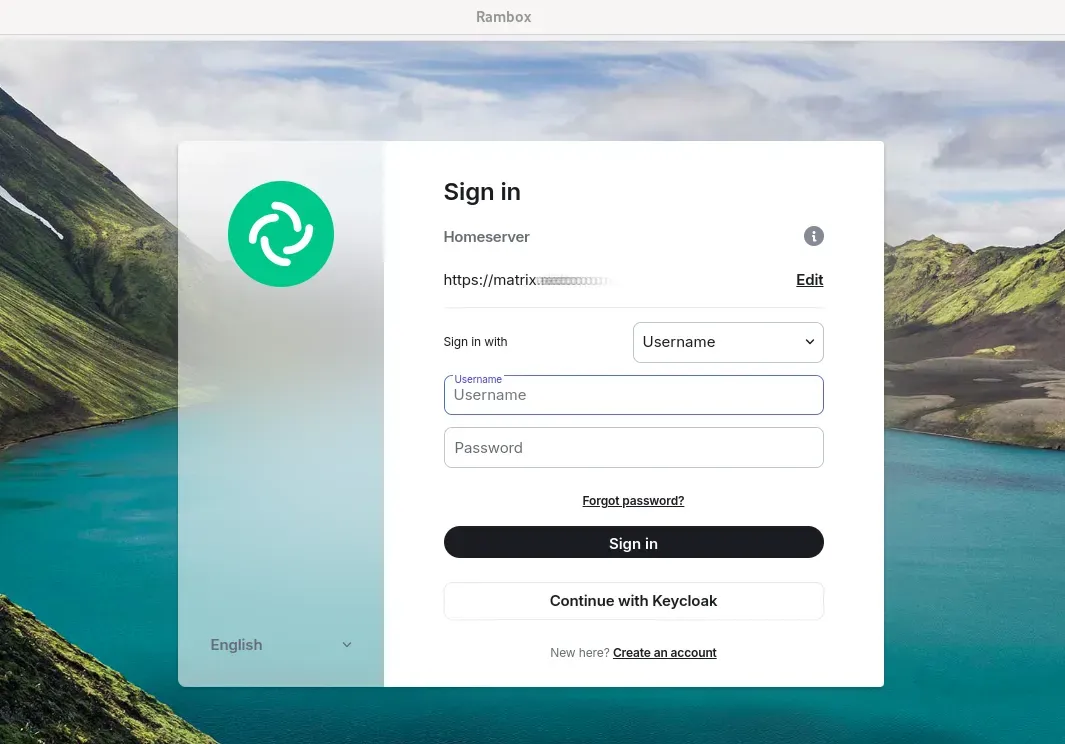 The keycloak option is recognized
As you can see, thanks to our server configuration, the Continue with Keycloak option is available. Click on it to complete your account setup.
After logging in through Keycloak, you’ll be redirected to the next screen, where your username and profile details are automatically populated according to our configuration.
 Continue with the profile info provided by Keycloak
After you click Continue, you’ll be logged in and ready to use your personal Matrix server. Just keep in mind that at first, your server will be completely empty.
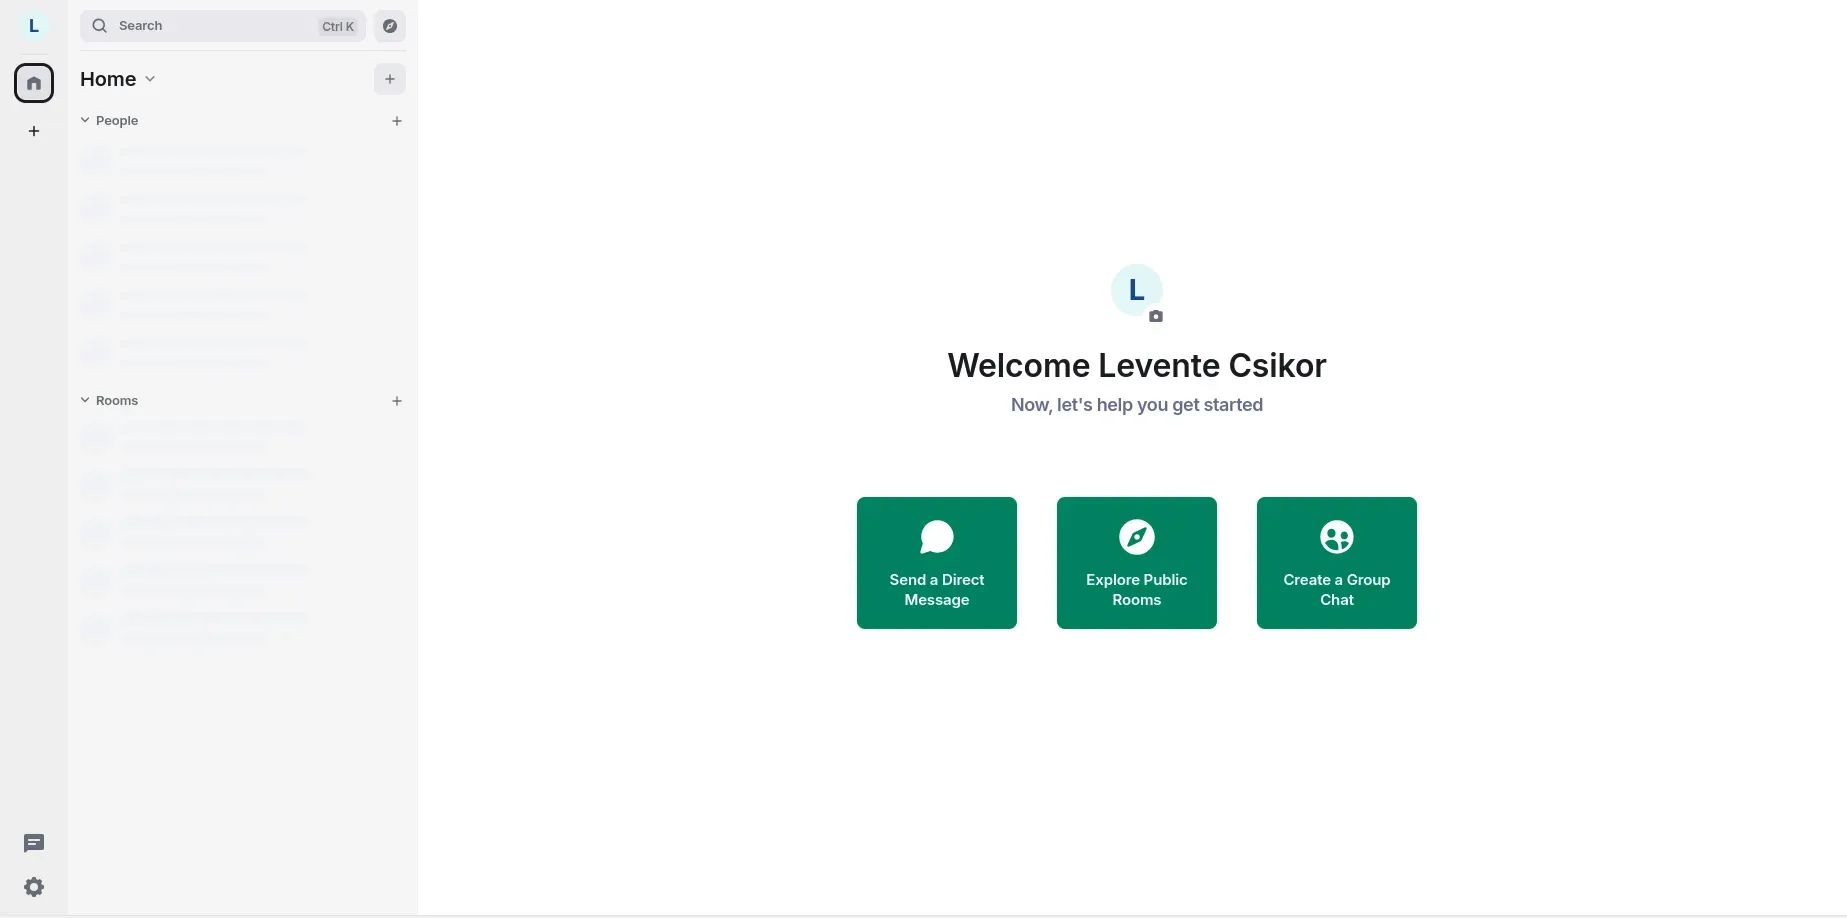 Once we logged in, we have our very own Matrix server
Let’s try to add a public room or space, and explore. Click on Explore Public Rooms, select matrix.org server (instead of yours as you don’t have anything). And, here we bump into our first issue already…
 Failed to query public spaces
This error is the direct cause of our service not set up properly for federation. Because adding anything/anyone outside of your own matrix server would require federation. Let’s do what I briefly discussed above. Create a new public hostname for our tunnel that directs traffic to the same matrix container, but its 8448 port (instead of 8008). Unfortunately, the story does not stop here; in fact it gets a bit complicated :)
That .well-known thingy above should be served by a web server. But synapse itself cannot serve it for us. This means, that we cannot just simply mount a persistent directory to our container and consider things done. And since we do not run any nginx server (or any simple web server), and we are using Cloudflare tunnels, we need to rely on Cloudflare workers. Don’t worry, they are also free, but a bit tricky to setup.
Cloudflare worker
First of all, we need to go to the main dashboard of cloudflare, not the One (zero-trust) dashboard we used to use for our tunnel setups. This is located under https://dash.cloudflare.com/. After logging in, on the left side panel, select Compute (workers). Expand the menu item, click on workers and pages. Here, I would note, that the workaround we do here can be done with pages too; i just found the worker-based solution simpler, because the pages requires a github account as well to get content from there, which is a bit overkill for our setup.

Click on the Create button.

Then, just use the Hello world example for brevity. Then, we will change its code.
 Select on the Start with Hello World!
Then, we will given something like the one below. A randomized worker name and the code. We cannot modify the code here, we need to click on Deploy first. You can leave the name as it is; it does not matter.
 Deploy first this sample hello world app
After that, our worker is successfully deployed. However, it does not do anything good for our project yet. Click on Edit code.
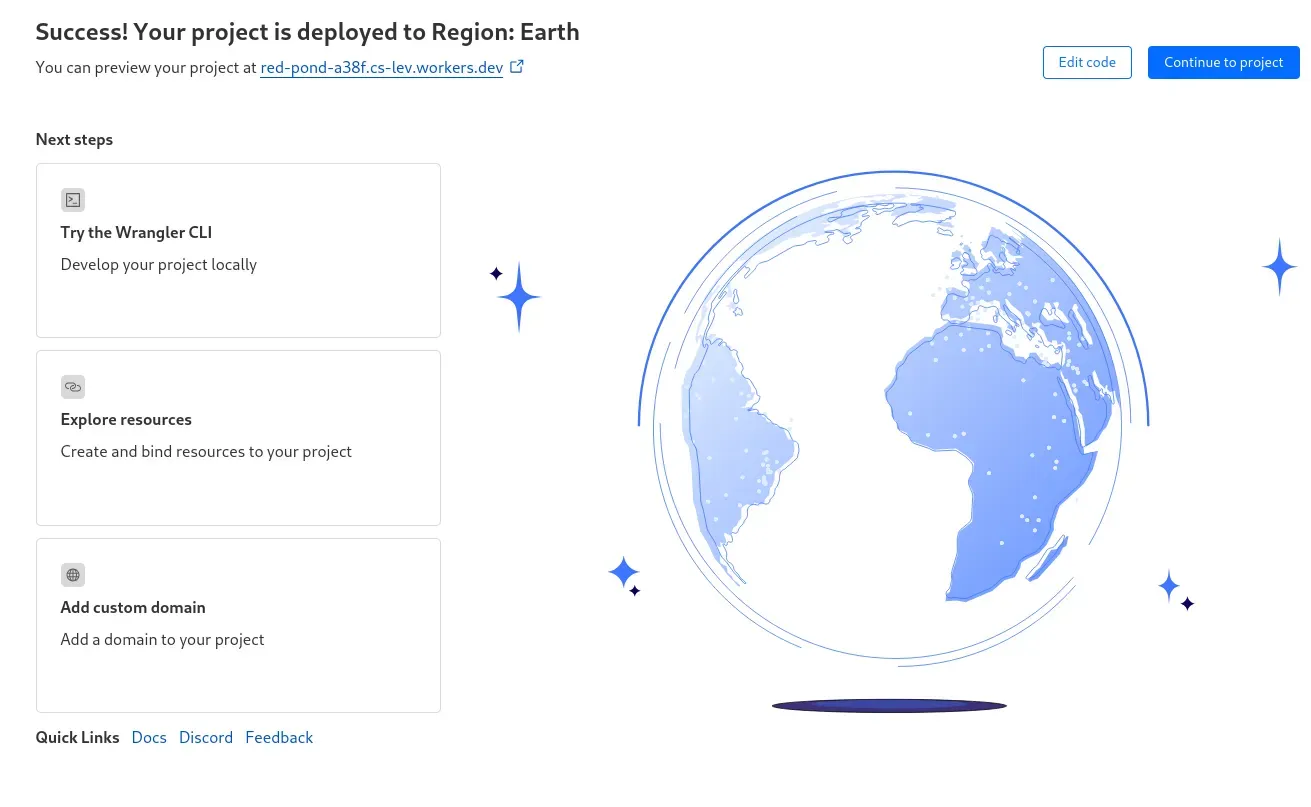 Click on Edit code
We see the code editor now as shown below.
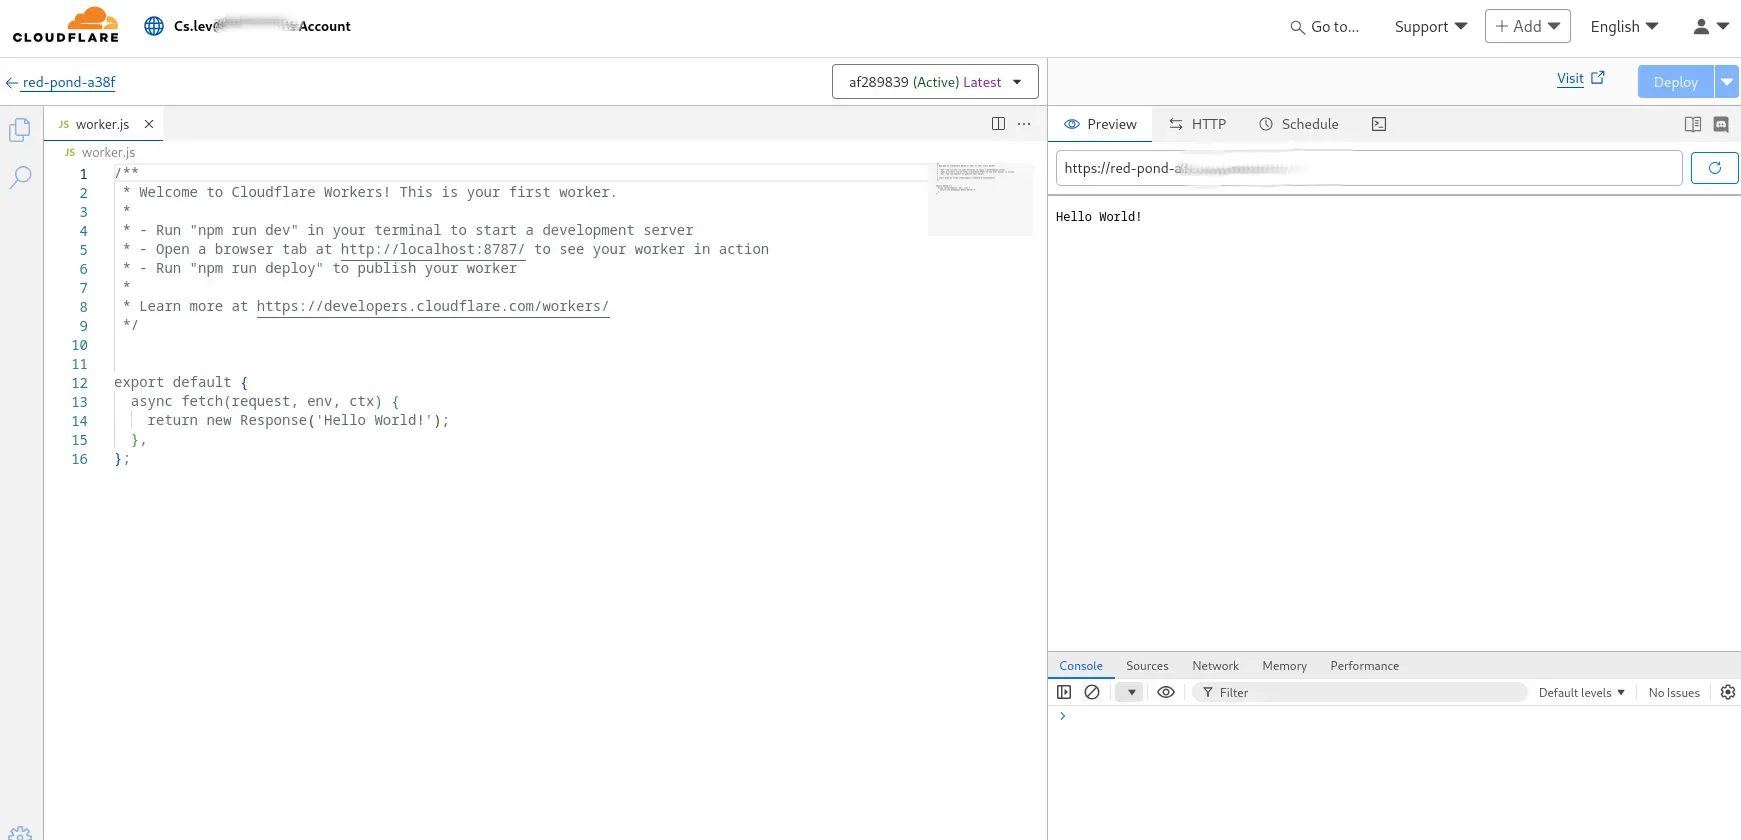
Remove the code, and copy-paste the following:
export default {
  async fetch(request, env, ctx) {
    const url = new URL(request.url);
    // Serve the .well-known/matrix/server file
    if (url.pathname === "/.well-known/matrix/server") {
      return new Response(
        JSON.stringify({ "m.server": "<your-matrix-federation-domain>:443" }),
        {
          headers: {
            "content-type": "application/json",
            "Access-Control-Allow-Origin": "*"
          }
        }
      );
    }
    // Optionally, handle /.well-known/matrix/client as well:
    if (url.pathname === "/.well-known/matrix/client") {
      return new Response(
        JSON.stringify({
          "m.homeserver": { "base_url": "https://<your-matrix-domain>" }
        }),
        {
          headers: {
            "content-type": "application/json",
            "Access-Control-Allow-Origin": "*"
          }
        }
      );
    }
    return new Response("Not found", { status: 404 });
  },
};
Don’t forget to chage the <...> parts to set your domains correctly, both the main matrix domain and the federation domain you created for your cloudflare tunnel.
Alright, our worker code is ready. We need to setup a route to serve this under the correct URL. Go to our new worker’s settings, and select Domains & Routes where you will see something like this.
 The domain & routes settings for the worker
Next, click on **+Add **and add our main matrix domain. From the side menu that flies in from the right, select Route.
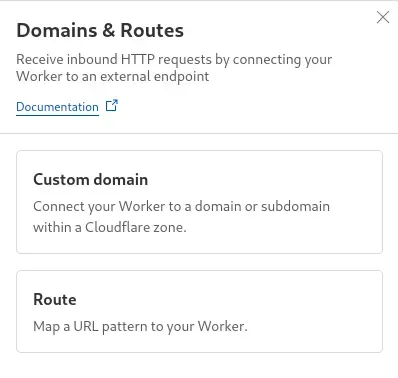 Select Route
Set the following in the pop-up window. For the Zone, select your main domain from the drop-down list. For the route set this:
<your-matrix-domain>/.well-known/matrix/*Of course, replace <your-matrix-domain> with your actual matrix domain (not the federation domain!)
 Setting up the route properly
After this, you will see your newly created route in the **Domains & Routes section. **The Cloudflare setup is finished by this last move. We need to go back to our matrix server and carry out some changes.
Configure Matrix server for federation
First of all, by default, our Synapse server does not serve anything on port 8448. This can be confirmed when you check the homeserver.yaml at /mnt/storage/docker/matrix/ directory. We need to duplicate the lines that are set for port 8008 and change the port to 8448. The rest of the changes can remain. As you can see below, tls is disabled for both cases and Cloudflare is the one that terminates the TLS.
listeners:
  - port: 8008
    tls: false
    type: http
    x_forwarded: true
    resources:
      - names: [client, federation]
        compress: false
  - port: 8448
    tls: false
    type: http
    x_forwarded: true
    bind_addresses: ['0.0.0.0']
    resources:
      - names: [client, federation]
        compress: false
In order to make sure everything will be correct, double-check if you have these lines:
server_name: "<your-matrix-domain>"
public_baseurl: "https://<your-matrix-domain>/"
Bear in mind that the server_name is just the domain name without anything else, while the public_baseurl is with https://.
Alright, there is nothing else to be done, just restarting our matrix server. Go to your Portainer, and restart the stack/container.
Testing
Log out of your Element client and then log back in to completely clear your previous session data. During login, you may be prompted to authorize or authenticate your client for added security. Once you return to a fresh, empty interface, take some time to explore the public spaces and rooms on matrix.org. If your setup is correct, you should see a curated list of recommended rooms ready for you to join.
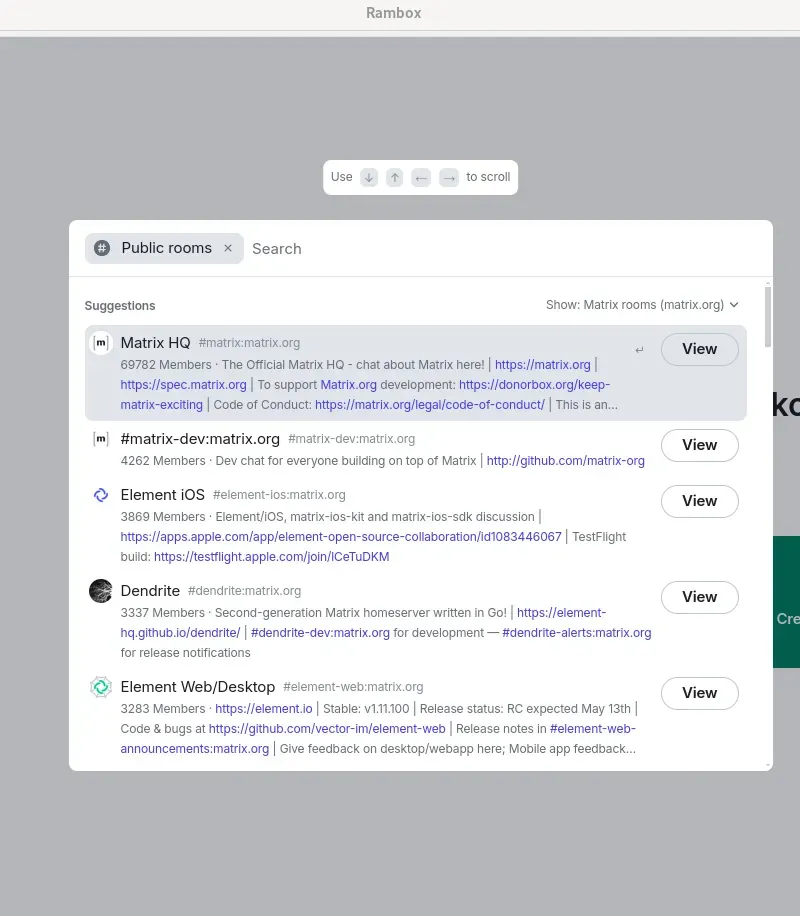 Our matrix server is ready for federation
Successfully accessing public rooms and spaces across Matrix servers is a strong indicator that your Matrix server is configured correctly — not just for internal chats, but also for federation with other Matrix servers. This means your server can seamlessly connect and communicate across the wider Matrix network, unlocking the true decentralized power of the platform.
To confirm your federation setup, head over to the Matrix Federation Tester at https://federationtester.matrix.org and enter your Matrix domain. This tool will verify that your server is discoverable and properly federated, ensuring you’re ready to take full control of your private, interconnected messaging experience
 We passed all the tests
Resource Implications of Hosting a Federated Matrix Room on a Raspberry Pi
Running a Matrix room on your own Raspberry Pi server and allowing federated users from other servers to join is absolutely possible — but it’s important to understand the resource demands, especially as your room grows or gains popularity.
How Federation Impacts Your Pi
When users from other Matrix servers (like matrix.org) join your room, their home servers federate with yours. While these users aren’t registered directly on your server, your Raspberry Pi must still process, store, and synchronize all events (messages, state changes, etc.) for the room, and maintain communication with every federated server involved.
Key Factors Affecting Resource Usage
- Room Size: The more users and federated servers in your room, the more data your Pi must handle. Each new participant increases the volume of events and state data your server processes and stores.
- Room Activity: High message rates or frequent changes (like new members joining, permissions updates, etc.) can quickly spike CPU, RAM, and disk usage on your Pi.
- Presence Updates: Features like presence (showing online/offline status) are particularly resource-intensive and can lead to CPU spikes and high memory usage, especially on lower-powered hardware.
- Large Public Rooms: Hosting or joining large rooms (hundreds or thousands of users) can cause significant increases in RAM and CPU usage, sometimes leading to slowdowns or crashes on a Raspberry Pi.
Real-World Raspberry Pi Performance
- For small rooms with just a handful of federated users, a Raspberry Pi 4 (with 4GB RAM or more) generally performs well and stays responsive.
- If you host or join very large rooms, your Pi may use several gigabytes of RAM and high CPU, which can exhaust its resources and impact overall performance.
- Users have reported that with careful management, a Pi 4 can comfortably handle modest Matrix workloads, but resource consumption grows rapidly with room size and activity.
My take
If you’re aiming to host large-scale discussions — say, on topics like encrypted DNS — it’s often best to register accounts on established public Matrix servers such as matrix.org and create your bigger rooms there. These public servers are built to handle high traffic and large communities, providing the robustness and scalability that a single Raspberry Pi might struggle to deliver. While the privacy on these public servers won’t match the full control you have on your own self-hosted server, the Matrix protocol’s end-to-end encryption and federation model still ensure strong built-in privacy protections for your conversations. Just be mindful to adhere to the hosting server’s policies to avoid your room being deleted. Remember, you can maintain multiple Matrix accounts simultaneously — one on your personal server and others on public servers — allowing you to participate flexibly across different communities and leverage the strengths of each environment. This approach balances privacy, performance, and reach, empowering you to engage in worldwide discussions without compromising security or scalability.
Additionally, it’s not just about hosting a room — simply joining (federating with) a room means your Matrix server will start syncing its history. For high-traffic rooms with thousands of users, this initial synchronization can take a long time (sometimes over an hour) on a Raspberry Pi, and your server will continue to store all subsequent messages locally. For example, after joining just one large group, my homeserver.db has already grown to 1.5GB. For these scenarios, it’s generally better to use an account on a more powerful, resource-rich server for large public rooms, while reserving your own Synapse instance for small, private, privacy-sensitive groups.
UPDATE
After experimenting with Matrix federation across different rooms, I quickly noticed a serious performance drop — joining rooms took forever, and sometimes the container would even freeze. At first, I thought my Matrix server was overloaded, but the real culprit was my Pi-hole: it was rate-limiting and blocking DNS requests from the Matrix container. Here’s the catch — Matrix’s decentralized nature means it fires off a massive number of DNS queries to a wide range of domains, which can easily overwhelm your Pi-hole and trash its cache.
Pi-hole’s rate limiting is global, not per-app, so raising the limit helps Matrix but also weakens protection for your whole network. That’s not ideal, since rate limiting is a great way to spot apps behaving badly — ironically, that’s how I caught Matrix in the act! Plus, with Matrix’s flood of DNS requests, your Pi-hole dashboard becomes cluttered with random Matrix domains, making troubleshooting a headache.
My solution? I configured my Matrix container to use dnscrypt-proxy directly as its DNS resolver. This bypasses Pi-hole, keeps your DNS logs clean, and ensures Matrix runs smoothly without hitting rate limits or bogging down your network.
By routing your Matrix container’s DNS queries directly through dnscrypt-proxy, you won’t benefit from Pi-hole’s advanced features like ad-blocking and detailed monitoring. However, you still gain the advantage of encrypted DNS traffic, enhancing your privacy. Unlike Pi-hole, dnscrypt-proxy does not implement any rate limiting for clients, so your Matrix server won’t get throttled. Plus, thanks to dnscrypt-proxy’s “carousel” approach — where DNS requests are distributed among multiple upstream resolvers — there’s a lower risk of hitting rate limits on any single resolver, since each only receives a fraction of the total queries. This setup keeps your Matrix server responsive while maintaining strong DNS privacy.
What to change?
To update your Matrix container to use dnscrypt-proxy for DNS, simply open your docker-compose.yml file and change the dns: line from 172.30.1.3 (your Pi-hole) to 172.30.1.4, where your dnscrypt-proxy is running. If you’ve configured dnscrypt-proxy to listen on a different port, such as 5053 instead of the default 53, you’ll need to adjust it back to port 53—Docker’s DNS settings only let you specify the IP address, not the port. Fortunately, this isn’t an issue since dnscrypt-proxy isn’t exposed to the host, so it won’t conflict with Pi-hole’s use of port 53 on the host system. To make this change, edit your dnscrypt-proxy.toml file and update the relevant line to set the listening port to 53. If you’ve been following along, you’ll find this file at /mnt/storage/docker/dns/dnscrypt-proxy/config:
listen_addresses = ['0.0.0.0:53'] Keep in mind, if you change dnscrypt-proxy’s listening address, you’ll also need to update Pi-hole’s upstream DNS resolver settings. This requires editing both your DNS stack’s docker-compose.yml file—defining the new resolver as an environment variable—and updating the actual configuration file, since environment variables might not be applied if the container isn’t being set up for the first time.
- "DNS1=172.30.1.4#53"And go to your pihole.toml file and modify the [dns] section’s upstreams array as well. This file is /mnt/storage/docker/dns/pihole/config/.
[dns]
  # Array of upstream DNS servers used by Pi-hole
  # Example: [ "8.8.8.8", "127.0.0.1#5335", "docker-resolver" ]
  #
  # Possible values are:
  #     array of IP addresses and/or hostnames, optionally with a port (#...)
  upstreams = [
    "172.30.1.4#53"
  ] ### CHANGED, default = []
Now you can safely stop and restart your entire DNS stack. After bringing everything back up, verify that DNS resolution is working as expected. Test by sending DNS queries directly from your Pi to the *dnscrypt-proxy *container — this ensures your Matrix server will be able to resolve domains properly. Next, check that regular DNS resolution across your local network is functioning normally. In my experience, I had to fully stop the stack, edit the necessary files, and then start it again; simply editing the files while containers were running and restarting them through Portainer didn’t apply the changes.
UPDATE 2
After running Matrix on my Raspberry Pi for about a month, I noticed it was consistently consuming nearly all available memory — hovering close to 100%. This began to impact other critical services, like my Home Assistant dashboard, which runs on the same device. To restore stability and reclaim about 50% of usable memory, I ultimately decided to shut down my Matrix node on the Pi. Of course, if you don’t run any of the services I do (in this series), the Pi seems to be still a good choice for a private Matrix node.
That said, I still fully support the Matrix ecosystem and believe in its potential. The setup process I shared above remains valid for any system architecture, so I’m keeping it here — for anyone interested in spinning up a private Matrix instance on a more powerful machine, or even for internal company use. If that’s you, check out my follow-up post on running Synapse natively on Debian 13 with federation disabled entirely — a leaner setup for a fully private, non-federated homeserver.
Ready to take back your digital privacy? Running your own Matrix server on a Raspberry Pi isn’t just a fun project — it’s a powerful statement of independence from Big Tech’s walled gardens. With Matrix, you control your data, your identity, and your conversations, all while enjoying secure, end-to-end encrypted messaging and the freedom to connect with anyone across the federated network. Whether you’re chatting with friends on your own server or joining global discussions on public ones, you’re part of a privacy-first, open-source revolution. So fire up your Pi, follow these steps, and join the future of truly private, decentralized communication!
You wanna chat about it? DM me @xdentalhacker:matrix.org