
Part 12 — How I Run My Entire Digital Life on a Raspberry Pi: Unify and Elevate your Authentication with Keycloak
Table of Contents
Imagine transforming our Raspberry Pi into the command center for all our home services, where a single, secure login unlocks everything — from dashboards to smart home controls. With Keycloak, we are not just adding authentication; we’re unifying and elevating our digital life, bringing enterprise-grade identity management right into our living room. Gone are the days of juggling passwords for every app — Keycloak acts as your master key, streamlining user access, enhancing security, and delivering a seamless, single sign-on experience across your self-hosted ecosystem. Whether it’s about our Grafana, Portainer, Home Assistant, or Nextcloud, Keycloak empowers us to manage users and permissions from one intuitive dashboard, taking our Raspberry Pi setup to the next level of convenience and control.
 Image generated by ChatGPT
Keycloak
Keycloak is an open-source identity and access management solution from Red Hat that provides a centralized platform for authentication and authorization across your applications and services. It enables Single Sign-On (SSO), allowing users to log in once and seamlessly access multiple web and mobile apps, while offering robust security features like multi-factor authentication, role-based access control, and integration with external identity providers such as LDAP, Active Directory, and popular social platforms. With its user-friendly admin console and support for open standards like OAuth 2.0, OpenID Connect, and SAML, Keycloak simplifies user management, enhances security, and streamlines access control — making it an ideal choice for both enterprise and home lab environments looking to unify and elevate authentication.
Deploy stack
Let’s create our docker-compose file for the new keycloak stack.
services:
  keycloak:
    image: quay.io/keycloak/keycloak:26.0.7
    container_name: keycloak
    environment:
      KC_BOOTSTRAP_ADMIN_USERNAME: keycloak_admin
      KC_BOOTSTRAP_ADMIN_PASSWORD: keycloak_secret
      KC_PROXY_ADDRESS_FORWARDING: true
      KC_HEALTH_ENABLED: true
      KC_PROXY: edge
      KC_HTTP_ENABLED: true
      KC_HOSTNAME_STRICT_BACKCHANNEL: false
      KC_HOSTNAME: https://<your_keycloak_domain>
      KC_HOSTNAME_ADMIN: https://<yoar_keycloak_domain>
      KC_HOSTNAME_STRICT_HTTPS: true
    # ports:
    #   - "8080:8080"
    #   - "9000:9000" # Management port for health/metrics endpoints
    # volumes:
    #   - /mnt/storage/docker/keycloak/h2:/opt/keycloak/data/h2
    command: start-dev
    dns: 172.30.1.3
    networks:
      pi_docker_network:
        ipv4_address: 172.30.1.30

networks:
  pi_docker_network:
external: trueImportant: Do all these environment variables look overwhelming? Wondering why the Keycloak version is pinned instead of using
latest? After days of experimenting with various guides, Stack Overflow threads, and even a challenging chat with Perplexity, I discovered that no straightforward setup worked for remote access through Cloudflare tunnels. Eventually, I landed on a specific Keycloak version and a set of environment variables that reliably enable remote access via Cloudflare Tunnel. The only value you’ll need to adjust isKC_HOSTNAMEandKC_HOSTNAME_ADMIN— set this to your public URL, and be sure to include the https:// prefix; omitting it can cause the setup to fail.
NGINX — based access
For NGINX-based reverse proxy, certain parameters are not needed and they are actually obsolete. The only ENV vars you need is:
environment:
      KC_HEALTH_ENABLED: true
      KC_HTTP_ENABLED: true
      KC_HOSTNAME: https://<your_keycloak_domain>
      KC_HOSTNAME_ADMIN: https://<your_keycloak_domain>
Notice that the volume section is currently commented out. This is intentional just as the other environment variables — Keycloak needs to run with its built-in H2 database for our home setup, since we don’t require a separate PostgreSQL instance (we won’t have many realms or users anyway). The reason is that if we mount a volume from the start, Keycloak sometimes fails to initialize its data files in the empty directory and throws errors about missing files. To avoid this, we first deploy the stack without the volume so Keycloak can set up its internal files, and only then do we copy those files out from the container for persistence.
Once deployment is complete, let’s extract the files. Navigate to your /mnt/storage/docker directory and run the following commands:
$ cd /mnt/storage/docker
$ mkdir keycloak
$ cd keycloak
$ sudo docker cp keycloak:/opt/keycloak/data/h2 ./
If everything went well, you can see the h2 database files.
$ ls h2/
keycloakdb.mv.db  keycloakdb.trace.db
Make sure that the permissions are set properly for this directory and the container will be able to write it.
$ sudo chmod 775 -R h2/Now, return to Portainer, uncomment the volume lines in your configuration, and click “Update Stack” to redeploy the service. The logs should now show everything running smoothly. Next, let’s head over to the Cloudflare dashboard to update our tunnel settings, since we’ll want to access Keycloak remotely.
 Adding keycloak as a new subdomain and point it to our container
Once all is setup, using your newly configured public hostname, you should be able to see the login screen.
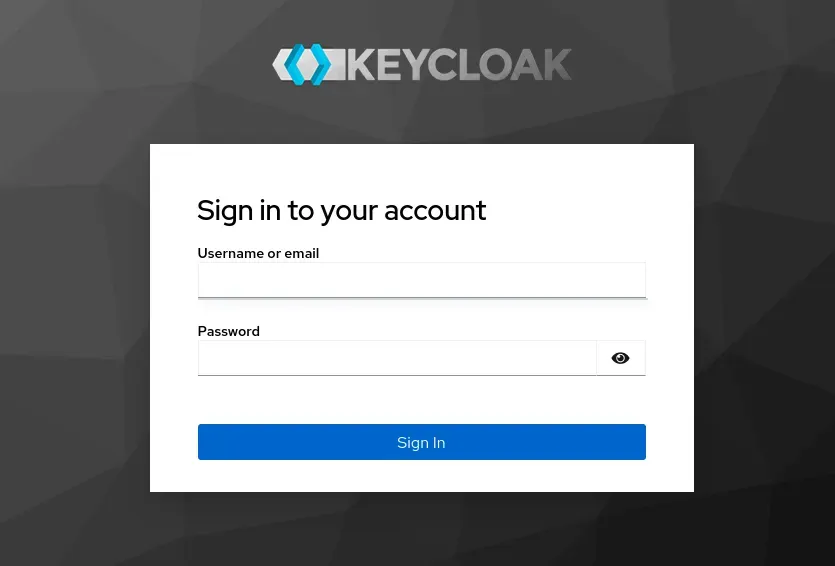 Keycloak login screen after successfully configuring our stack
Configure Keycloak
Keycloak can feel daunting at first, especially with its concepts of realms, applications, and users, but understanding these building blocks is key to unlocking its powerful identity management features.
A realm in Keycloak acts as a completely isolated management space — think of it as a security domain or a tenant. Each realm contains its own set of users, groups, roles, and applications, and these are not shared with other realms. Since this isn’t an enterprise setup and only you (and perhaps a few other home users) will be accessing all the services, we’ll just need to create a single realm for our environment.
Within a realm, you define applications (also called “clients” in Keycloak terminology). An application is any service or software — such as our Grafana, Portainer, Home Assistant— that you want to secure with Keycloak. Registering an application as a client allows it to delegate authentication to Keycloak, enabling features like Single Sign-On (SSO) and centralized access control. Applications can be configured to use standard protocols like OpenID Connect or SAML, and can have their own specific roles and permissions
Users are the individuals who will authenticate via Keycloak. Each user belongs to a specific realm and can be assigned to groups or roles that determine what applications and resources they can access. Users can manage their own accounts through Keycloak’s account console, update their profiles, change passwords, and even link external identity providers (like Google or LDAP) for social or federated login. We will only use, as mentioned above, one of a few users only.
Realm
Let’s create our one and only realm. Once we logged in, we see the following screen.
 The dashboard after logging in for the first time
As you can see on the top right corner, we only have one realm now, which is the master. Let’s leave it to be the there and create a new realm with a name of your choice; i choose pi5. You don’t have to set any resource file, just name your realm and hit Create.
Users
Let’s create a user. Once our new realm is selected at the top left corner, we see users on the left side menu. Click on it and create a new user.
 Click on create a new user
As a next step, fill in your user details.
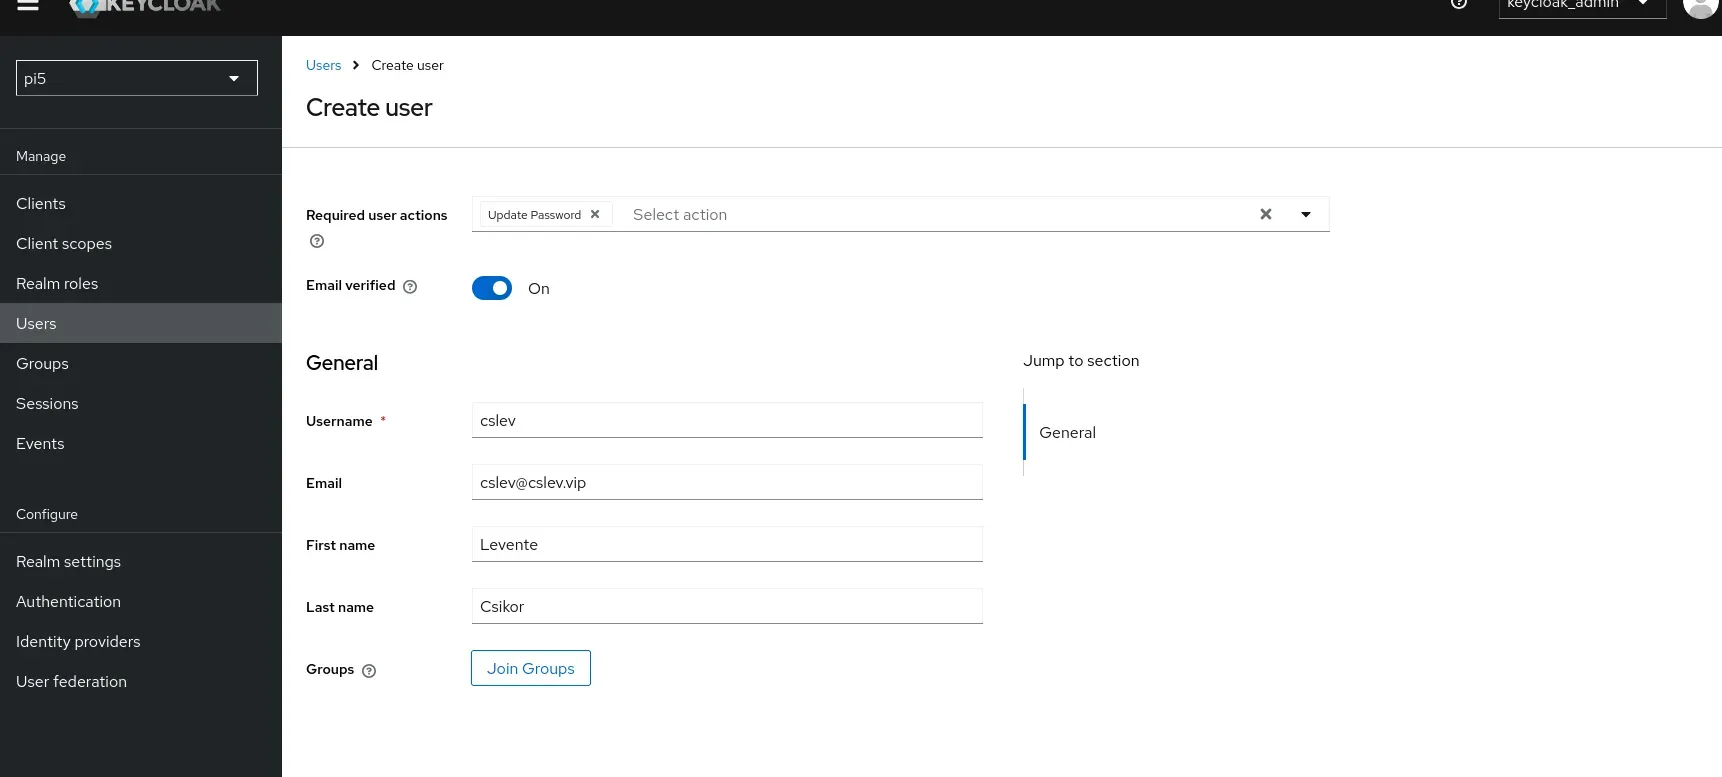 Fill in the user details
As you can see there is a “Required user actions”, which you can leave empty or set any action that is needed to activate the account. For instance, when you create a user for someone, you might set it with a random password. Then, after the first login, you can enforce the user to change that password — this is for instance an option for that action. Explore the rest to figure out what you need. In our setup, we do not necessarily need any of those.
Once our user is created, click on the Credentials tab and set a strong password. You can disable the “temporary” setting, then you don’t have to change it after your first login with that user.
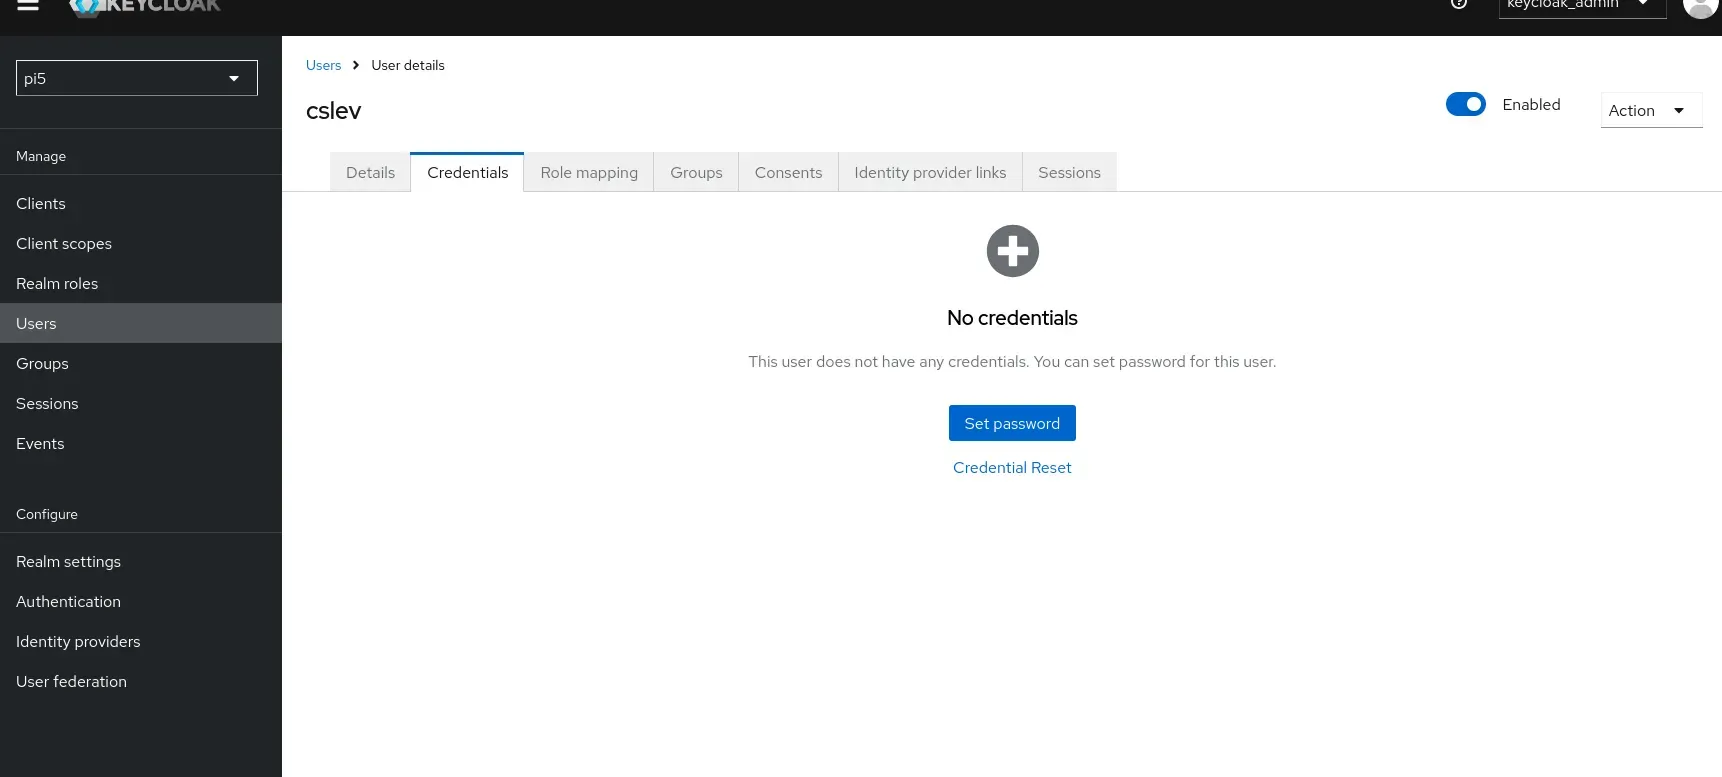 Create a password for our user
Switch to production mode
After setting up Keycloak, you should create a permanent admin user to replace the less secure, bootstrapped temporary admin account. To do this, create a new user in the master realm — let’s call this user admin—and set a password (ensure “Temporary” is set to OFF). No additional action is required during creation. Then, in the Role Mappings tab, assign the admin and/or realm-admin roles from the realm-management client to this user. This grants the account full administrative privileges in the master realm.
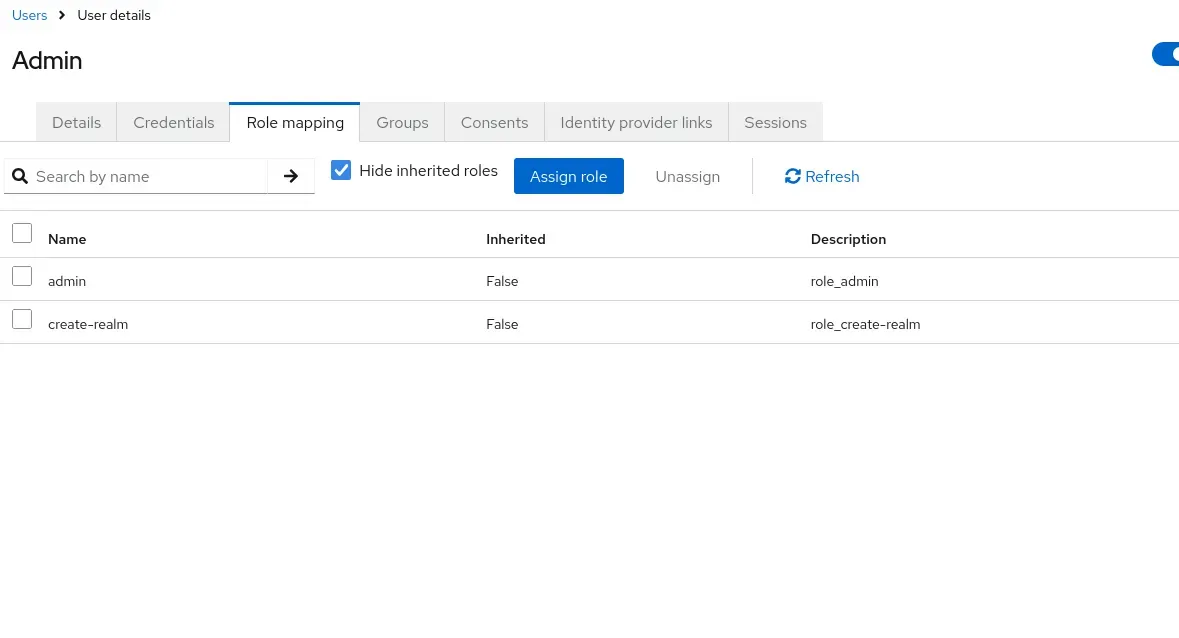 Assign admin roles to our new admin user
After this, let’s navigate to our Portainer, and remove the following lines in the docker-compose file:
      # KC_BOOTSTRAP_ADMIN_USERNAME: keycloak_admin
      # KC_BOOTSTRAP_ADMIN_PASSWORD: keycloak_secret
Ensure, you remove the user from the database too:
 Select the bootstrap account and delete
As a final step, change the command from start-dev, to start:
command: startThen, redeploy the stack and login with our new admin user.
Login as user
Now, let’s test logging in with our new user. Remember, the default Keycloak URL directs you to the master realm, where this user does not exist. If you attempt to log in there, you’ll encounter an “Invalid user” error. Instead, use the following URL to access the correct realm directly: https://<your_keycloak_domain>/admin/pi5/console/
After entering your credentials, you may be prompted to complete a form with additional details such as your first and last name if these were not provided when the account was created. Once submitted, you’ll be logged in, but you likely won’t see much — usually just a message indicating you have no realm access, since this user doesn’t have administrative privileges. This login simply verifies your password; you won’t need to use this account further for admin tasks. If needed, log in as an admin and mark your user’s email as verified by toggling the “Email Verified” option in the user’s settings.
Register Grafana as a client
Now, let’s register an application to our realm. Let’s do it for Grafana as we already create a public hostname for that in our previous episode.
 Fill in the details as requested
For Client type, choose OpenID connect (as most of the cases). Click on Next and continue the configuration.
When configuring a Keycloak client for Grafana SSO, make sure to set Client Authentication to ON, which designates the client as confidential and enables secure OAuth2 flows using a client secret. Enable Standard Flow (ON), as this uses the recommended Authorization Code Flow for web applications, and optionally turn on Direct Access Grants if you need API or service account access, though it’s not strictly required for browser-based SSO. Leave Implicit Flow, Service Accounts Roles, OAuth 2.0 Device Authorization Grant, and OIDC CIBA Grant all OFF, as these are not needed for typical Grafana integrations. Also, you do not need to enable Authorization for the client, since Grafana manages its own user permissions. This configuration ensures a secure and streamlined SSO experience between Keycloak and Grafana.
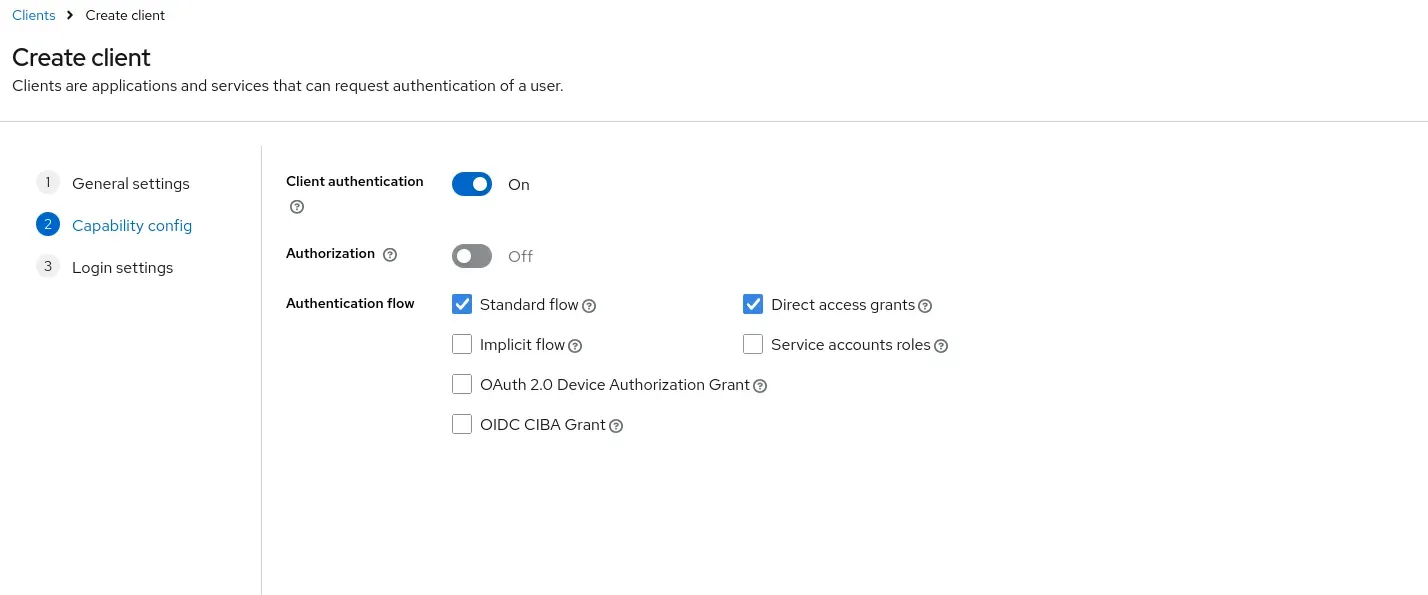 Capability config for Grafana
Service Accounts Roles are intended for machine-to-machine authentication, allowing backend services to act as clients and obtain tokens without user interaction. OAuth 2.0 Device Authorization Grant is designed for devices with limited input options — like smart TVs — enabling users to authenticate on a separate device. OIDC CIBA Grant (Client Initiated Backchannel Authentication) is an advanced flow used in specialized scenarios, such as banking, where authentication is triggered by a backend service rather than the user directly. None of these are needed for standard browser-based SSO with Grafana.
In the next Login settings, we need to set the URLs. In most cases, we just need to provide the base URL, except for the Valid redirect URIs; for that we add our base URL suffixed with /login/generic-oauth. Let’s save and we are done with the configuration of keycloak (for Grafana).
 Set the URLs properly
After our client is configured, go to its Credentials tab on the top, and we need to get the Client secret, this will be needed for Grafana to set it up for OpenID-based authentication.
 Copy the Client secret
Environment variables for Grafana
We need to go to our portainer, and configure a set of variables for Grafana to enable Keycloak-based authentication. Add (and revise according to your setting) the following as additional environment variables for Grafana’ docker-compose file:
#keycloak based auth
- GF_AUTH_GENERIC_OAUTH_ENABLED=true
- GF_AUTH_GENERIC_OAUTH_NAME=Keycloak
- GF_AUTH_GENERIC_OAUTH_CLIENT_ID=grafana
- GF_AUTH_GENERIC_OAUTH_CLIENT_SECRET=<paste-your-secret-here>
- GF_AUTH_GENERIC_OAUTH_AUTH_URL=https://<your_keycloak_domain>/realms/pi5/protocol/openid-connect/auth
- GF_AUTH_GENERIC_OAUTH_TOKEN_URL=https://<your_keycloak_domain>/realms/pi5/protocol/openid-connect/token
- GF_AUTH_GENERIC_OAUTH_API_URL=https:/<your_keycloak_domain>/realms/pi5/protocol/openid-connect/userinfo
- GF_AUTH_GENERIC_OAUTH_SCOPES=openid profile email
- GF_AUTH_GENERIC_OAUTH_ALLOW_SIGN_UP=true
- GF_SERVER_ROOT_URL=https://<your_grafana_domain>
- GF_AUTH_SIGNOUT_REDIRECT_URL=https://<your_grafana_domain>
Additionally, we need to disable standard login form. To do so, change the related environment variable to true :
- GF_AUTH_DISABLE_LOGIN_FORM=trueOnce you have carried out the changes, redeploy the stack.
Now, when we navigate to our Grafana dashboard, we will see the following:
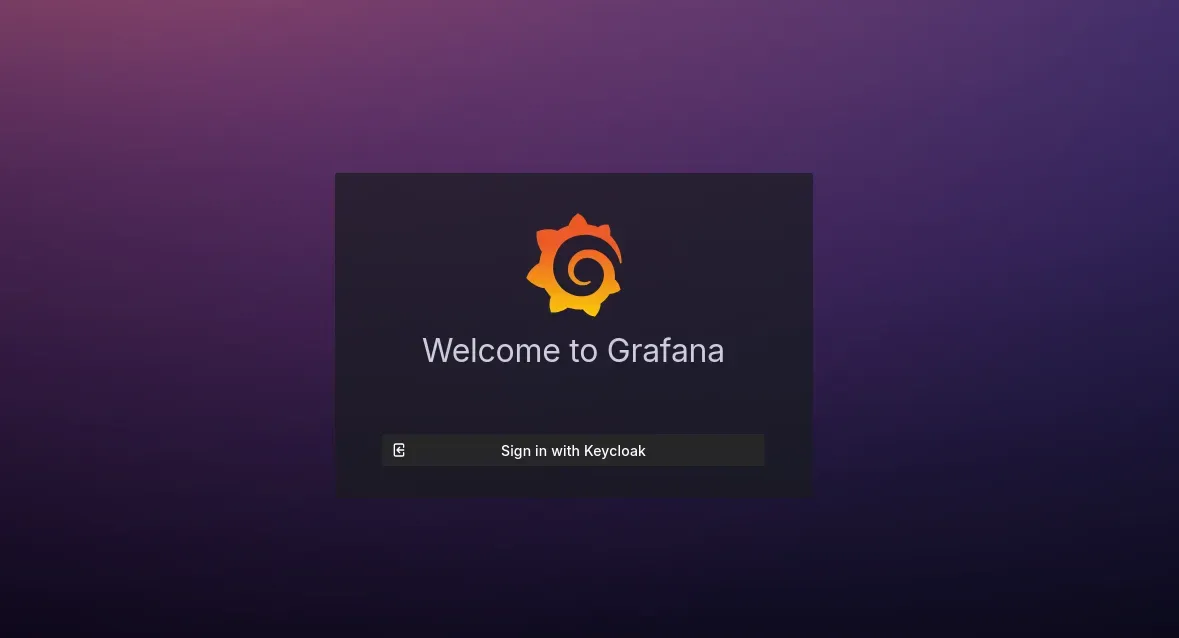 We can only authenticate via Keycloak
Let’s give it a try. Clicking on “Sign in with Keycloak” will redirect you to the Keycloak login page, and after entering your credentials, voilà — you’ll be successfully logged in.
 Logged in as a user maintained in keycloak
Extend our realm with Portainer
Alright, having keycloak with one service only does not make a lot of sense in terms of unified account management for multiple services. Let’s extend our keycloak realm with Portainer. In our previous episodes, we did not set up Portainer for remote access (as it came earlier in our series than the remote access configuration).
So, configure our Cloudflare tunnel; this step must be so easy for you at this stage, so I just leave it without further explanation.
Keycloak setting
Add Portainer as a new client to our realm. Once you’ve completed the basic information, configure the capabilities as outlined below.
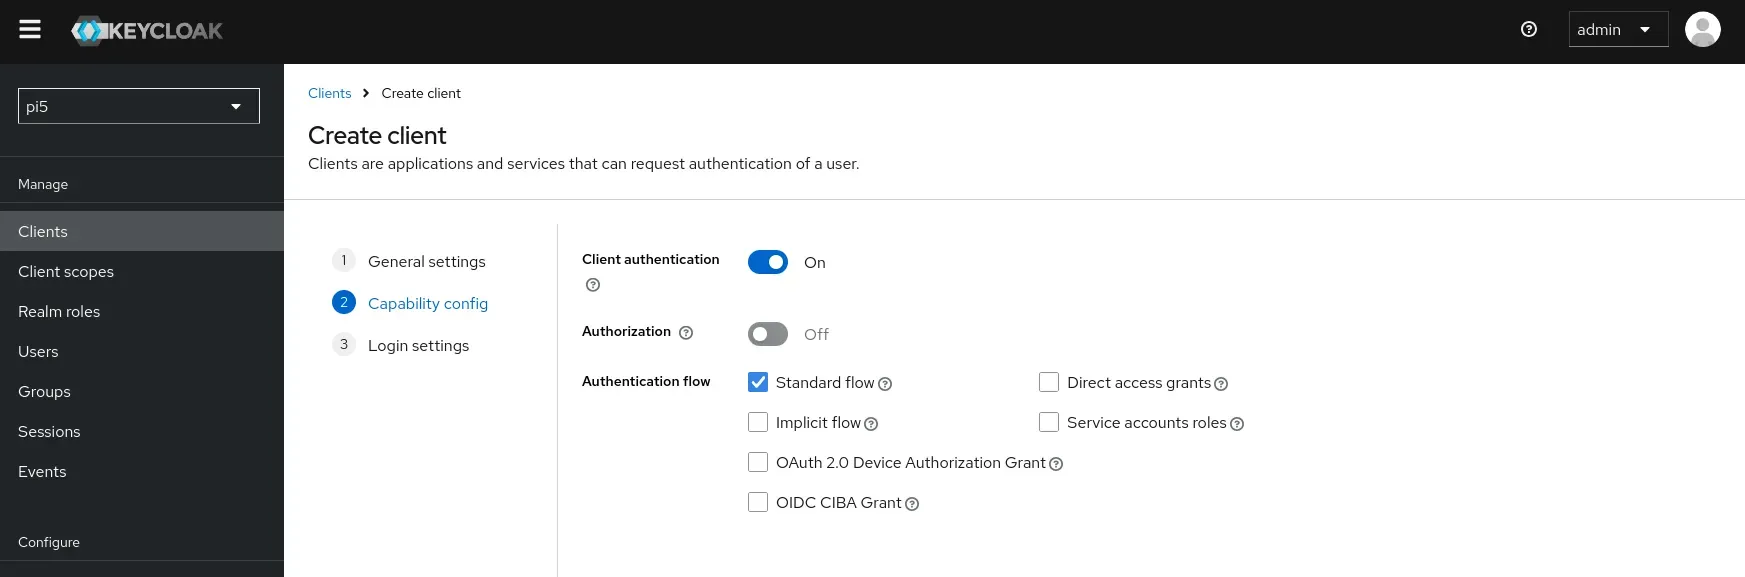 Capabilities set for portainer
Unlike with Grafana, for our Portainer integration with Keycloak, you should enable “Client authentication” for your Keycloak client. In the flows section, keep everything disabled except for the Standard flow. Although, toggling *Direct access grants *is optional.
For the Login settings, use your <portainer_domain> as the value for Root URL, Home URL, and Web origins. For redirect URLs, use the same domain but add a /* at the end to wildcard all possible options.
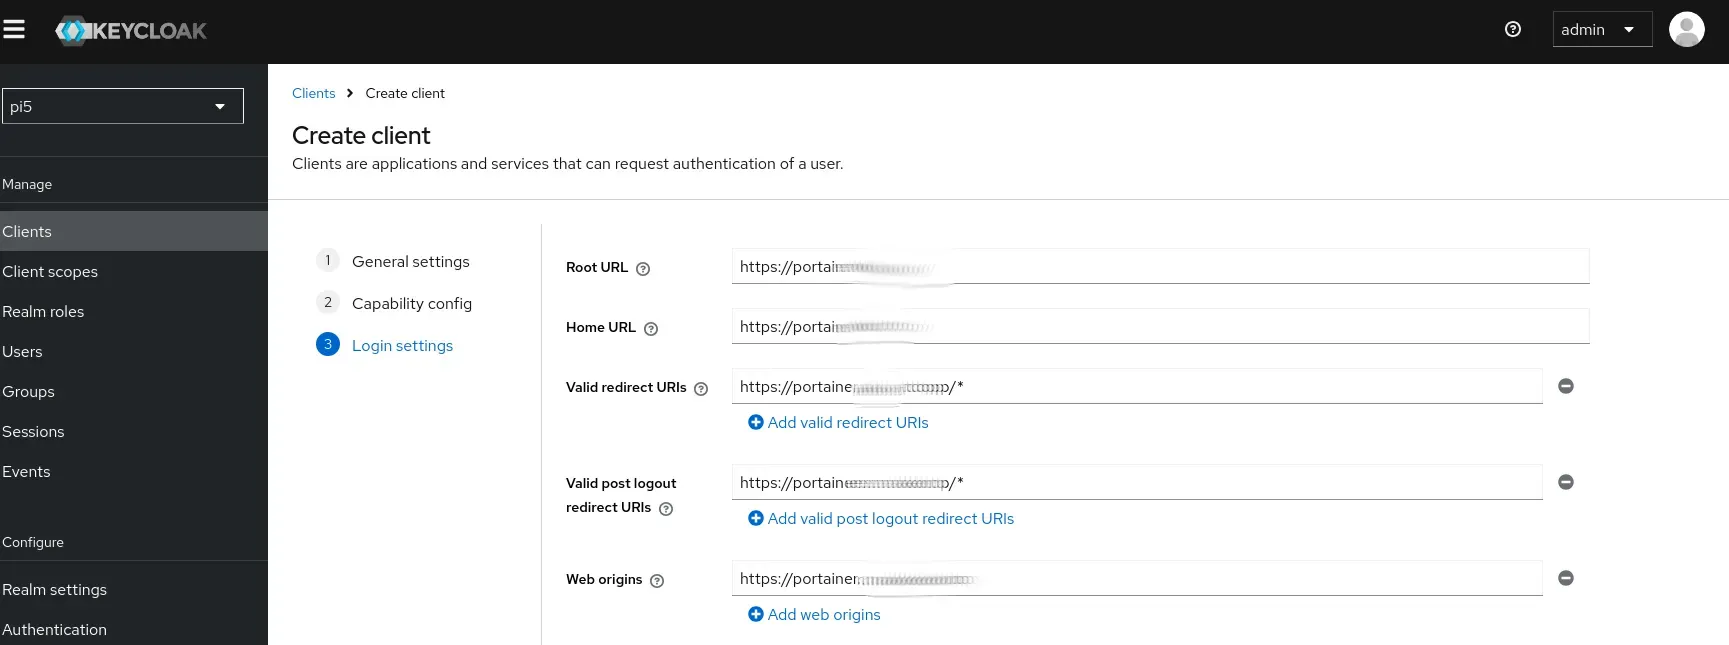 Login settings for portainer client
Portainer authentication settings
Navigate to your Portainer instance and, from the left sidebar, choose Settings followed by Authentication. At the top, enable SSO, select OAuth as the provider, and then enter the custom configuration details at the bottom of the page.
 Oauth settings in portainer
Set the client ID as portainer (or how you named it in your keycloak client setting), and copy the client secret from keycloak to here. For the rest, set them as follows (modify pi5if your realm name is different):
- Authorization URL:
https://<your_keycloak_domain>/realms/pi5/protocol/openid-connect/auth - Access Token URL:
https://<your_keycloak_domain>/realms/pi5/protocol/openid-connect/token - Resource URL:
https://<your_keycloak_domain>/realms/pi5/protocol/openid-connect/userinfo - Redirect URL:
https://<your_portainer_domain> - Logout URL:
https://<your_keycloak_domain>/realms/pi5/protocol/openid-connect/logout?client_id=portainer&post_logout_redirect_uri=https%3A%2F%2F<your_portainer_domain>
- User Identifier:
email - Scopes:
openid(optionally addprofile email)
In addition to the previous steps, there’s a crucial action required: since the Keycloak user won’t automatically match the existing admin user in Portainer (resulting in an “Unauthorized” error after trying to login via Oauth), we need Portainer to create a new user (if one doesn’t already exist) using the user information provided by Keycloak. To achieve this, enable the automatic user provisioning toggle as shown below:
 Enable Automatic user provisioning
Now, save the settings and logout from the top-right corner. If all goes well, you will be landed to the renewed login screen.
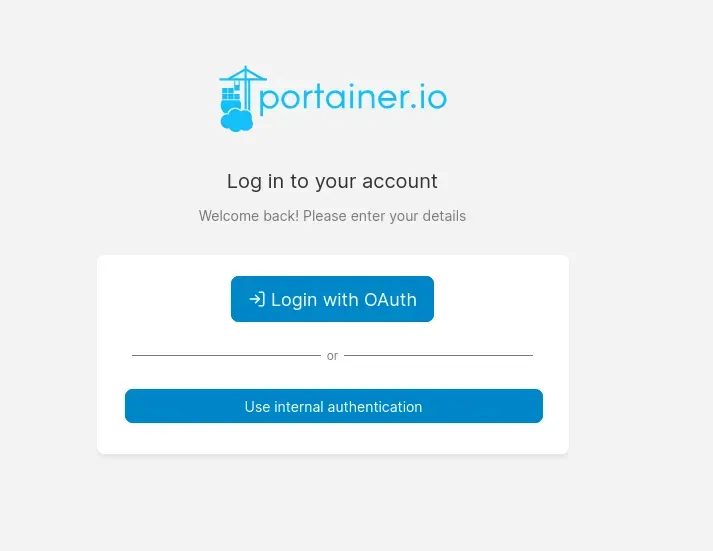 Login window after setting up Oath in portainer
After logging in as a “newly created user”, you’ll find that you don’t have admin rights and can’t view or select the environment. This happens because Portainer has just created your user account through the OAuth process. To assign admin privileges, log out and then sign in again using “Use internal authentication” as the admin. Next, navigate to user management and select the new user.
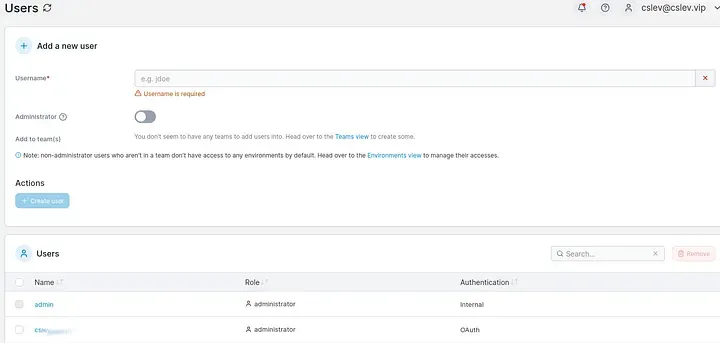 The new user has just been created, click on its name for more details
Make him administrator, save, then logout.

Once you log back in with your new user, you’ll have full admin privileges.
Further potential steps I don’t recommend :)
You may be considering removing the local authentication method entirely, but that’s not the approach I’ve taken here. Firstly, there isn’t an ENVIRONMENT variable that lets you simply disable it. Secondly, you can’t delete the original admin user through the web dashboard. While it’s possible to manually remove the admin user directly from the database inside the container, doing so could lock you out of internal authentication if Keycloak ever becomes unavailable. As long as your admin password remains strong, the main benefit of enabling OAuth is that you can now log in to Portainer using your unified Keycloak credentials.
UPDATE: Nginx config for Keycloak with rate limit protection
If you use NGINX and set up as I did, the config below ensures keycloak works perfectly.
######################$$$#########
###       KEYCLOAK-SSO         ###
#########################$$$######
### REDIRECT ANYTHING ON PORT 80 --> 443
server {
    listen 80;
    server_name <your_keycloak_domain>;
    return 301 https://$host$request_uri;
}

server {
  #variables
  set $service http://172.30.1.30:8080;
  #server info
  listen 443 ssl;
  http2 on;
  server_name <your_keycloak_domain>;
  #common ssl settings
  include /etc/nginx/ssl.conf;

# Static theme resources — no rate limit, just cache them
  location /resources/ {
    proxy_pass $service;
    include /etc/nginx/proxy.conf;
    proxy_set_header X-Forwarded-Proto  https;
    proxy_set_header X-Forwarded-Host   $host;
    proxy_set_header X-Forwarded-For    $proxy_add_x_forwarded_for;
    proxy_cache_valid 200 1d;
    access_log off;
  }

  # Admin console API — no rate limit
  # Fires 10-20 parallel calls just loading a client config page
  location /admin/ {
    proxy_pass $service;
    include /etc/nginx/proxy.conf;
    proxy_set_header X-Forwarded-Proto  https;
    proxy_set_header X-Forwarded-Host   $host;
    proxy_set_header X-Forwarded-For    $proxy_add_x_forwarded_for;
    proxy_hide_header X-Frame-Options;
    add_header Content-Security-Policy "frame-ancestors 'self' *.cslev.vip";
    access_log /var/log/nginx/access_keycloak_sso.log;
    error_log  /var/log/nginx/error_keycloak_sso.log;
  }

  # JS adapter (used by client apps)  — no rate limit
  location /js/ {
    proxy_pass $service;
    include /etc/nginx/proxy.conf;
    proxy_set_header X-Forwarded-Proto  https;
    proxy_set_header X-Forwarded-Host   $host;
    proxy_set_header X-Forwarded-For    $proxy_add_x_forwarded_for;
    access_log off;
  }

  # Auth/OIDC endpoints — rate limited (brute force protection)
  # login, token, userinfo, logout, etc.
  location /realms/ {
    limit_req zone=mylimit burst=20 nodelay;
    proxy_pass $service;
    include /etc/nginx/proxy.conf;
    proxy_set_header X-Forwarded-Proto  https;
    proxy_set_header X-Forwarded-Host   $host;
    proxy_set_header X-Forwarded-For    $proxy_add_x_forwarded_for;
    proxy_hide_header X-Frame-Options;
    add_header Content-Security-Policy "frame-ancestors 'self' *.cslev.vip";
    access_log /var/log/nginx/access_keycloak_sso.log;
    error_log  /var/log/nginx/error_keycloak_sso.log;
  }

  # Everything else (landing, welcome page)
  location / {
    limit_req zone=mylimit burst=30 nodelay;
    include /etc/nginx/proxy.conf;
    proxy_set_header X-Forwarded-Proto  https;
    proxy_set_header X-Forwarded-Host   $host;
    proxy_set_header X-Forwarded-For    $proxy_add_x_forwarded_for;
    proxy_hide_header X-Frame-Options;
    add_header Content-Security-Policy "frame-ancestors 'self' *.cslev.vip";
    proxy_pass $service;
    access_log /var/log/nginx/access_keycloak_sso.log;
    error_log  /var/log/nginx/error_keycloak_sso.log;
  }
  location = /robots.txt {
    # 'alias' points directly to the file's path inside the container.
    alias /usr/share/nginx/html/robots.txt;
    allow all; # Allow all access to the robots.txt file itself
    log_not_found off; # Don't log 404s if the file is missing
    access_log off;    # Don't log every robots.txt access request
  }
}
In this post, we took our login and user management to the next level by unifying everything under Keycloak. No more juggling separate accounts — just one powerful identity provider to handle it all! We walked through securing our setup with a proper admin user, and then seamlessly brought Grafana into the fold. The best part? Any other app can be integrated just as easily, giving you a central hub for authentication and user control — the setups we made should be now quite intuitive for any future setup. With this foundation, your stack is not only more secure, but also cooler and way more convenient. Welcome to the future of unified access!