
Part VII/B — NVIDIA Mellanox Bluefield-2 SmartNIC Hands-On Tutorial: To Offload or Not To Offload? Continued
Table of Contents
We continue our quest on the offloading topic (Part VII/A) and investigate the packet processing performance with pktgen.
Architecture
For the measurements, I prepare the machines to materialize the architecture depicted below.
 Architecture used in this measurement study
The setup is more or less the same we had previously. The Host on the left-hand side (let’s call it H1) runs the Bluefield-2 DPU in EMBEDDED_CPU Mode (i.e., in SmartNIC mode). It implements OvS and the whole packet processing logic on the ARM cores. On the other hand, the other Host on the right-hand side (let’s call it H2) does only utilize the SmartNIC as a NIC, i.e., the Bluefield-2 DPU is in SEPARATED_HOST Mode. This means that the packets sent to H2 are not going through the ARM cores and are “directly” processed by H2 itself.
Now, instead of running iperf3 instances, both hosts run pktgen instead.
Configuration
To run pktgen on the hosts, we have to install DPDK on the hosts themselves. It is the same installation process as we did on the SmartNICs in Part II. Let’s repeat them below assuming your DPDK file is uncompressed under /opt:
# cd /opt
# wget https://fast.dpdk.org/rel/dpdk-20.11.1.tar.xz
# tar -xJvf dpdk-20.11.1.tar.xz
# cd dpdk-stable-20.11.1
# export RTE_SDK=/opt/dpdk-stable-20.11.1
# export RTE_TARGET=x86_64-native-linuxapp-gcc
# meson -Dexamples=all build
# ninja -C build
# ninja -C build install
# ldconfig
# cd ..
# wget https://git.dpdk.org/apps/pktgen-dpdk/snapshot/pktgen-dpdk-pktgen-21.02.0.tar.xz
# tar -xJvf pktgen-dpdk-pktgen-21.02.0.tar.xz
# make
# make install
After everything is installed, fire up pktgen on H1.
# cd PKTGEN_INSTALL_DIR
# ./usr/local/bin/pktgen -l 32–35 -n 4 --socket-mem “0,1024” -a 0000:81:00.0 -- -T -p 1 -P -m “[33–35].0”
You can observe that, in contrast to Part II, I am using different pktgen options. The reason is multi-fold.
First, the PCI ID of the port on the host is different than the one we see on the Bluefield. Use the following command to figure out yours:
# mst start
# mst status -v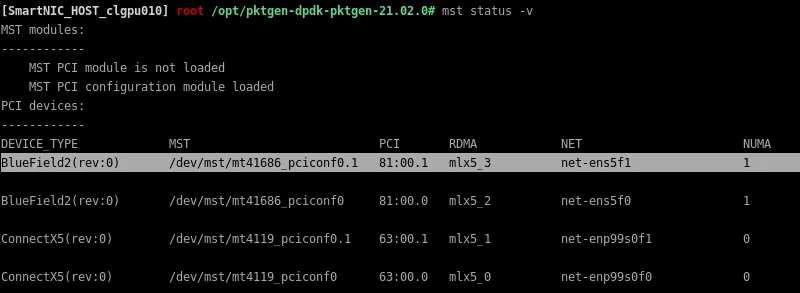 PCI ID and further important details for the ports to be used in pktgen
We can observe that the PCI ID is 81:00.0/1 instead of 03:00.0/1 (at least in my configuration).
The other important observation is that the Cloudlab machines I am using are NUMA architectures, and the NIC is placed into a PCI slot connected to the second CPU socket (NUMA ID is 1, not 0). This means we have a massive amount of processing power consisting of 64 cores + hyper-threading, i.e., 128 threads in total.
Let’s figure out the exact numbers via DPDK’s cpu_layout.py:
# /opt/dpdk-stable-20.11.1/usertools/cpu_layout.py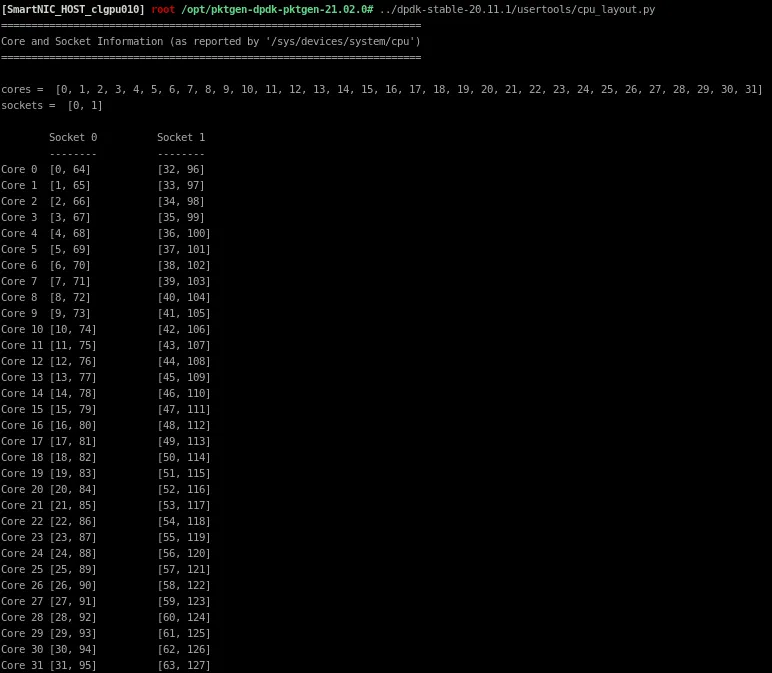 Core numbering starts at #32 for the second CPU in our NUMA architecture
Accordingly, in our pktgen command, I am not using the HEX-based CPU core pinning anymore; I stick to the simple numbering argument -l 32–35 for brevity.
Last but not least, bear in mind the *—socket-mem “0,1024” *option. Since the hugepages now will be used by the second NUMA node, we assign 0 hugepages to NUMA node 0 and all 1024 to the NUMA node 1.
Okay, now you should have a running pktgen on the Host. Before we go one layer above and configure OvS on the Bluefield, we have to make some changes to pktgen.
As mentioned in Part II, when the SmartNIC is in SEPARATED_HOST Mode, the destination MAC address of the packets “decides” whether the Host or the SmartNIC will receive the packets. Accordingly, check the MAC address of the interface at H2, and set it as a destination MAC address in pktgen running at** H1**.
You can use ifconfig on H2 to figure out the MAC address. In my case, the port that will be used is ens5f0.
 Get the MAC address of the receiving interface at H2
Accordingly, set the destination MAC address in pktgen at H1.
Pktgen:/> set 0 dst mac 0c:42:a1:a4:89:e0 Confirm the changes by checking the highlighted line in pktgen
Okay, so far pktgen configuration is ready at H1. Fire up a pktgen at H2 in the same way, except you don’t have to bother with the destination MAC address. Even if you send packets from H2 to H1, OvS running on the Bluefield at H1 will take care of the packet routing by Layer-1 and Layer-3 information (see below).
Accordingly, let’s go one layer below at H1, and configure OvS on the Bluefield.
Configure OvS on the Bluefield-2 DPU
Here, we are going to go incrementally from no offload towards full offload with DPDK. If you have just installed BlueOS (or its Ubuntu equivalent) on the Bluefield, you have an OvS running by default. It is running its kernel datapath, which is offloaded to the hardware.
Let’s put it back to square one.
Delete all bridges
# ovs-vsctl del-br ovsbr1
# ovs-vsctl del-br ovsbr2
Disable offloading
# ovs-vsctl --no-wait set Open_vSwitch . other_config:hw-offload=falseRestart OvS
# /etc/init.d/openvswitch-switch restartRecreate a bridge, and add each port to it that was there before
# ovs-vsctl add-br ovsbr1
# ovs-vsctl add-port ovsbr1 p0
# ovs-vsctl add-port ovsbr1 pf0hpf
# ovs-vsctl add-port ovsbr1 pf0sf0
As you observe, there is a third port pf0sf0, which I just added as it was there before; we are not going to use it, though.
Now, if you check ovs-vsctl show, you should see something like this:
 Output of ovs-vsctl show after readding bridge and its ports
Next, delete flow rules and add new ones corresponding to the pktgen’s default values.
# ovs-ofctl del-flows ovsbr1
# ovs-ofctl add-flow ovsbr1 "ip, in_port=p0, ip_dst=192.168.1.1, actions=output:pf0hpf"
We might add the reverse direction if we would send back packets from H2 to H1. Since pktgen at H2 would also have the same destination IP, we don’t change that in the flow rule; swapping the ports is more than enough
# ovs-ofctl add-flow ovsbr1 "ip, in_port=pf0hpf, ip_dst=192.168.1.1, actions=output:p0"Okay, now everything is set! Let’s see the performance.
Performance of OvS (kernel datapath) without Offloading
Let’s start sending packets from pktgen at H1.
 Sending rate with 64-byte packets is ~32.6 Mpps (~22 Gbps)
While the sending rate is ~32.6 Mpps (~22 Gbps) with 64-byte packets on the receiving side, I only observe slightly less than 250.000 packets per second (162 Mbps).
 On the receiving side, the performance is not satisfying (162 Mbps only) with 64-byte packets.
We can confirm that the flows and the packet processing are not offloaded to the hardware.
ip=$(printf "%d.%d.%d.%d\n" "$((RANDOM % 256))" "$((RANDOM % 256))" "$((RANDOM % 256))" "$((RANDOM % 256))");# ovs-dpctl dump-flows The corresponding flow is present in the kernel datapath
By dumping all flows irrespectively to the datapath that processes them, we can observe that, again, the corresponding flow is handled by the OvS datapath, i.e., the dp flag is set to ovs.
# ovs-appctl dpctl/dump-flows -m The corresponding flow’s dp flag is set to ovs, i.e., it is processed by the kernel datapath
The performance metrics with different packet sizes can be seen below.
 The performance of OvS without hardware offload using different packet sizes
Performance of OvS Offloaded to the Hardware
Now, let’s enable hardware offloading and restart OvS.
# ovs-vsctl --no-wait set Open_vSwitch . other_config:hw-offload=true
# /etc/init.d/openvswitch-switch restart
Delete the default NORMAL forwarding rule and install the IP address-based one to ease the tracking of the offloaded flows.
# ovs-ofctl del-flows ovsbr1
# ovs-ofctl add-flow ovsbr1 "ip, in_port=pf0hpf, ip_dst=192.168.1.1, actions=output:p0"
Let’s start to send packets
 We receive the sent traffic at a rate 25.07 Mpps (16.8 Gbps)
We observe a receiving packet rate of 25.07 Mpps, which results in 16.8 Gbps. Note, the packet size here is 64 bytes, and the sending rate is 32.5 Mpps (21.4 Gbps).
Below, we can observe how the performance increases as the packet size increases. Note, this is normal behavior, i.e., the greater the packet size, the better the throughput.
 The performance of OvS with hardware offload (TC) using different packet sizes
Networking elements are usually bounded by the number of packets they can process every second. Therefore, if they can process X (>0) packets, the throughput measure is becoming dominated by the packet size.
When the packet size becomes 1024 bytes, we actually reach line rate; 11.9 Mpps is around 99 Gbps.
Interestingly, in this experiment, my machines at Cloudlab seem to be connected via 100 GbE instead of the 40 GbE I measured last time.
Performance of OvS-DPDK without Offloading
Next, we configure OvS to use DPDK, we assign all cores for packet processing, and we will NOT offload packet processing to the hardware (yet).
First, disable offloading
# ovs-vsctl --no-wait set Open_vSwitch . other_config:hw-offload=falseConfigure OvS to utilize DPDK
# export LD_LIBRARY_PATH=/opt/mellanox/dpdk/lib/aarch64-linux-gnu/Enable hugepages and mount them if you did not so already
# echo 1024 > /sys/kernel/mm/hugepages/hugepages-2048kB/nr_hugepages
# mountpoint -q /dev/hugepages || mount -t hugetlbfs nodev /dev/hugepages
Set hugepage configuration accordingly for OvS
# ovs-vsctl --no-wait set Open_vSwitch . other_config:dpdk-socket-mem="1024"Set DPDK initialization flag to True
# ovs-vsctl --no-wait set Open_vSwitch . other_config:dpdk-init=truePin handler and revalidator thread to core 7
# ovs-vsctl --no-wait set Open_vSwitch . other_config:dpdk-lcore-mask=0x80Configure the rest of the cores for packet processing
# ovs-vsctl --no-wait set Open_vSwitch . other_config:pmd-cpu-mask=0x7fNote, however, pktgen only sends one type of flows, and RSS is neither configured nor would be used. So, still, one core will handle all the packets.
Finally, restart OvS
# /etc/init.d/openvswitch-switch restartLet’s remove first the previously configured kernel bridge
# ovs-vsctl del-br ovsbr1Add a new bridge to the OvS system that is DPDK-enabled
# ovs-vsctl --no-wait add-br ovsdpdk -- set bridge ovsdpdk datapath_type=netdevRestrict OvS to only “see” the DPDK port that we want to use. Double-check the PCI ID at your setting by mst status -v.
# ovs-vsctl set Open_vSwitch . other_config:dpdk-extra="-a 0000:03:00.0, representor=[0,65535]"Add the PF first
# ovs-vsctl --no-wait add-port ovsdpdk dpdk0 -- set Interface dpdk0 type=dpdk -- set Interface dpdk0 options:dpdk-devargs=0000:03:00.0Add the VF
# ovs-vsctl --no-wait add-port ovsdpdk dpdk1 -- set Interface dpdk1 type=dpdk -- set Interface dpdk1 options:dpdk-devargs=0000:03:00.0, representor=[0,65535]Finally, restart OvS again to enforce all our settings
# /etc/init.d/openvswitch-switch restartNow, let’s confirm OvS looks like as intended
# ovs-vsctl show OvS-DPDK with bridge ovsdpd is successfully configured
As we did before, let’s start by removing the default one, then add the appropriate flow rule to match the packets sent from pktgen.
# ovs-ofctl del-flows ovsdpdk
# ovs-ofctl -O OpenFlow12 add-flow ovsdpdk "ip, in_port=dpdk1, ip_dst=192.168.1.1, actions=output:dpdk0"
Okay, let’s see the numbers. In contrast to some hypotheses I made at the end of the previous part, OvS-DPDK without offloading is not better than the hardware offloaded variant.
We can observe below that the performance of OvS-DPDK is more or less around 2.3 Mpps irrespectively to the packet size. This means ~1.560 Gbps and 27 Gpbs in the case of **64- **and 1500-byte packet sizes, respectively.

There is one interesting aspect of the results. Namely, there is a slight performance drop between packet sizes of 64 bytes and 512 bytes. I measured this interval explicitly by increasing the packet size step-by-step, and it turned out, when the packet size is [69–272] bytes, the throughput is around 1.7 Mpps only. Above 272 bytes, it gets back to normal.
I believe this is not only a measurement anomaly, and there is something in the background. However, the performance is usually slightly worse when the packet size is small, then gradually reaches its peak. For instance, vendors used to claim wire-speed packet processing performance, but in the appendix, they claim that only above 128-byte packets.
Performance of OvS-DPDK with Offloading
Okay, we reached the last aspect of our investigation. According to our previous study, after hardware offloading, there should not be any differences even if offloading was done via DPDK rte_flow instead of TC flowers.
Below, we confirm this.
First, assuming you were following the steps above and running a DPDK-enabled OvS without offloading, switch the hardware offloading flag to true again.
# ovs-vsctl --no-wait set Open_vSwitch . other_config:hw-offload=trueThen, restart OvS
# /etc/init.d/openvswitch-switch restartThe switch instance is using DPDK, and the ports are still configured correctly. However, the flow rules are again back to NORMAL. So, reconfigure the flow table of the bridge ovsdpdk.
# ovs-ofctl del-flows ovsdpdk
# ovs-ofctl -O OpenFlow12 add-flow ovsdpdk "ip, in_port=dpdk1, ip_dst=192.168.1.1, actions=output:dpdk0"
After sending the packets via pktgen, I observed the same performance indicators as the TC flower-based hardware offloading. A complete rundown of all measurements is summarized below.
 The performance of OvS (in Mpps) on the Bluefield using different libraries and offloading techniques
We can observe that the performance of OvS-DPDK offloaded to the hardware with rte_flow is as high as OvS-kernel offloaded with TC flowers. The results confirm that no matter what packet processing libraries OvS is using until all flow rules can be offloaded to the hardware, i.e., all packets are processed in hardware exclusively, the overall packet processing performance is determined by the hardware block itself.
UPDATE: Just to make easier to see the performance with increasing packet size, below find the same plot but with Gbps scale instead.
 The performance of OvS (in Gbps) on the Bluefield using different libraries and offloading techniques
Performance of OvS-DPDK on the Bluefield with RSS
To avoid having any hole unpatched, below, I enforce OvS to scale as much as possible. To reach this, four things have to be kept in mind.
- OvS needs to have multiple RX queues, each handled by/assigned to a CPU core
- A diverse set of packet trace is required to enforce processing different flows at different RX queues
- Replaying a PCAP file is generally “slower” than pure, simple packet generation from pktgen
- Simply increasing the number of RX queues does not result in a continuous increase in performance. If you have too many queues but the trace you use is diverse, but each flow has only one packet, you could quickly end up introducing a bottleneck. DPDK application usually takes a batch of 32 packets from the NIC; if all of them belong to different flows, the application has to distribute all packets to all queues that involve extra CPU cycles, thereby introducing additional per-packet latency. Ideally, if the trace had 32 packets per flow and they are arriving in perfect chronological order, then the performance of RSS can be maxed out
Accordingly, let’s address all the important points above.
Again, similarly to Part VI, I will use my own PCAP generator to create a random traffic trace. Obtain it via git, and use the following simple for loop to create a random traffic trace descriptor.
# for i in {1..100}; do
  ip=$(printf "%d.%d.%d.%d\n" "$((RANDOM % 256))" "$((RANDOM % 256))" "$((RANDOM % 256))" "$((RANDOM % 256))"); ip2=$(printf "%d.%d.%d.%d\n" "$((RANDOM % 256))" "$((RANDOM % 256))" "$((RANDOM % 256))" "$((RANDOM % 256))");
  src_port=$(printf "%d\n" "$((RANDOM % 65535))");
  dst_port=$(printf "%d\n" "$((RANDOM % 65535))");
  echo "src_mac=00:00:00:00:00:01,dst_mac=0c:42:a1:a4:89:e0, src_ip=10.0.0.1, dst_ip=${ip}, src_port=${src_port}, dst_port=${dst_port}" >> rss_capable.txt;
done
The difference here compared to Part VI. is that we will use a different source IP, too. Moreover, we have to set the destination MAC address properly, otherwise, as mentioned above, the receiving side will not “take” the packets.
Once, the rss_capable.txt is ready, we can feed it to the pcap_generator
# python3 pcap_generator_from_csv.py -i rss_capable.txt -o rssThe resulting PCAP file will be rss.64bytes.pcap. As its name suggests, the packet size in the PCAP is uniformly 64 bytes.
Start pktgen by setting the create PCAP file rss.64bytes.pcap.
# cd /opt/pktgen-dpdk-pktgen-21.02.0
# ./usr/local/bin/pktgen -l 32–40 -n 4 --socket-mem “0,1024” -a 0000:81:00.0 -- -T -p 1 -P -m “[33:34–37].0” -s 0:/opt/pcap_generator/rss.64bytes.pcap
We we ping the cores explicitly for the TX queues. If untouched, by having one TX queue, the sending rate is caped around 30.6 Mpps. **By assigning four cores (lcore 34–37) to the TX queue, we can max out the sending rate at around 35 Mpps. **With this PCAP file and in my system, having less or even more TX queues (i.e., assigning less or even more CPU cores for sending) results in worse overall sending rate.
I have been using the same CPU core mapping on the receiving side but for RX queues. Again, having a different setting, i.e., less or more cores for RX, at the receving side, results in worse overall packet processing performance. So, I run pkgen at the receiving side via this command: ./usr/local/bin/pktgen -l 32–38 -n 4 —socket-mem “0,1024” -a 0000:81:00.0 — -T -p 1 -P -m “[33–35].0”
Hardware offloading is not benefiting from playing around with the CPU cores and queues as packets are processed by the hardware module itself. Put differently, packets are not passing through the ARM cores anymore. Hence, we have to disable hardware offload to carry out our measurement.
# ovs-vsctl --no-wait set Open_vSwitch . other_config:hw-offload=falseThen, restart OvS
# /etc/init.d/openvswitch-switch restartNext, we have to amend our flow table as we could not match on one destination IP address anymore. For brevity, we will simply match on Layer-1 information, i.e., all packets received from port dpdk1 (i.e., from H1) will be sent out on dpdk0 (i.e., towards H2).
# ovs-ofctl del-flows ovsdpdk
# ovs-ofctl -O OpenFlow12 add-flow ovsdpdk “ip, in_port=dpdk1, actions=output:dpdk0”
For now, leave everything else as it was before and see the maximum throughput we can reach. Start to send our PCAP from pktgen at H1 and observe the receive rate at H2.
The receive rate at H2 is waving between 400–1000 Kpps (300–500 Mbps). Due to the big changes, I will make a note of the peak performance reached within at least 10 seconds. This number for 1 RX queue is 1.018 Mpps (521 Mbps).
A complete run-down of using all possible RX queues, i.e., up to 7, is shown in the figure below.
 Performance of OvS-DPDK (w/o HW offload) running on increasing number of CPU cores. Blue and red plots show the performance in Mpps (left y-axis) and Gbps (right y-axis), respectively
We can observe that while in the previous measurements using the built-in single flow of *pktgen *achieves a constant performance of ~2.3 Mpps, processing rate of the diverse PCAP file is only ~1Mpps when using 1 core only.
As the number of cores, as well as the number of RX queues, is increasing, the performance also increases iteratively. We reach the highest receive rate with the highest number of RX queues (of seven). In particular, by assigning 7 cores for packet processing the receive rate is peaked at 5.6 Mpps (2.87 Gbps).
DISCLAIMER: I would not say that any DPDK application that cannot be offloaded to the hardware could only achieve less than 6 Mpps (when the packets are of size 64-bytes). OvS might be a too complex application to make such conclusions. I also measured pure DPDK performance in Part VI with pktgen, where it maxed out at ~28 Gbps with 5 cores only.
Conclusion
In the default EMBEDDED_CPU Mode (i.e., SmartNIC mode), OvS on the Bluefield uses the kernel datapath offloaded to the hardware. According to the analysis presented here, it provides the highest possible packet processing performance possible on the Bluefield-2 DPU.
In terms of numbers, this means ~25 Mpps (16.8 Gbps) and ~8.2 Mpps (~99 Gbps) packet processing performance with 64-byte and 1500-byte packets, respectively.
UPDATE: I have made a quick measurement with testpmd instead of OvS in the same environment. testpmd, however, allows only 2 cores at most and increasing the number of RX/TX queues above the number of cores allocated just makes the overall performance worse. See the details below.
I used my pcap_generator to create the PCAP files with different packet sizes. Note, we also have to pay attention to the destination MAC address in the packets, otherwise the pktgen on H1 will not receive our packets.
As an example for the 1024-byte packets experiment, I run pktgen as follows on H:
# cd PKTGEN_ROOT
# ./usr/local/bin/pktgen -l 32–46 -n 4 --socket-mem “0,1024” -a 0000:81:00.0 -a 0000:81:00.1 -- -T -p 3 -P -m “[33:34–37].0,[40–43].1” -s 0:/opt/pcap_generator/rss.1024bytes.pcap
testpmd (with two cores) on the Bluefield@H2 is started as follows:
# /opt/dpdk-stable-20.11.1/build/app/dpdk-testpmd -c7 -a 0000:03:00.0 -a 0000:03:00.1 -- -i -a --rxq=2 --txq=2 --nb-cores=2To run testpmd with one core only, omit everything after ‘-a’.
 testpmd performance on the Bluefield without any hardware offload
We can see that testpmd, using no hardware offload but CPU cores only, can achieve line rate performance using one and two cores when the packet size is above 1024 and 512 bytes, respectively.
In the next episode, i.e., in Part VIII., we delve into the process of installing DPDK from source properly and set it to be used system-wide.